Total doesn’t have a built-in Video post type for creating custom video galleries or posts, but it’s very easy to do so. In this guide I’ll show you how to register your custom Video post type, display your videos and create a custom video card.
If you want to display an image grid where you can click on the image to open a video in lightbox please refer to this documentation instead.
Step 1: Register your Video Post Type
First you will need to add your custom post type for videos. Of course I recommend using free Post Types Unlimited plugin since it makes it easy to add/manage custom post types. Plus, the PTU plugin gives you access to extra settings exclusive to the Total Theme.
Once you’ve installed the plugin simply click on Post Types on the left hand side of the WP dashboard, click the “Add New” button like such:
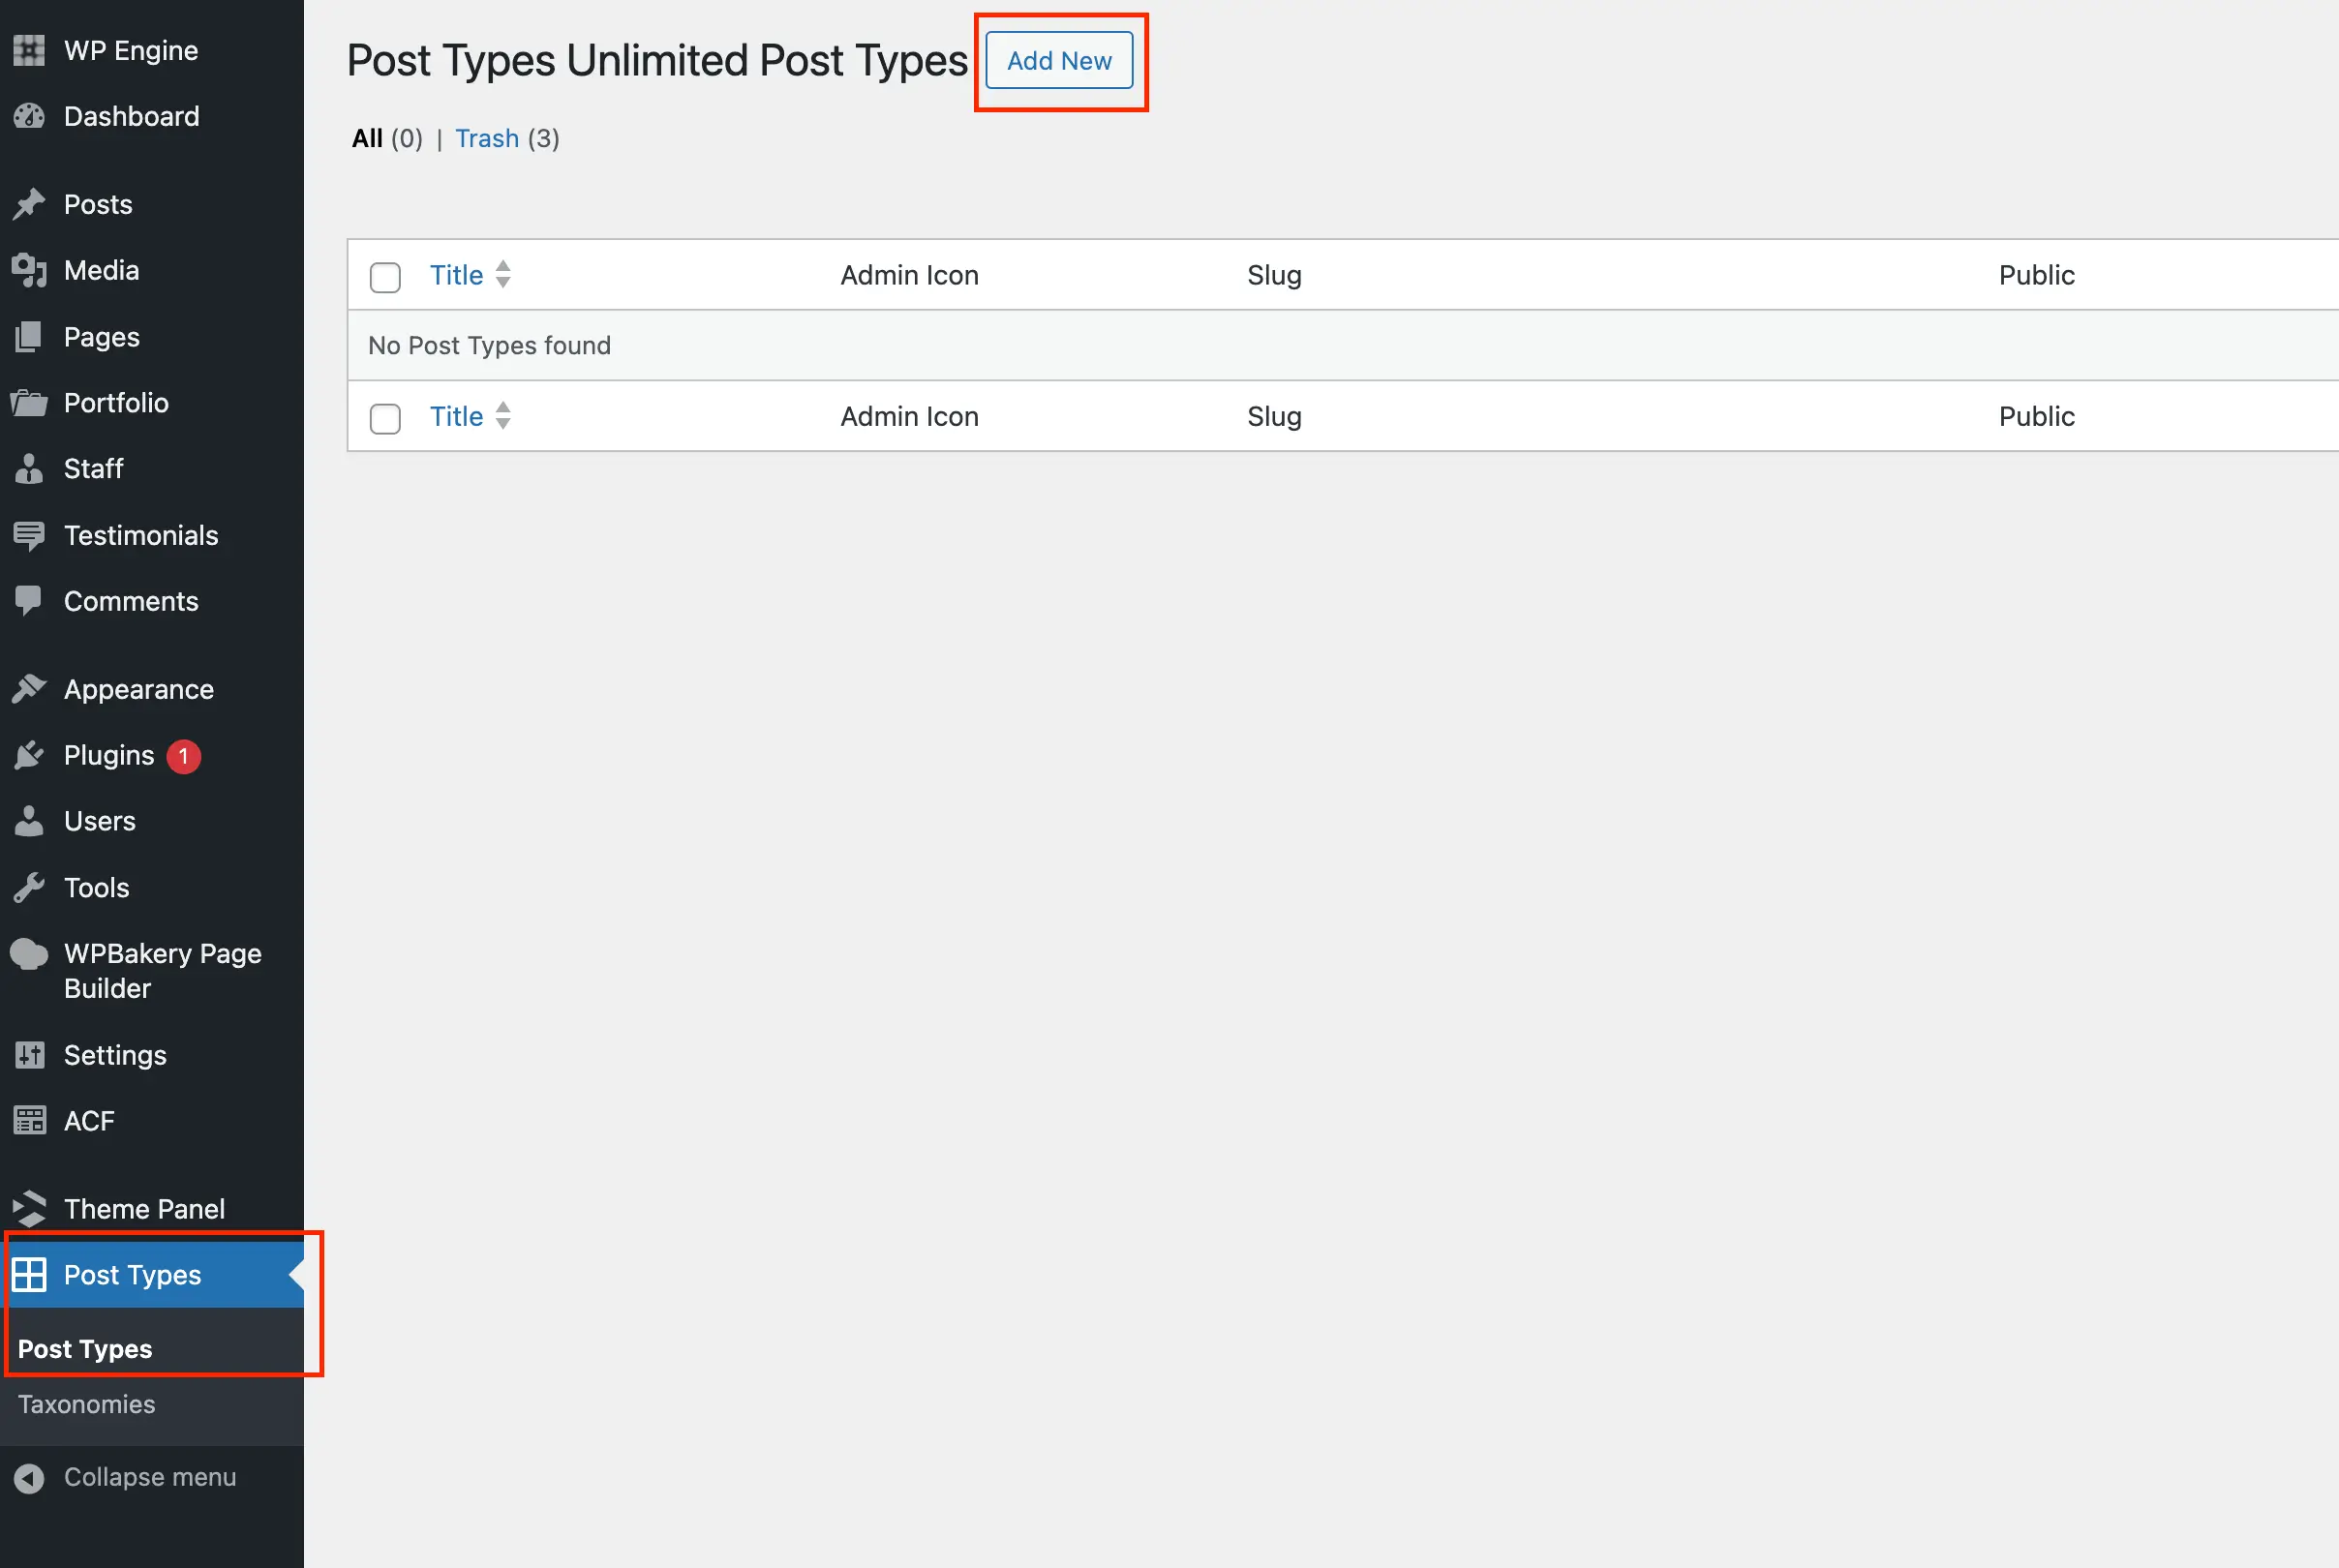
The add new button will take you to a screen where you can enter and select the details for your custom post type. Below is a screenshot showing what it should look like:
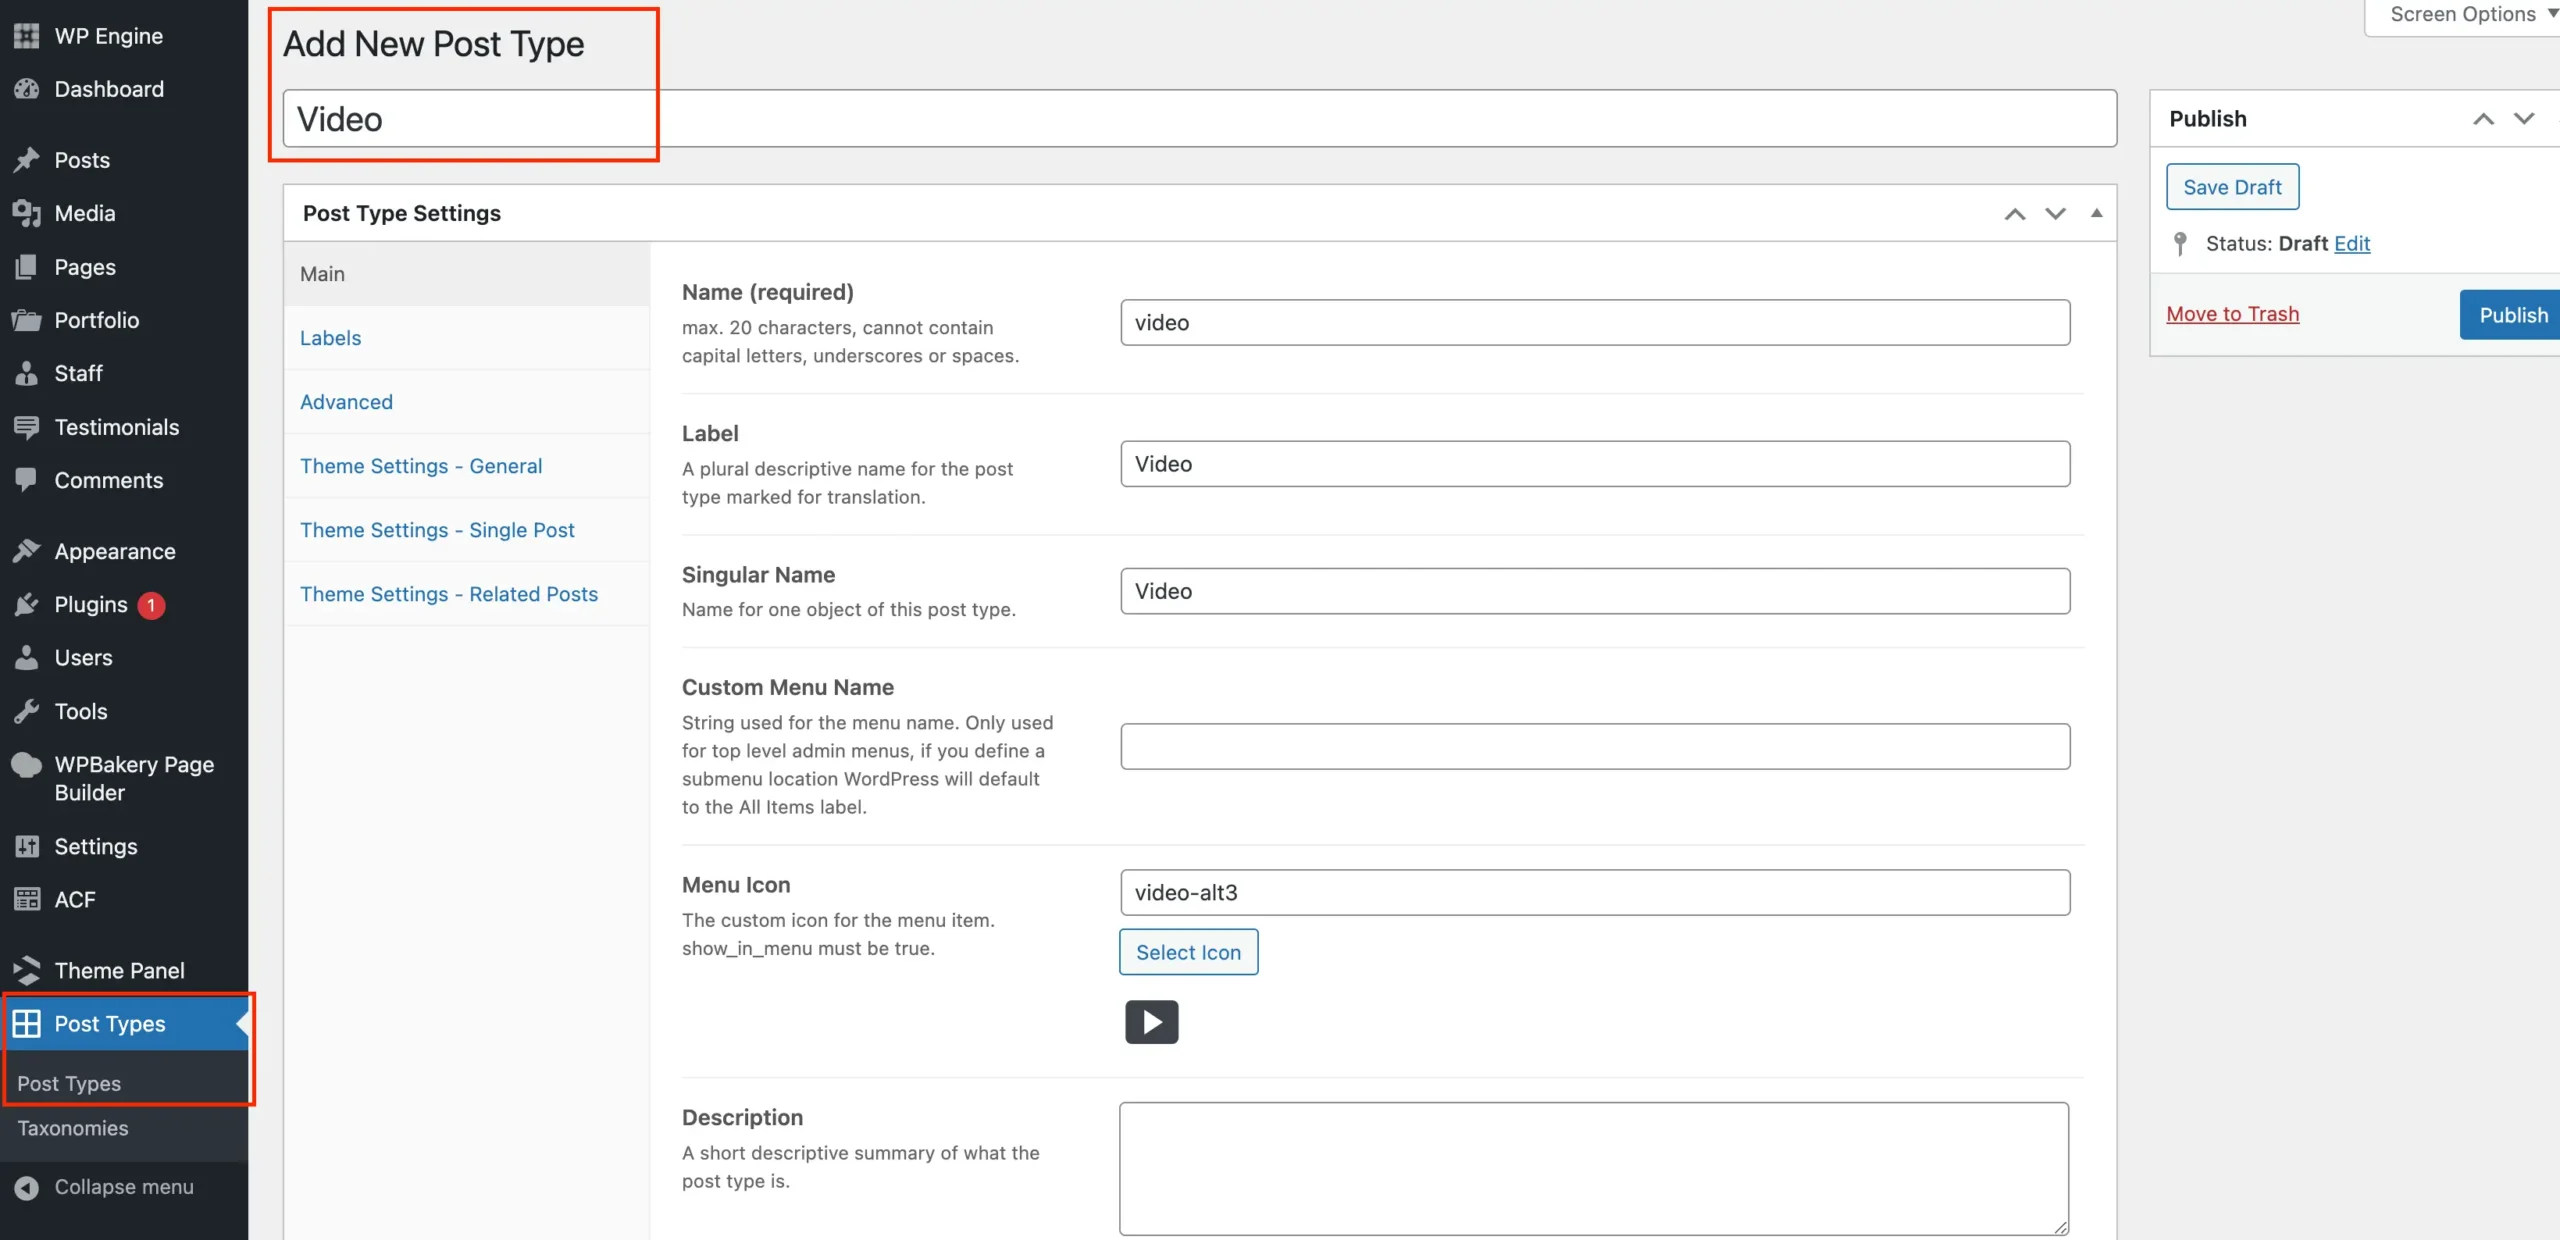
Enable or Disable Singular Post View
When registering your video post type you will want to decide if you need singular posts for your videos or not. If you just want to display your videos on a single page using the Post Cards element then you will want to disable the Single view.
To disable single posts for the video post type locate and uncheck the Publicly Queryable setting located in the main tab of the post type registration screen.
Choose the Video Post Type Supported Fields
When registering your custom post type one of the most important things to do is select the fields you want available when creating your video posts. This is located in the main tab and looks like such:
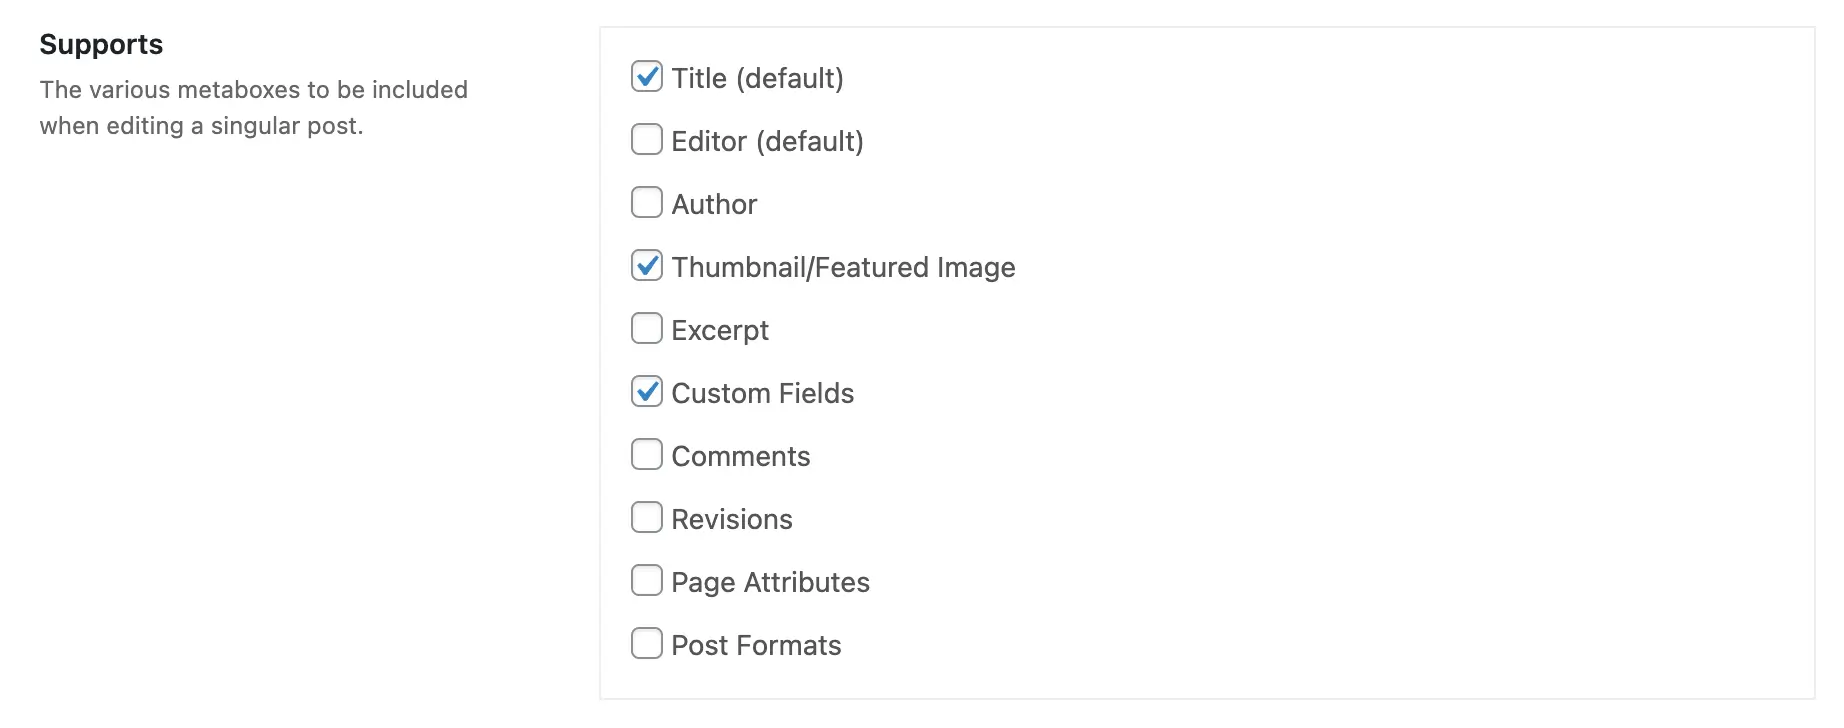
Title: This should always be enabled as you will want to give your videos titles for management.
Editor: If you are not going to have singular post views you probably don’t need to enable the “Editor” which is enabled by default as you won’t be adding any text for your videos.
Thumbnail: I would recommend enabling the thumbnail so you can assign images to your videos which will allow you to later create a custom card for your videos and use the image as the video overlay
Custom Fields: Enabling this field is of course optional but it will give you the ability to easily assign your video URL’s to a custom field if you want to use your own field (see next section).
Step 2: Create a Field for Assigning your Video URL
Now that you have your custom post type added you will want to set up a method for assigning your videos to each post. Sure you could just insert the video into the post content (editor) but this isn’t ideal because it creates a “lock-in” affect.
Rather, you will want to define your post videos using a custom field so that the videos are assigned separate from the post content giving you the ability to globally change how your videos are shown on the site.
You can use any name you want for the custom field used to assign your videos to your posts. But, if you want to make use of native theme functions you should name your field “wpex_post_video” which is the name used in the theme’s metabox Media tab.
Option 1: Using the Theme’s built-in Media Tab
The easiest and fastest method to add a video field to your post type is to enable the theme’s Media tab via the Post Types unlimited settings as such:
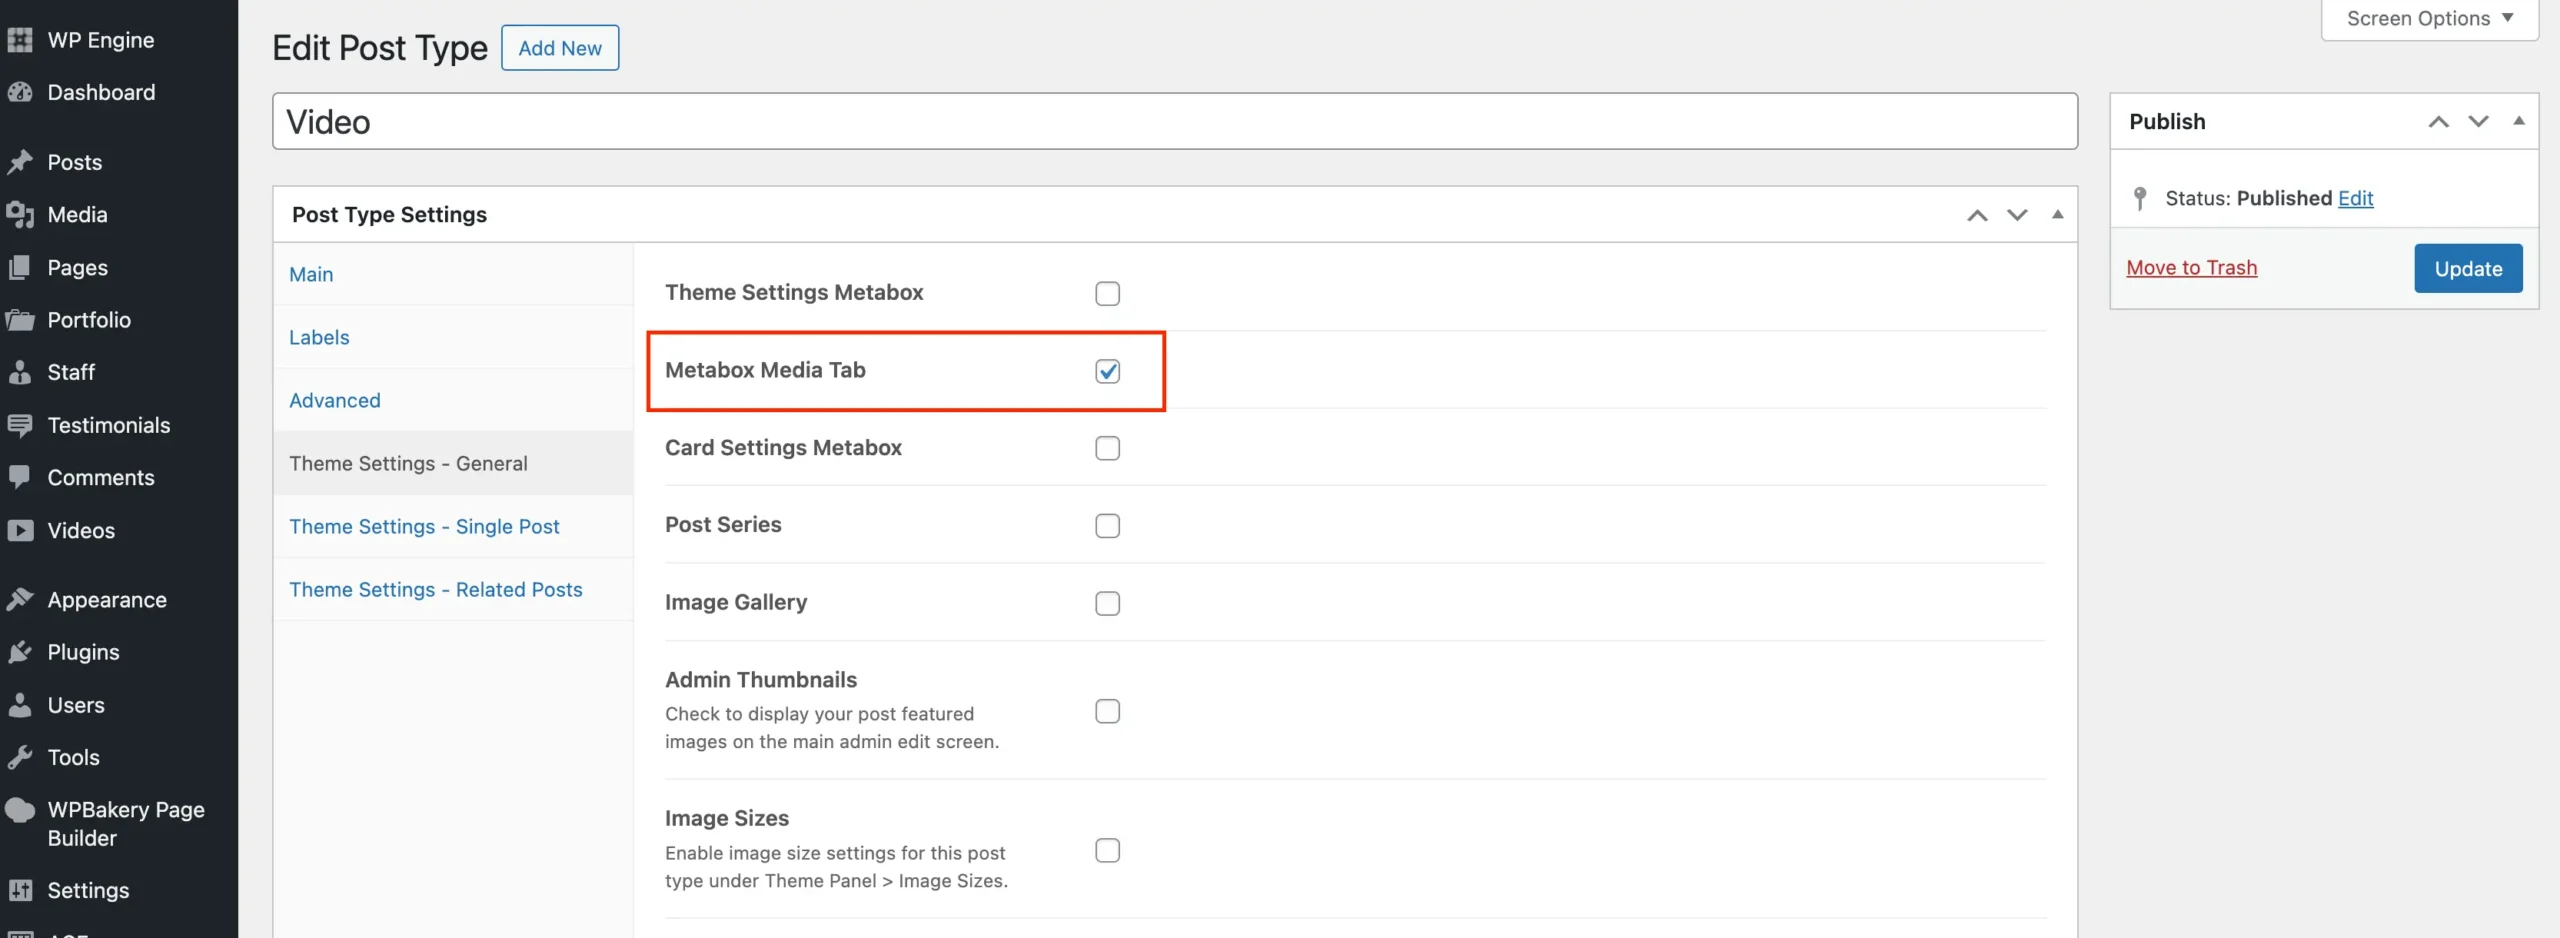
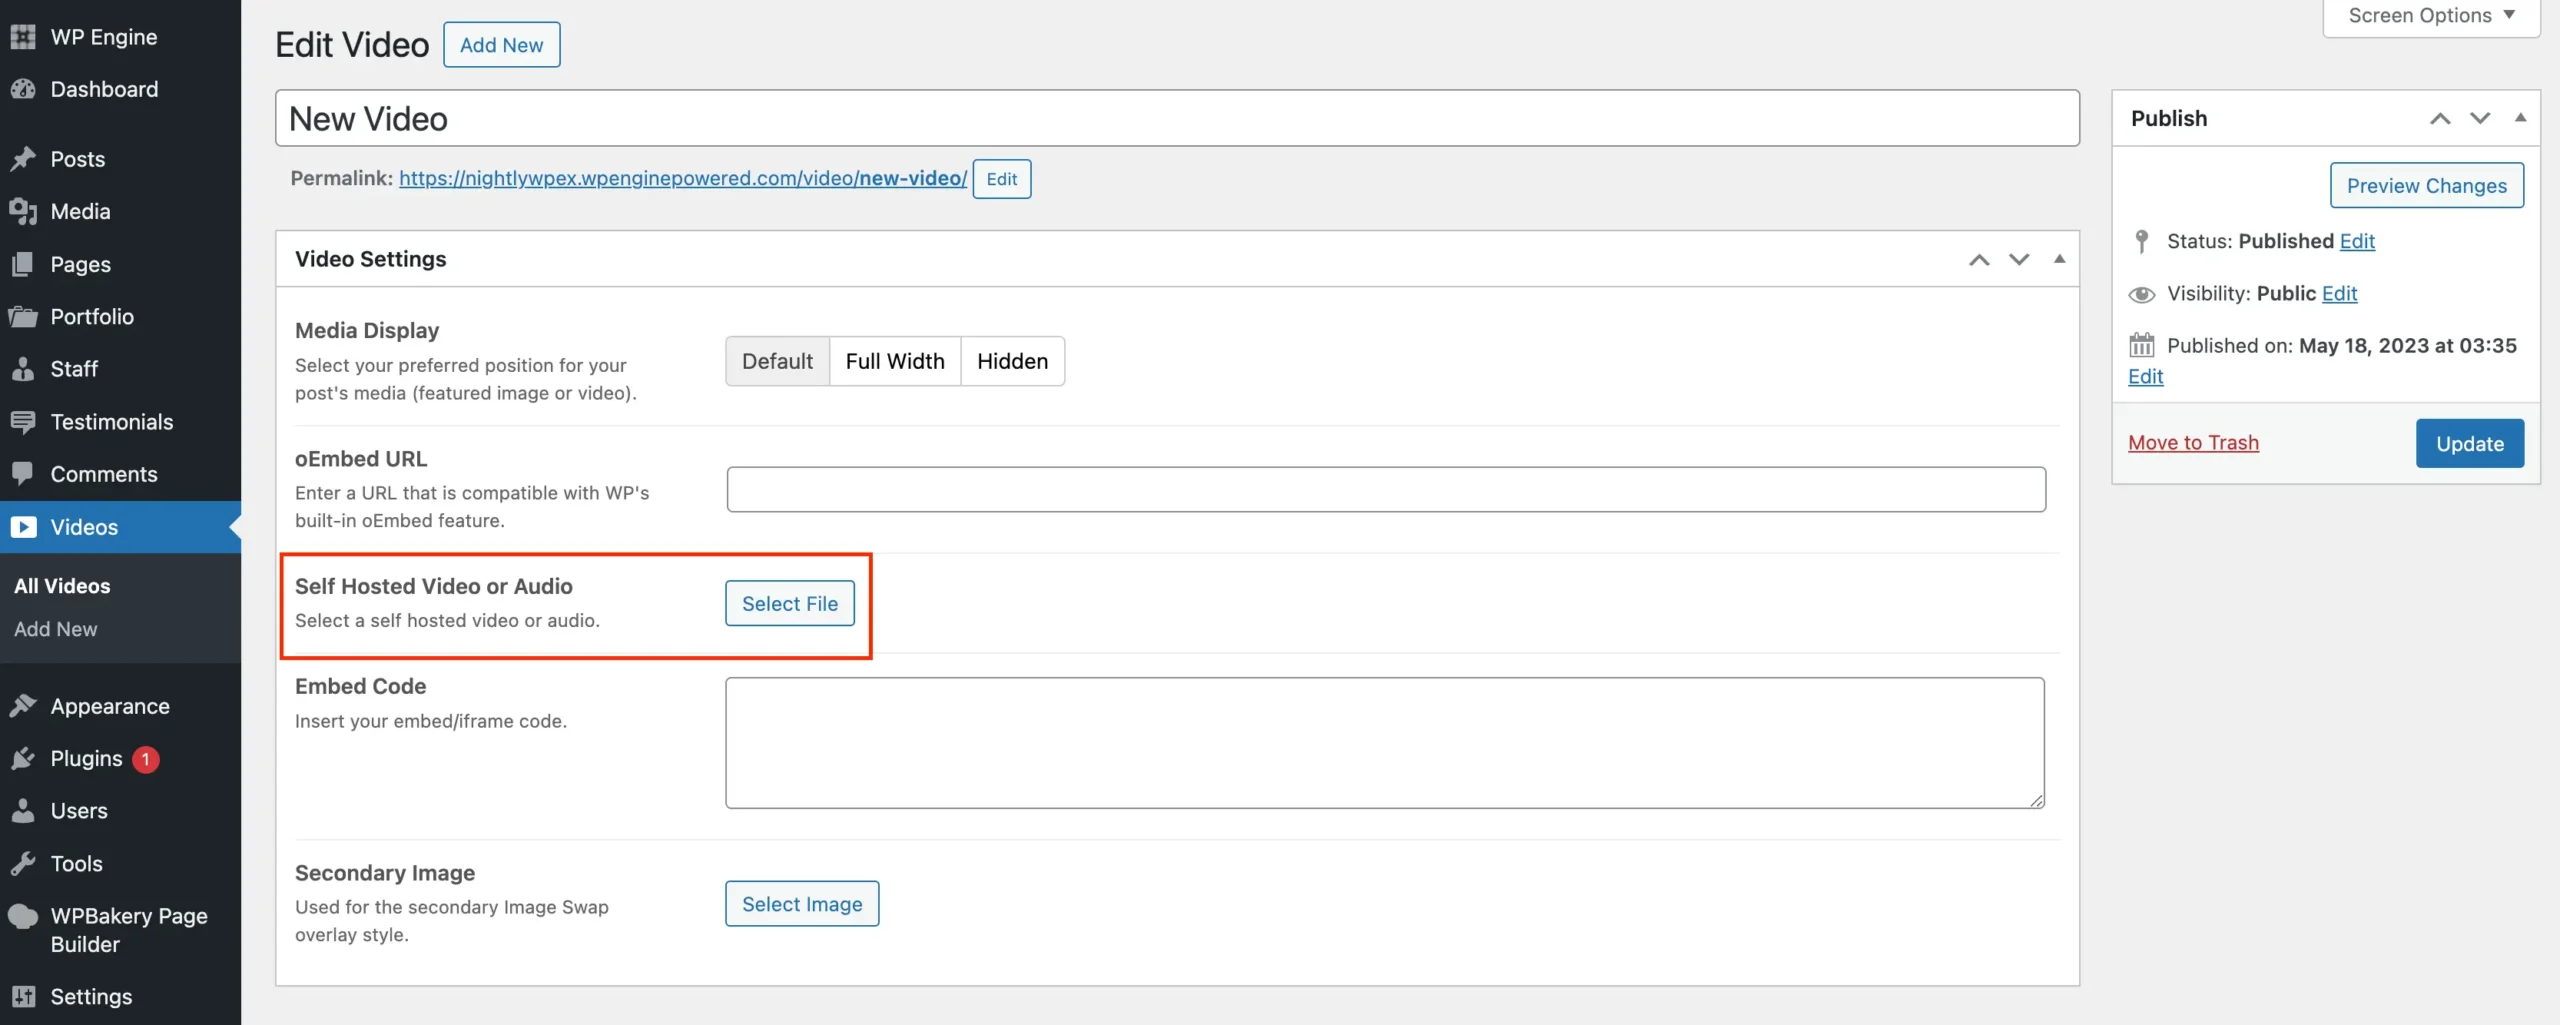
When you enable this setting and you go to create a video post you will find the theme’s Media fields where you can assign various media types to your post including a video:
Option 2: Using the WordPress Custom Fields
If you enabled “Custom Fields” for your video post type under the “Supports” setting it will allow you to assign custom fields to your posts manually. So you can use any name you want (make sure it’s the same for all video posts) to assign your video URL’s.
Here is an example showing how you may assign your videos using the native WordPress custom fields metabox:

ACF Plugin Notice: If you have the Advanced Custom Fields plugin installed, this plugin removes the native WordPress custom fields metabox so it won’t be visible! In which case, you should just use ACF to create your video field.
Option 3: Using the Theme’s Meta Factory Class
The 3rd and most “efficient” option is to use the theme’s Meta Factory class to add your custom field. Total has a built-in PHP class that can be used for adding custom fields to any post type with a little code and we have an example snippet here.
If you are using a child theme or a code snippets plugin you can add some code like this to register your own video custom field:
/**
 * Register custom fields.
 *
 * @link https://totalwptheme.com/docs/snippets/add-custom-metaboxes-to-total/
 */
function my_register_custom_metaboxes() {
    if ( ! class_exists( 'WPEX_Meta_Factory' ) ) {
        return;
    }

	// Video Post Type
    new WPEX_Meta_Factory( [
        'id'       => 'video',
        'title'    => esc_html__( 'Video Settings', 'total-child-theme' ),
        'screen'   => [ 'video' ],
        'context'  => 'normal',
        'priority' => 'default',
        'fields'   => [
            [
                'name' => esc_html__( 'Self Hosted Video', 'total-child-theme' ),
                'id'   => 'video_id',
                'type' => 'upload',
                'return' => 'id',
            ],
			[
                'name' => esc_html__( 'Video URL', 'total-child-theme' ),
                'id'   => 'video_url',
                'type' => 'text',
            ],
        ]
    ] );
}
add_action( 'admin_init', 'my_register_custom_metaboxes' );
With this snippet added you will see a new metabox on your video post type like such:

The previous code snippet will add both a Self Hosted and a Video URL field. It will be much easier and it’s highly recommended to stick to a single format for your videos. Either self hosted or hosted on a 3rd party platform like Youtube or Vimeo. You will need to edit the code to remove the field you don’t want.
Step 3: Create a Custom Video Card
Now that you’ve set up your Video post type and hopefully added your videos it’s time to display them on the site! To display your videos you will want to use the Post Cards element.
Total does have a built-in “Video” card style, but I would recommend creating a custom card for complete control.
Go to Theme Panel > Custom Cards to add a new Video Card style. If you are unfamiliar to the Total theme cards you may want to read the documentation here.
Your Video card can have anything you want but all you really need is the Video element set to display your video custom field like such:
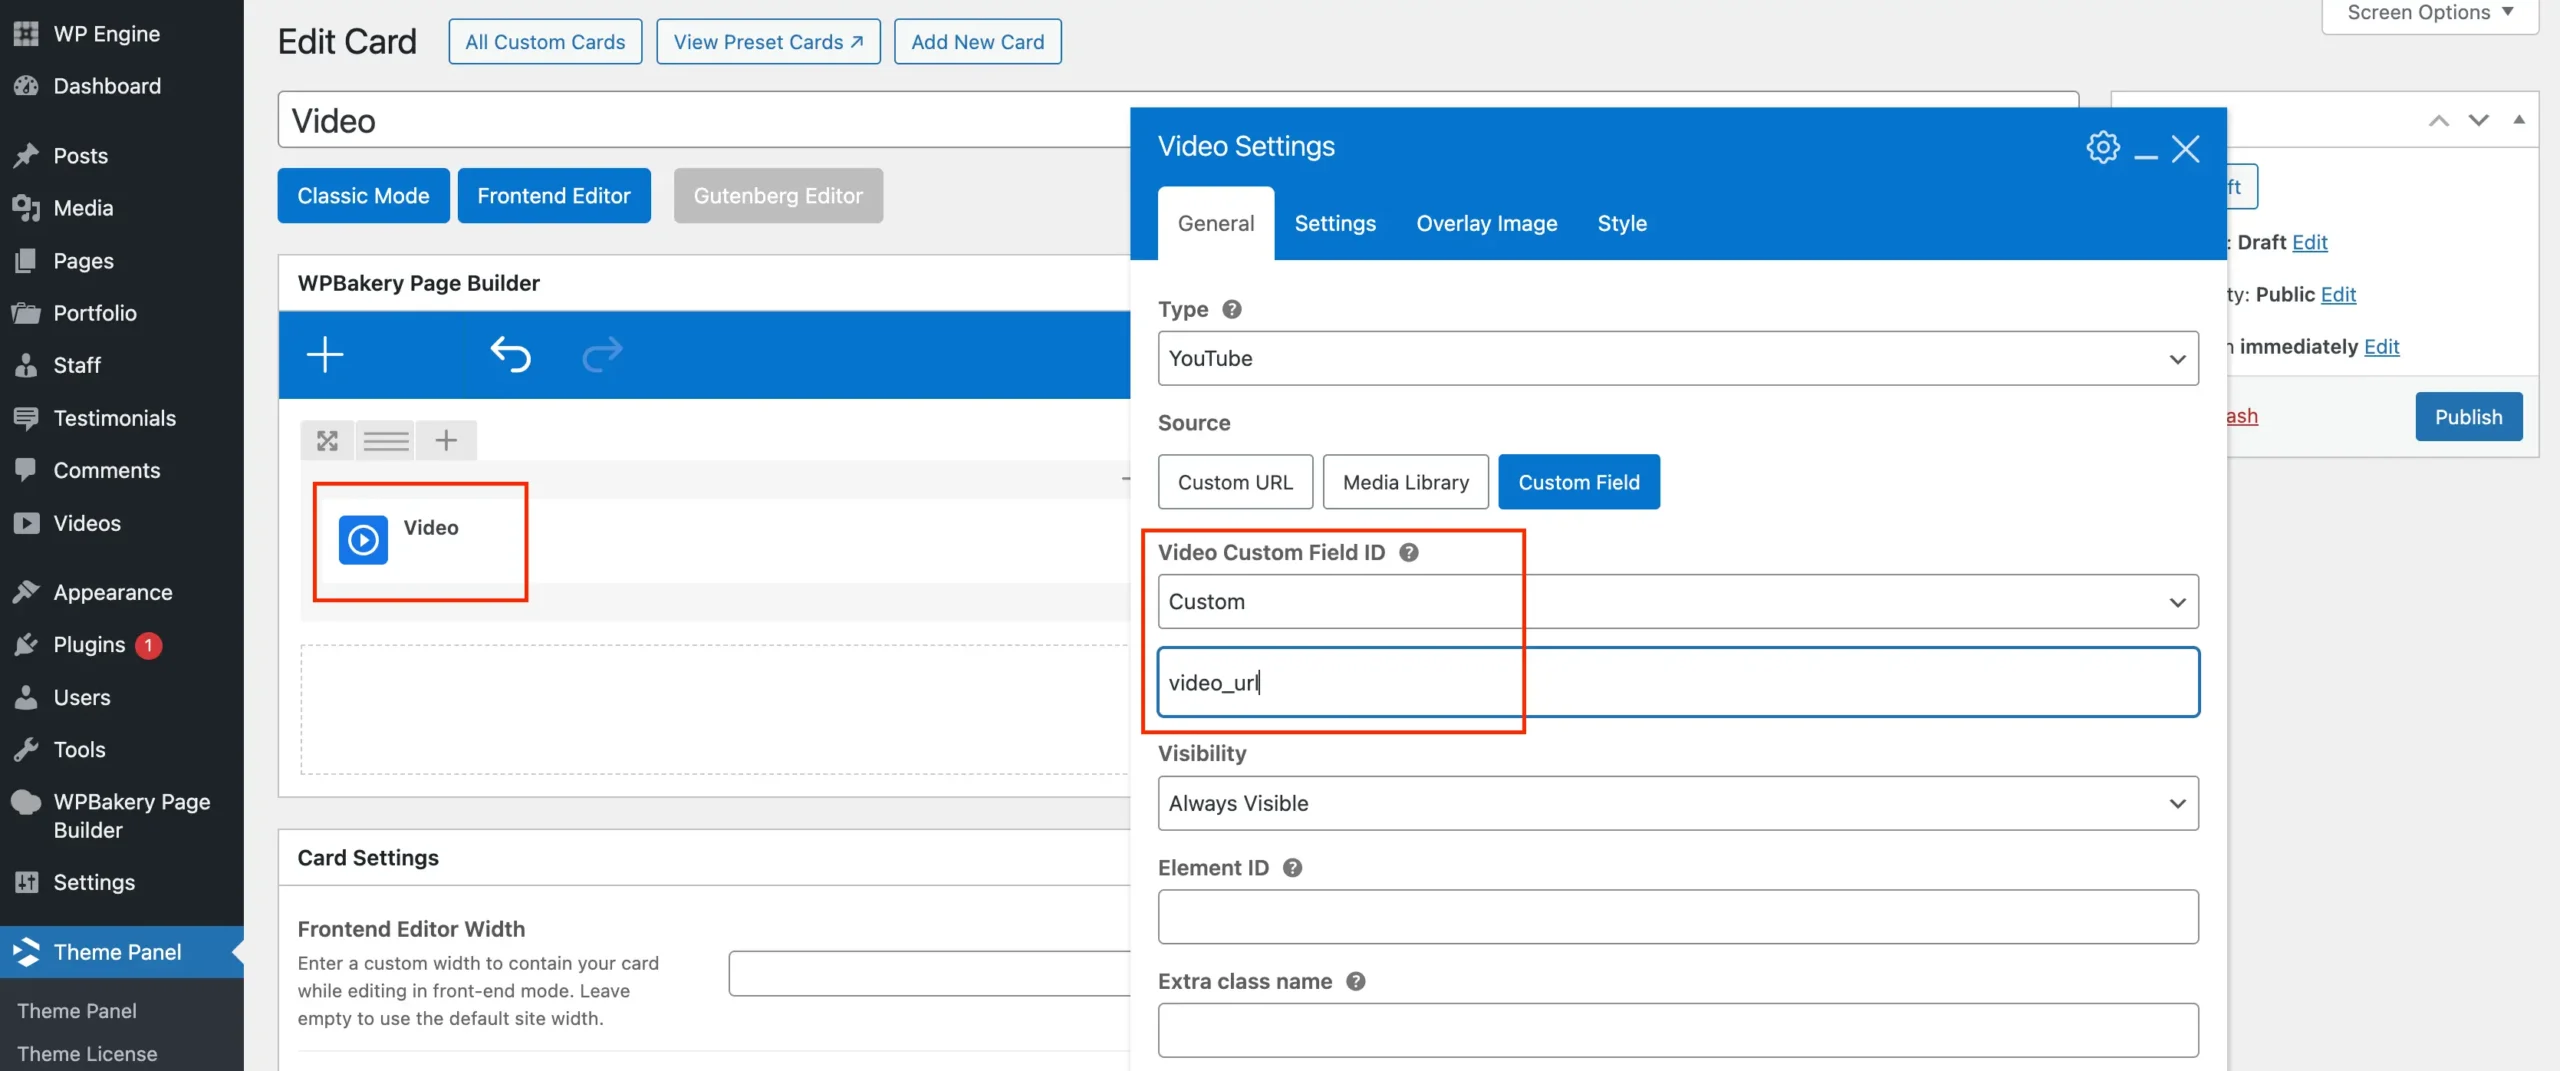
Make sure that you’ve selected or entered the correct custom field name that you’ve used to assign videos to your video posts.
Using the Overlay Image
By default the Video element will display the video itself with the controls and everything. You may want to instead display images that the user can click on to them play the video.
This is recommended primarily for Self Hosted videos as it improves the UI and page design. If you are displaying videos from 3rd party sites like YouTube it may require the user to double click on the video to get it to play (Vimeo doesn’t seem to have that issue though).
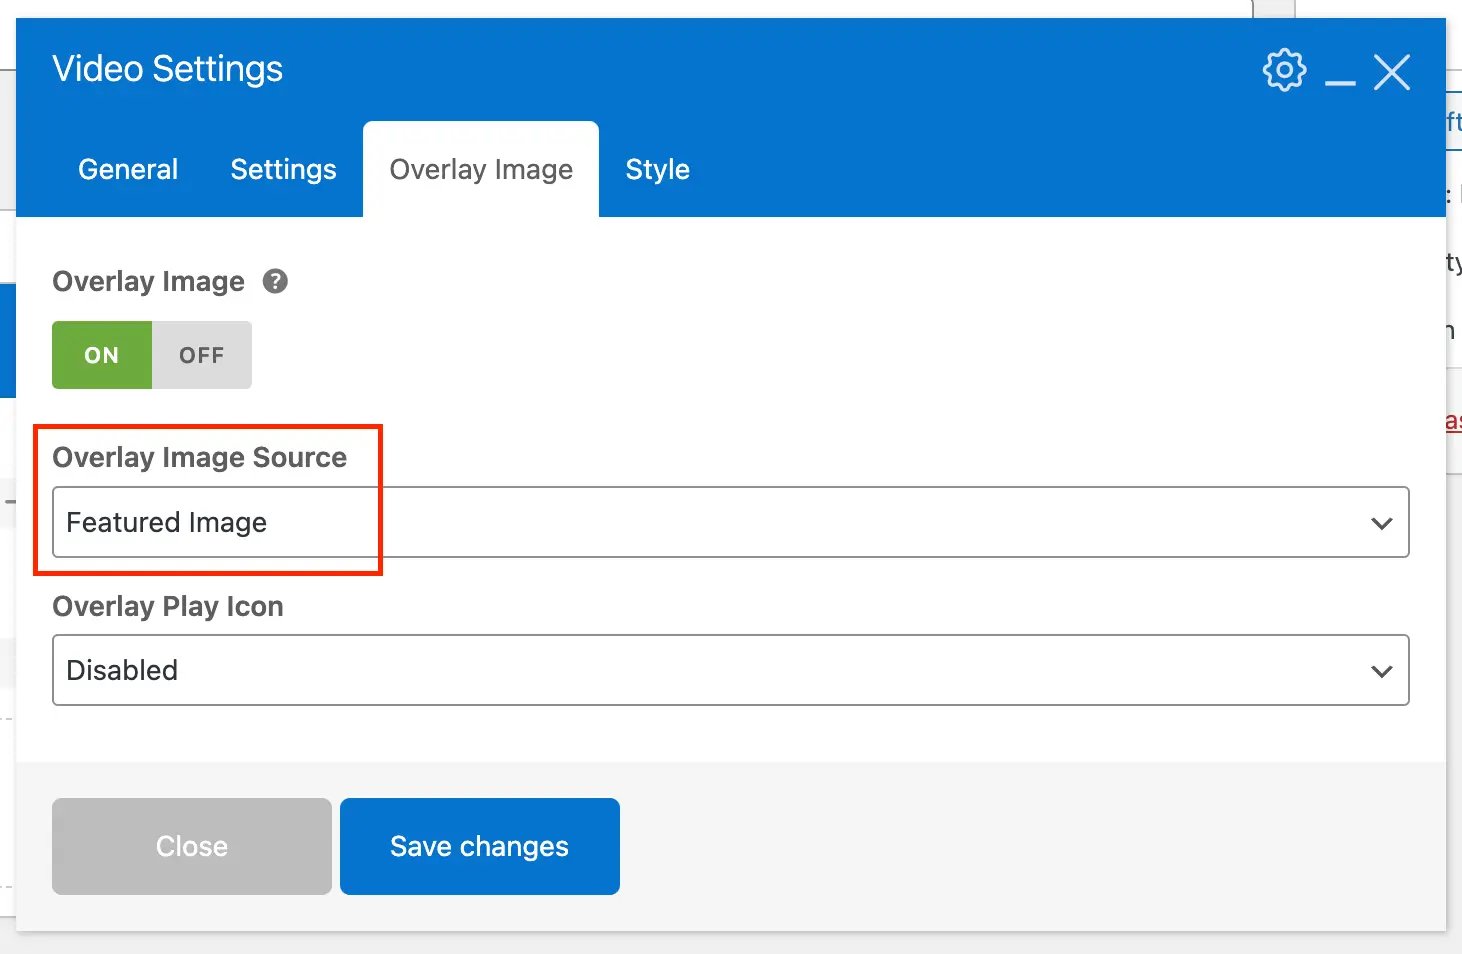
In order to use the Overlay Image feature we recommend you go back to your Post Type edit screen and enable “Thumbnails” for your post type under the “Supports” setting. This way you can assign photos to your videos.
Then you can select to use the post thumbnail image as your video overlay image like such:
Displaying the Youtube or Vimeo Thumbnails Automatically
Total does not have a built-in method for displaying the thumbnail defined for your video on YouTube or Vimeo. The reason for this is because it creates significant added bloat and it’s not recommended.
The theme would either need to hot-link to the YouTube/Vimeo thumbnail image which can slow down your site and lower your page speed score or it would need to download the images and store them. The later creates legal and security concerns, not to mention requires significant additional code/checks.
The most efficient way to display images on your own site for your videos is to upload them to your Media Library yourself and assign them to your video posts. If you would prefer to have an automatic method for this, it’s possible with custom code (you can hire me for that) but it’s NOT recommended.
If you want to display the YouTube or Vimeo thumbnails then I suggest disabling the Overlay Image and displaying the embedded video iframe instead.
Step 4: Display a Video Gallery using the Post Cards Element
Now that you’ve created your custom card you can display your videos on any page by inserting the Post Cards element.
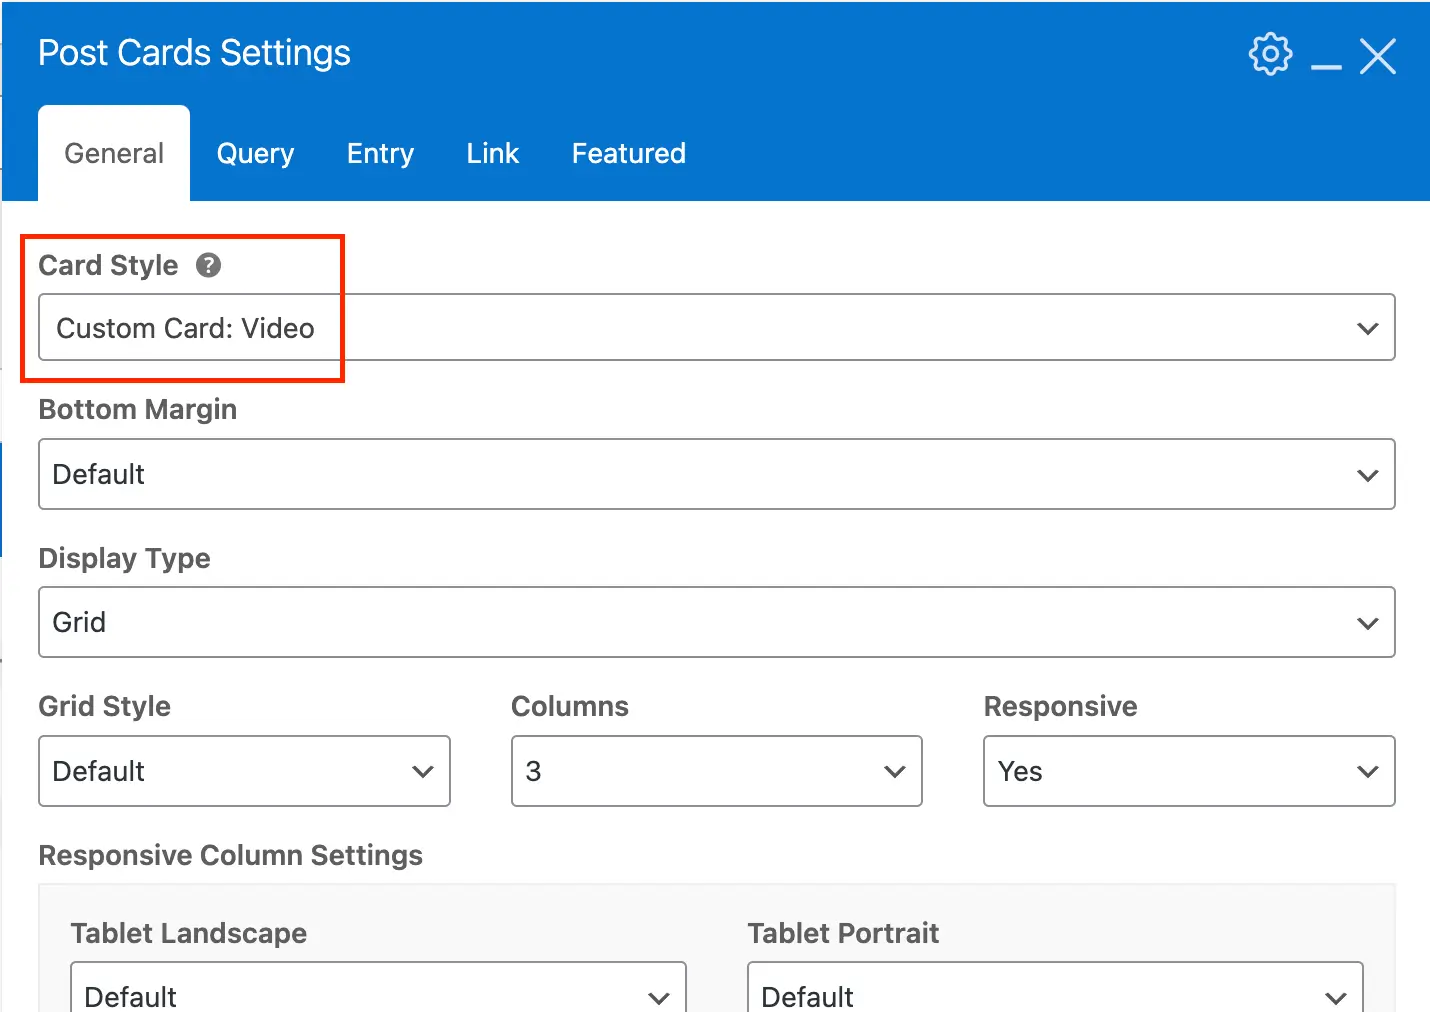
Make sure to select your Custom Video card style:
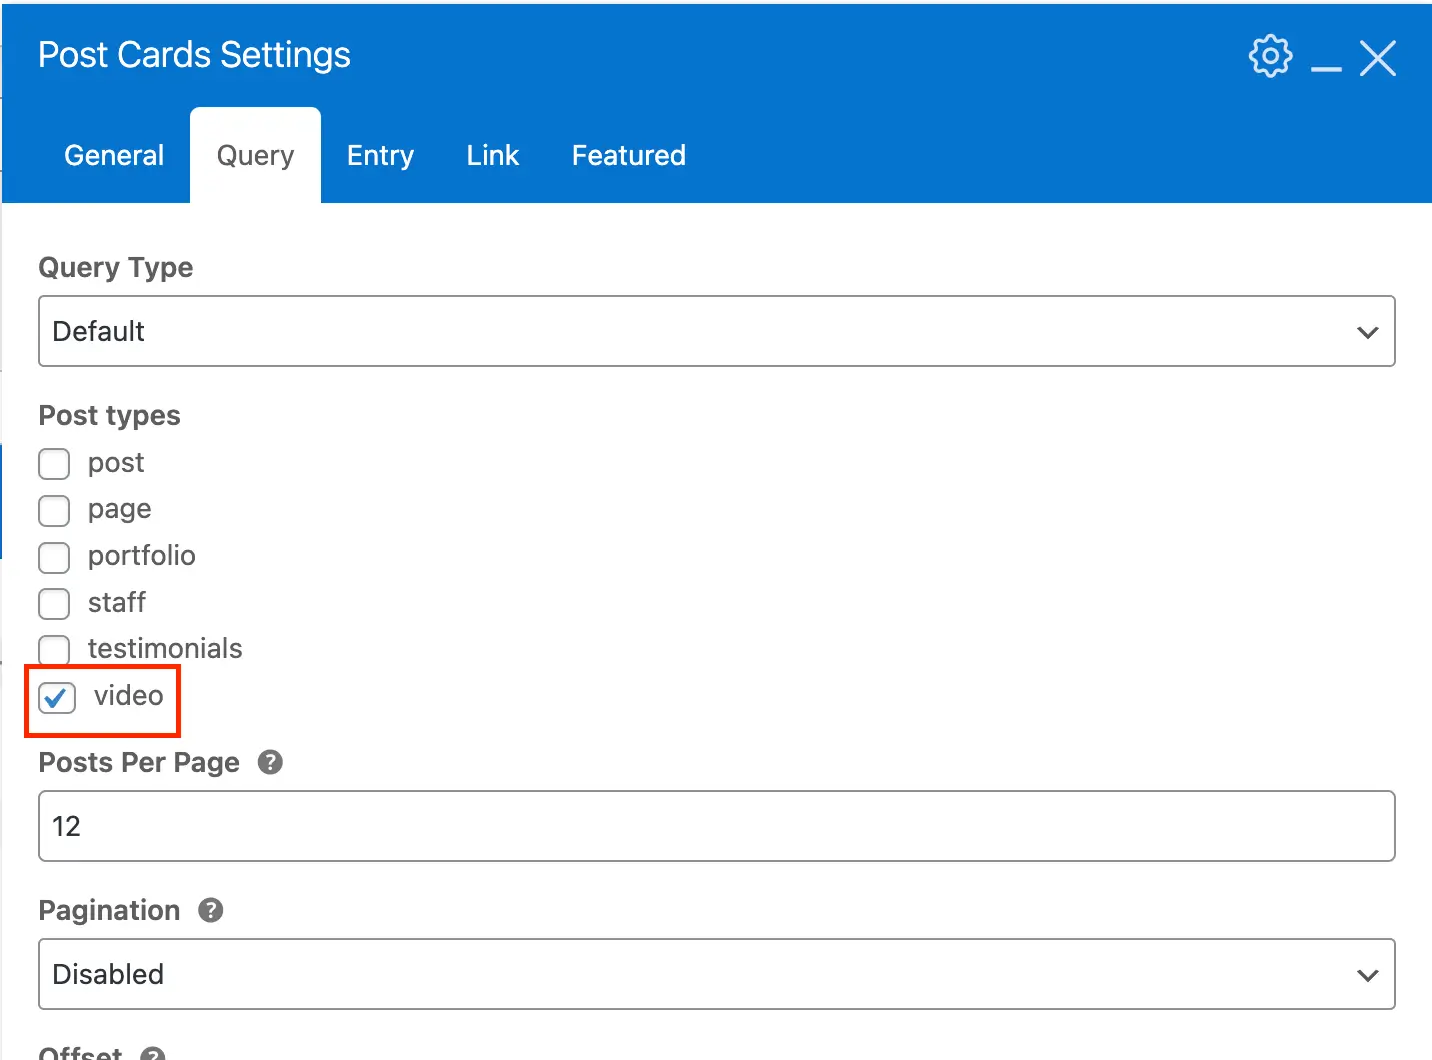
Then make sure to select your Video Post type:
Bonus: Categorizing and Tagging Videos
If you wish to organize your videos using categories or tags it’s very easy to do as well. Simply create new taxonomies using the Post Types Unlimited plugin and assign them to your Video Post Type.
Go to Post Types > Taxonomies and click the “Add New” button.
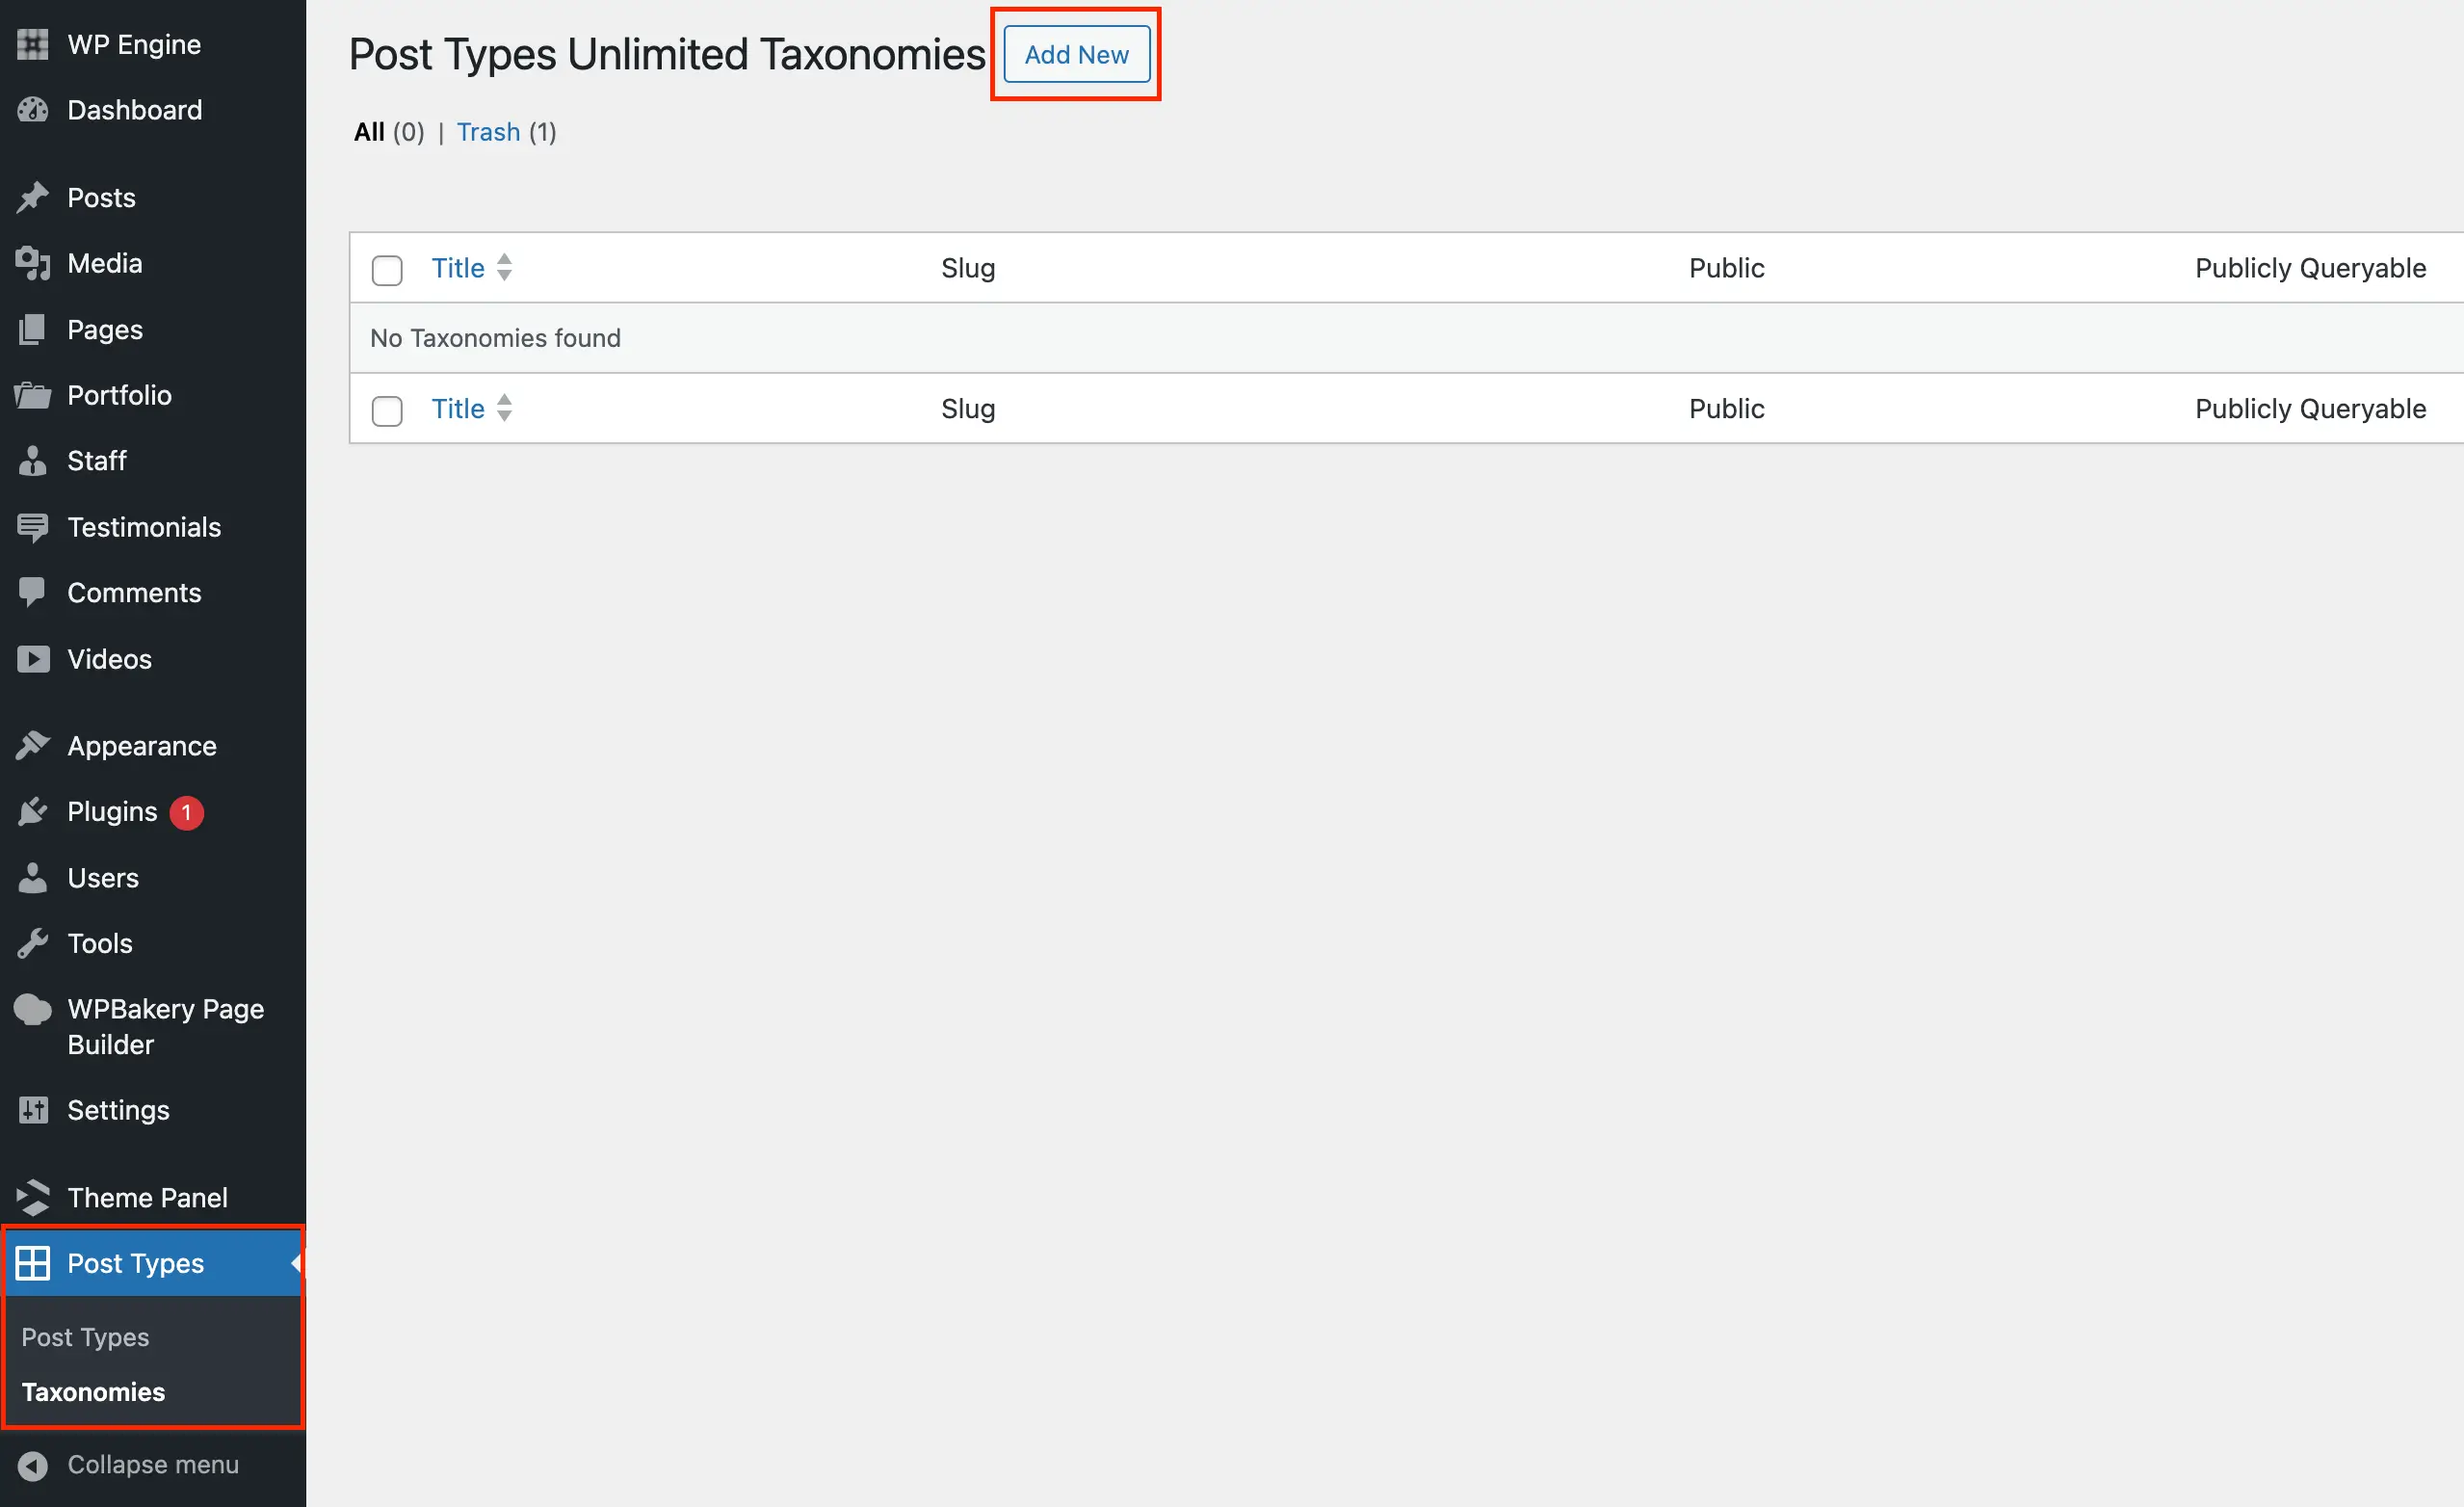
Now you can go a head and give your taxonomy a name and choose your settings.

When adding your custom taxonomy the most important thing is to ensure it’s assigned to your Video post type.
Do you Need Automatic Archives for Your Video Tags/Categories?
When creating your custom taxonomy it’s important to figure out if you want automatic archives created for each term. In order words do you want to have a page for each category/tag automatically created that displays all videos inside that term?
If you do NOT want to have automatic archives make sure you disable the Publicly Queryable setting in the main tab of your custom taxonomy edit screen.
If you DO want to have automatic archives, they will not look good by default so you will want to create a dynamic template for your archives. For your dynamic template you will insert the Post Cards element, select your custom video card style and then choose “Auto” for your “Query Type”.
Adding a Category or Tag Filter to Your Video Gallery
Now that you have a beautiful video gallery added to your page and you’ve also categorized and or tagged your videos you may want to give the visitor the ability to easily filter them. To do so you will want to refer to the documentation guide titled “Post Cards Ajax Terms/Category Filter“.