The Total theme is fully compatible with WPML, making it easy to create a multilingual site. This guide will walk you through the steps of setting up WPML and translating your website to support multiple languages. While the article is primarily focused on the Total theme, the instructions apply to any theme you are using.
Table of Contents
Getting Started
To begin, you’ll need to install and activate the following components:
- WPML Multilingual CMS: This is the core WPML plugin, which you will install first. It will enable you to install the additional required plugins directly through its dashboard.
- WPML String Translation: Allows you to translate content beyond posts, pages, and taxonomies, including elements like the site’s tagline, admin screen texts, widget titles and page builders.
- WPML Media Translation: Optional add-on for translating images, videos & PDF’s.
Once these are activated, you’ll be ready to start configuring your multilingual site.
If you’re new to WPML, we recommend checking out their Getting Started Guide, as it will provide the most up-to-date and accurate information.
Initial WPML Setup
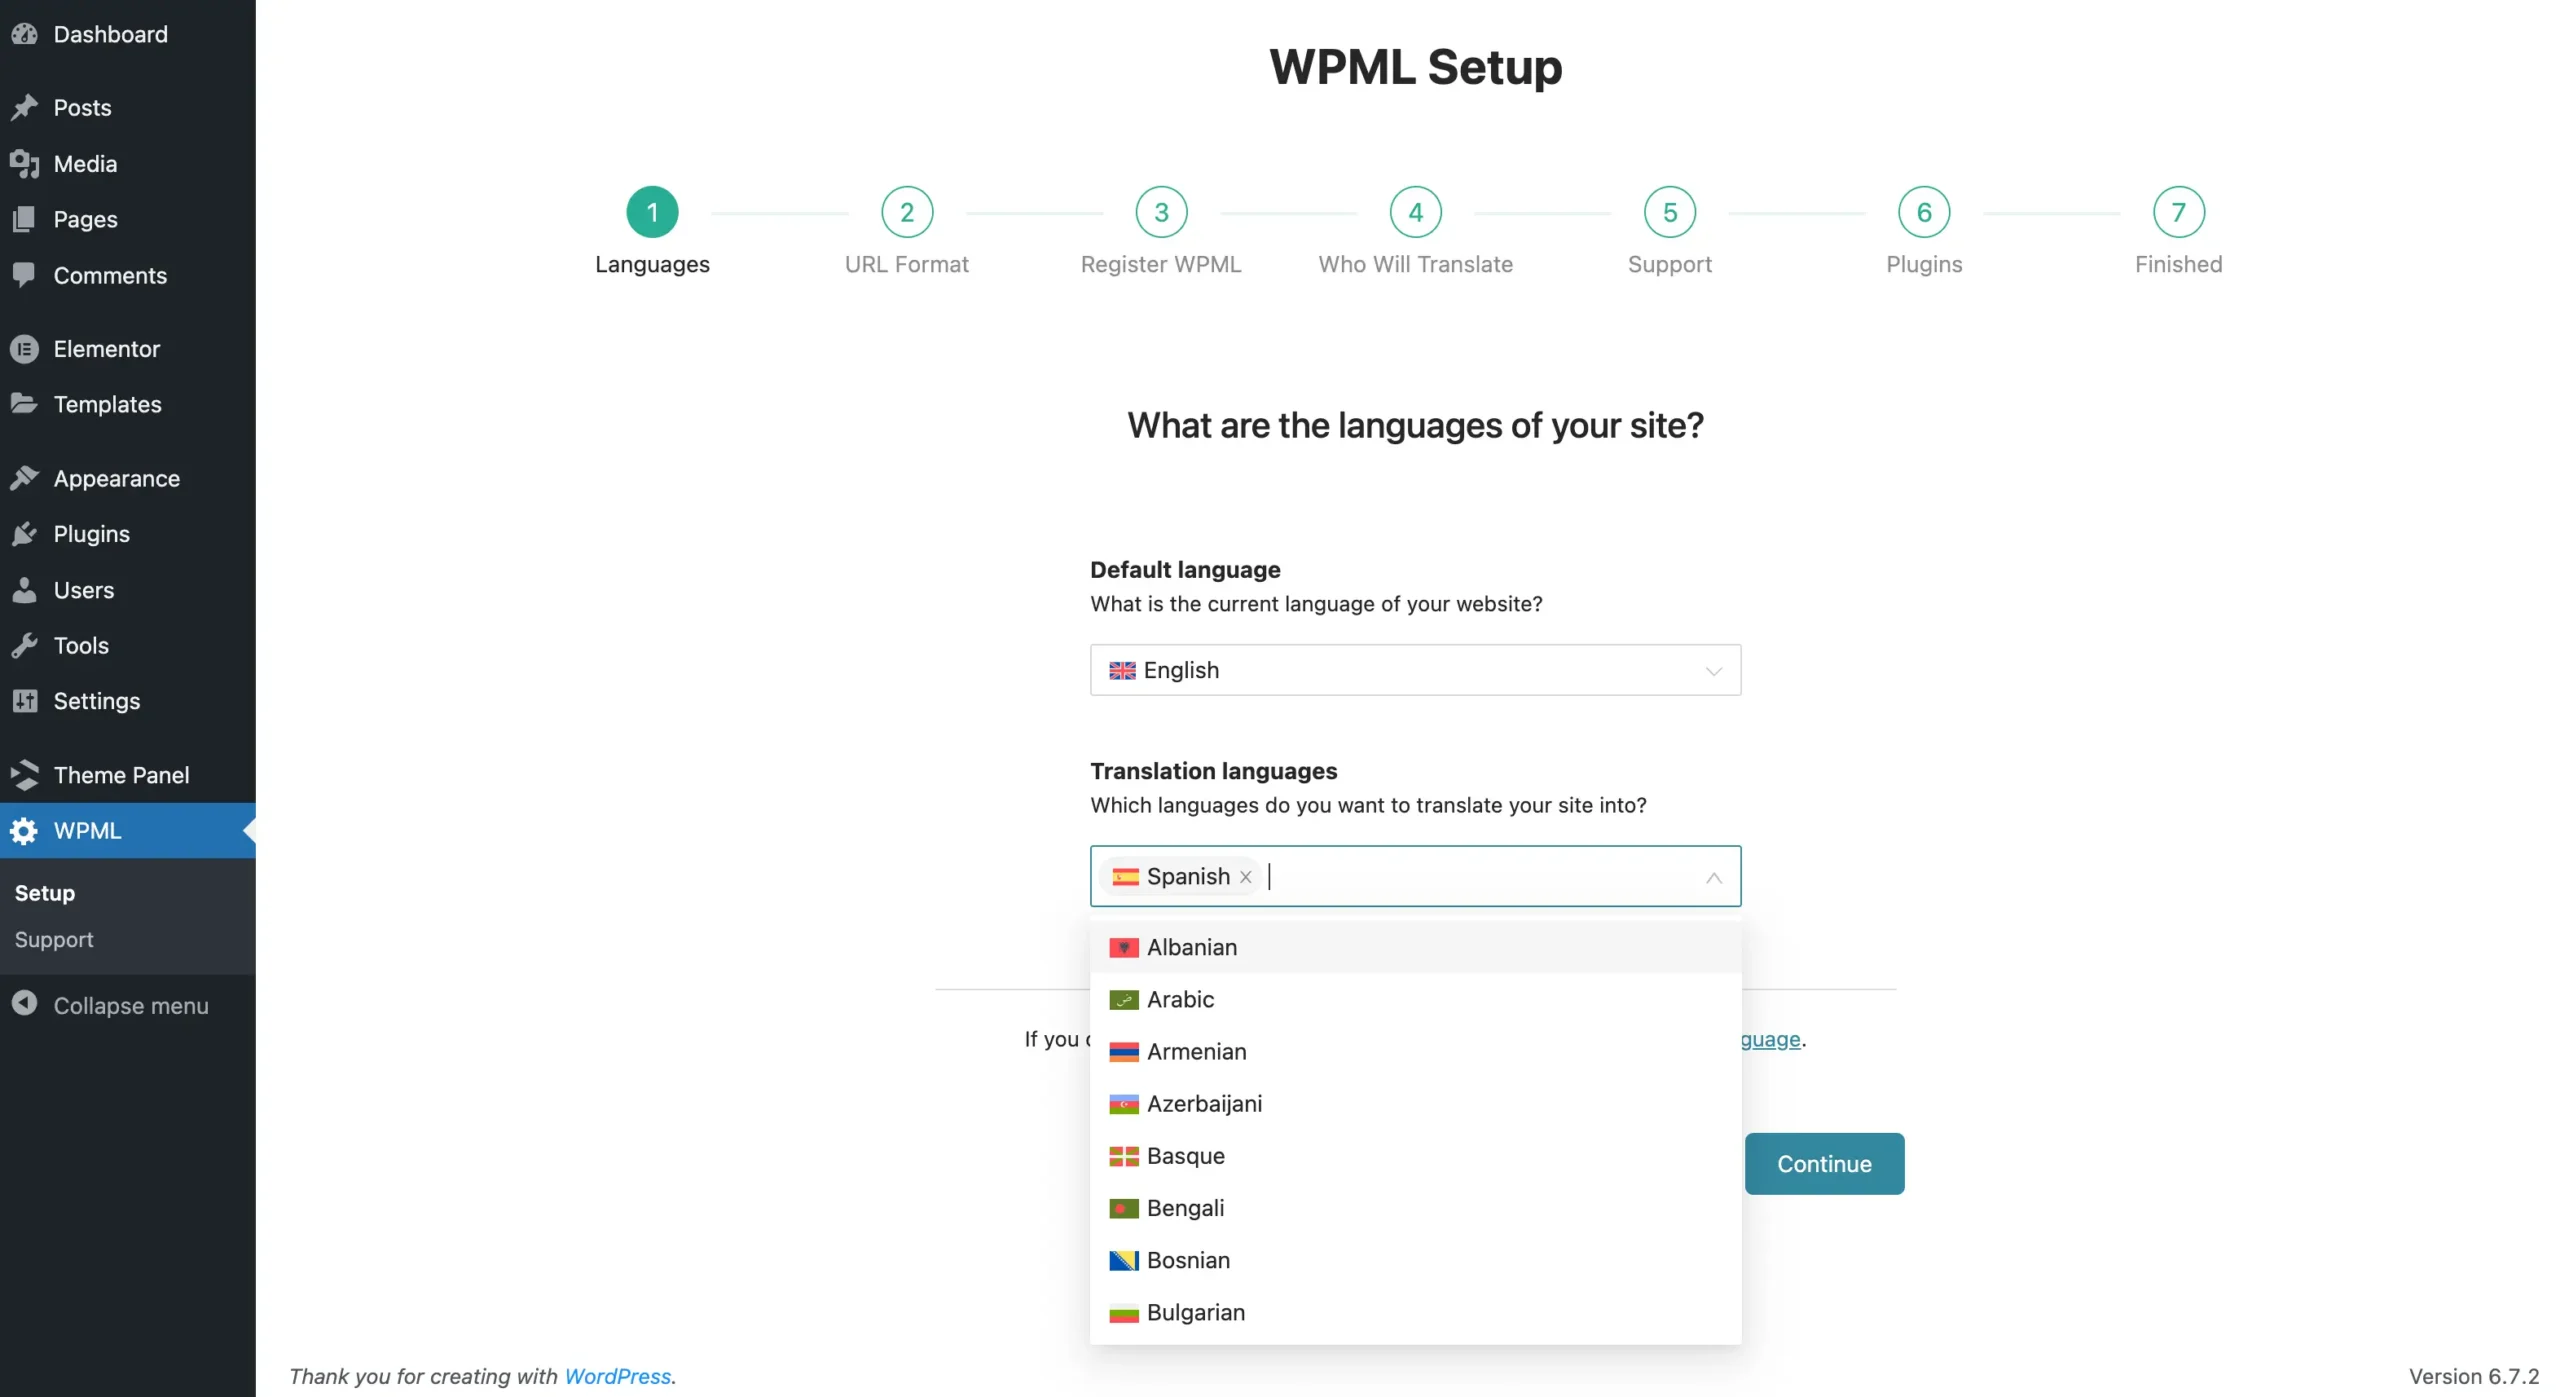
Upon activating WPML for the first time, you’ll be prompted to go through the setup wizard. This will guide you through registering WPML, selecting your site’s languages, choosing the URL format, setting up the translation mode and complete other essential setup steps.
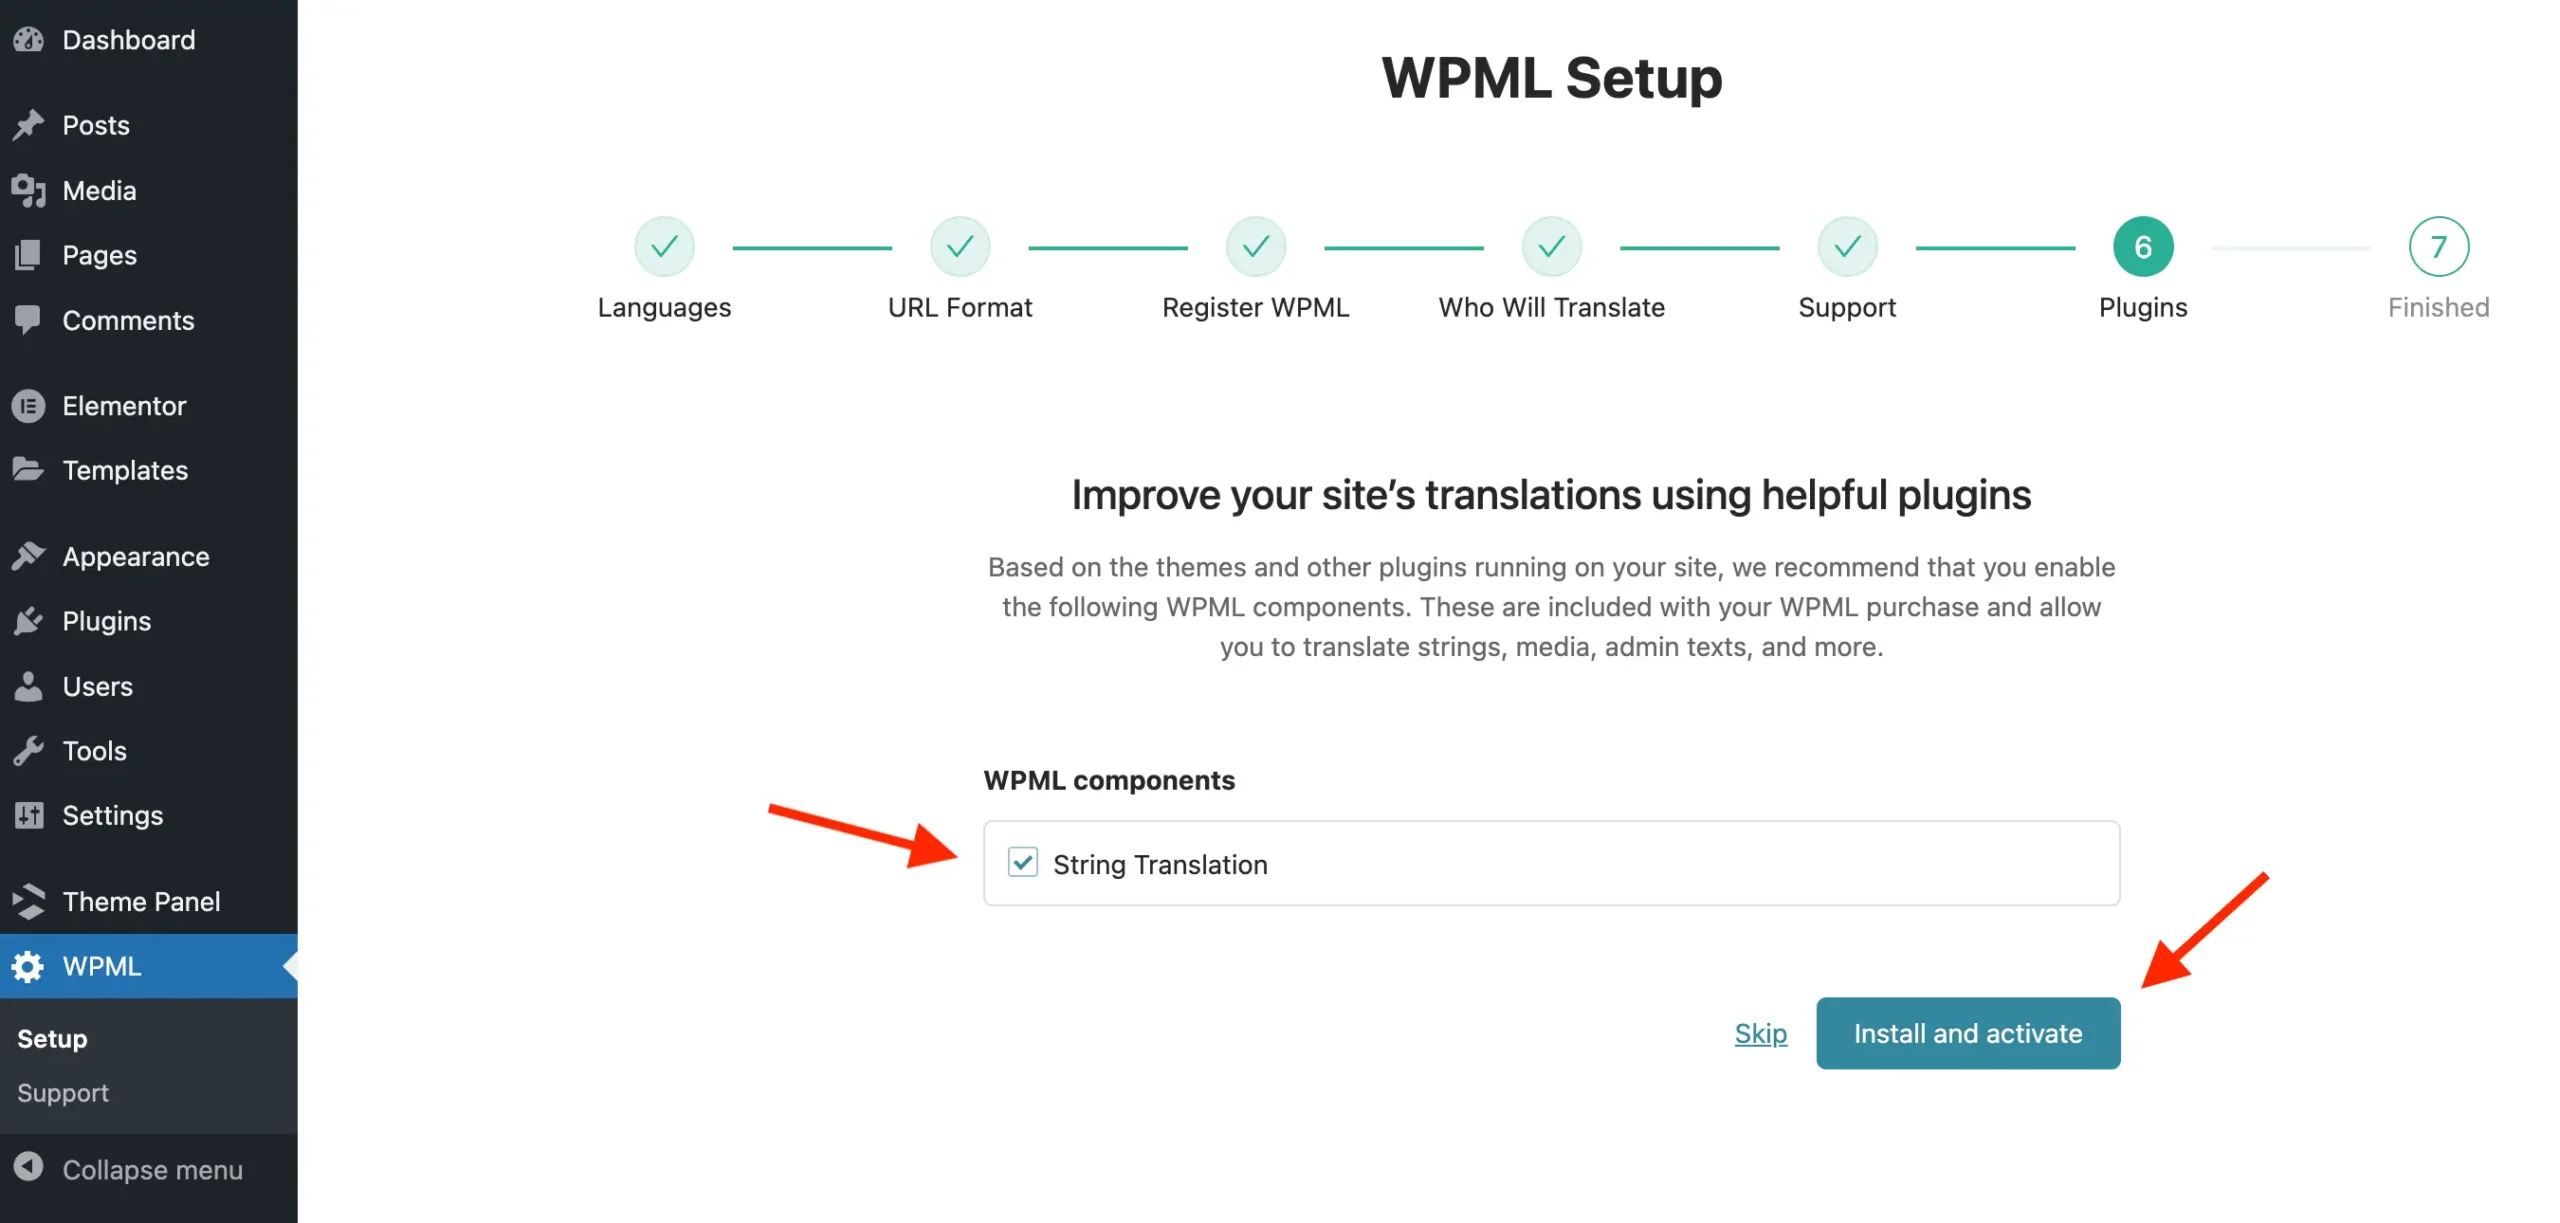
During the setup wizard, you’ll also reach the Plugins step. Here, you should install and activate the String Translation plugin. As mentioned earlier, this plugin lets you translate strings beyond posts, pages, and taxonomies. Enabling this add-on is essential.
Translating Your Site into Multiple Languages
Now that you’ve completed the setup wizard, it’s time to begin translating your site into different languages. To get started, navigate to WPML > Translation Management. Here, you’ll find all the content on your site that can be translated.
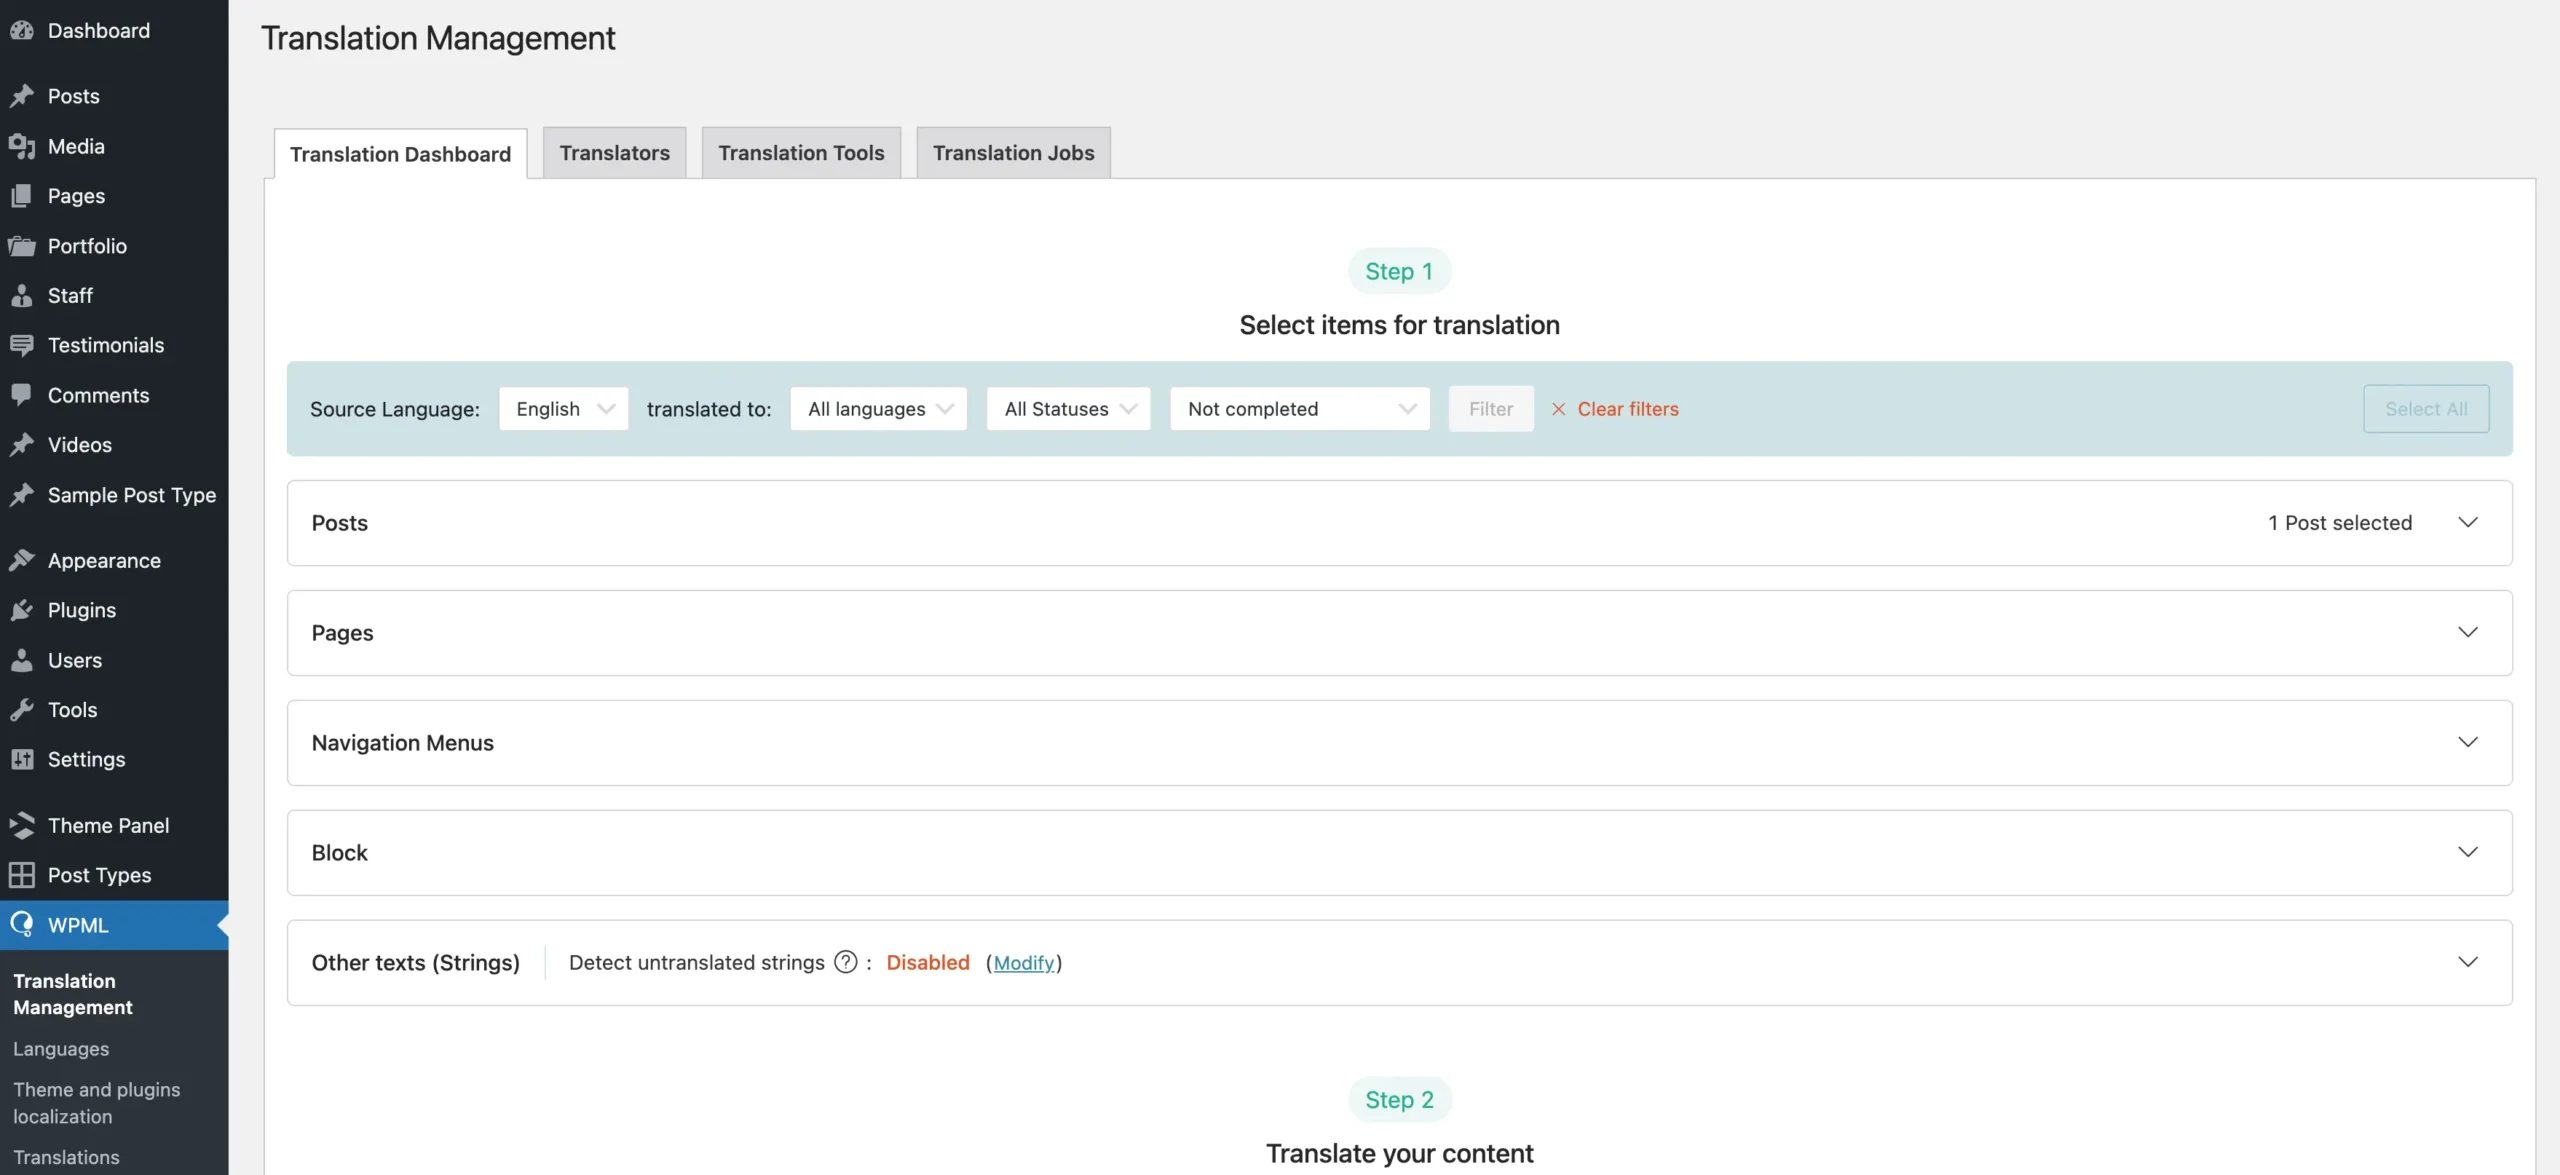
As you add content to your website, such as pages, posts, menus, and taxonomy terms, they will automatically appear in the Translation Management dashboard, allowing you to easily manage their translations.
If there are items on the Translation Management page that haven’t been translated yet, or if you need to edit any existing translations, simply check the box next to the item, scroll down to select your translation options, and click the Translate button.
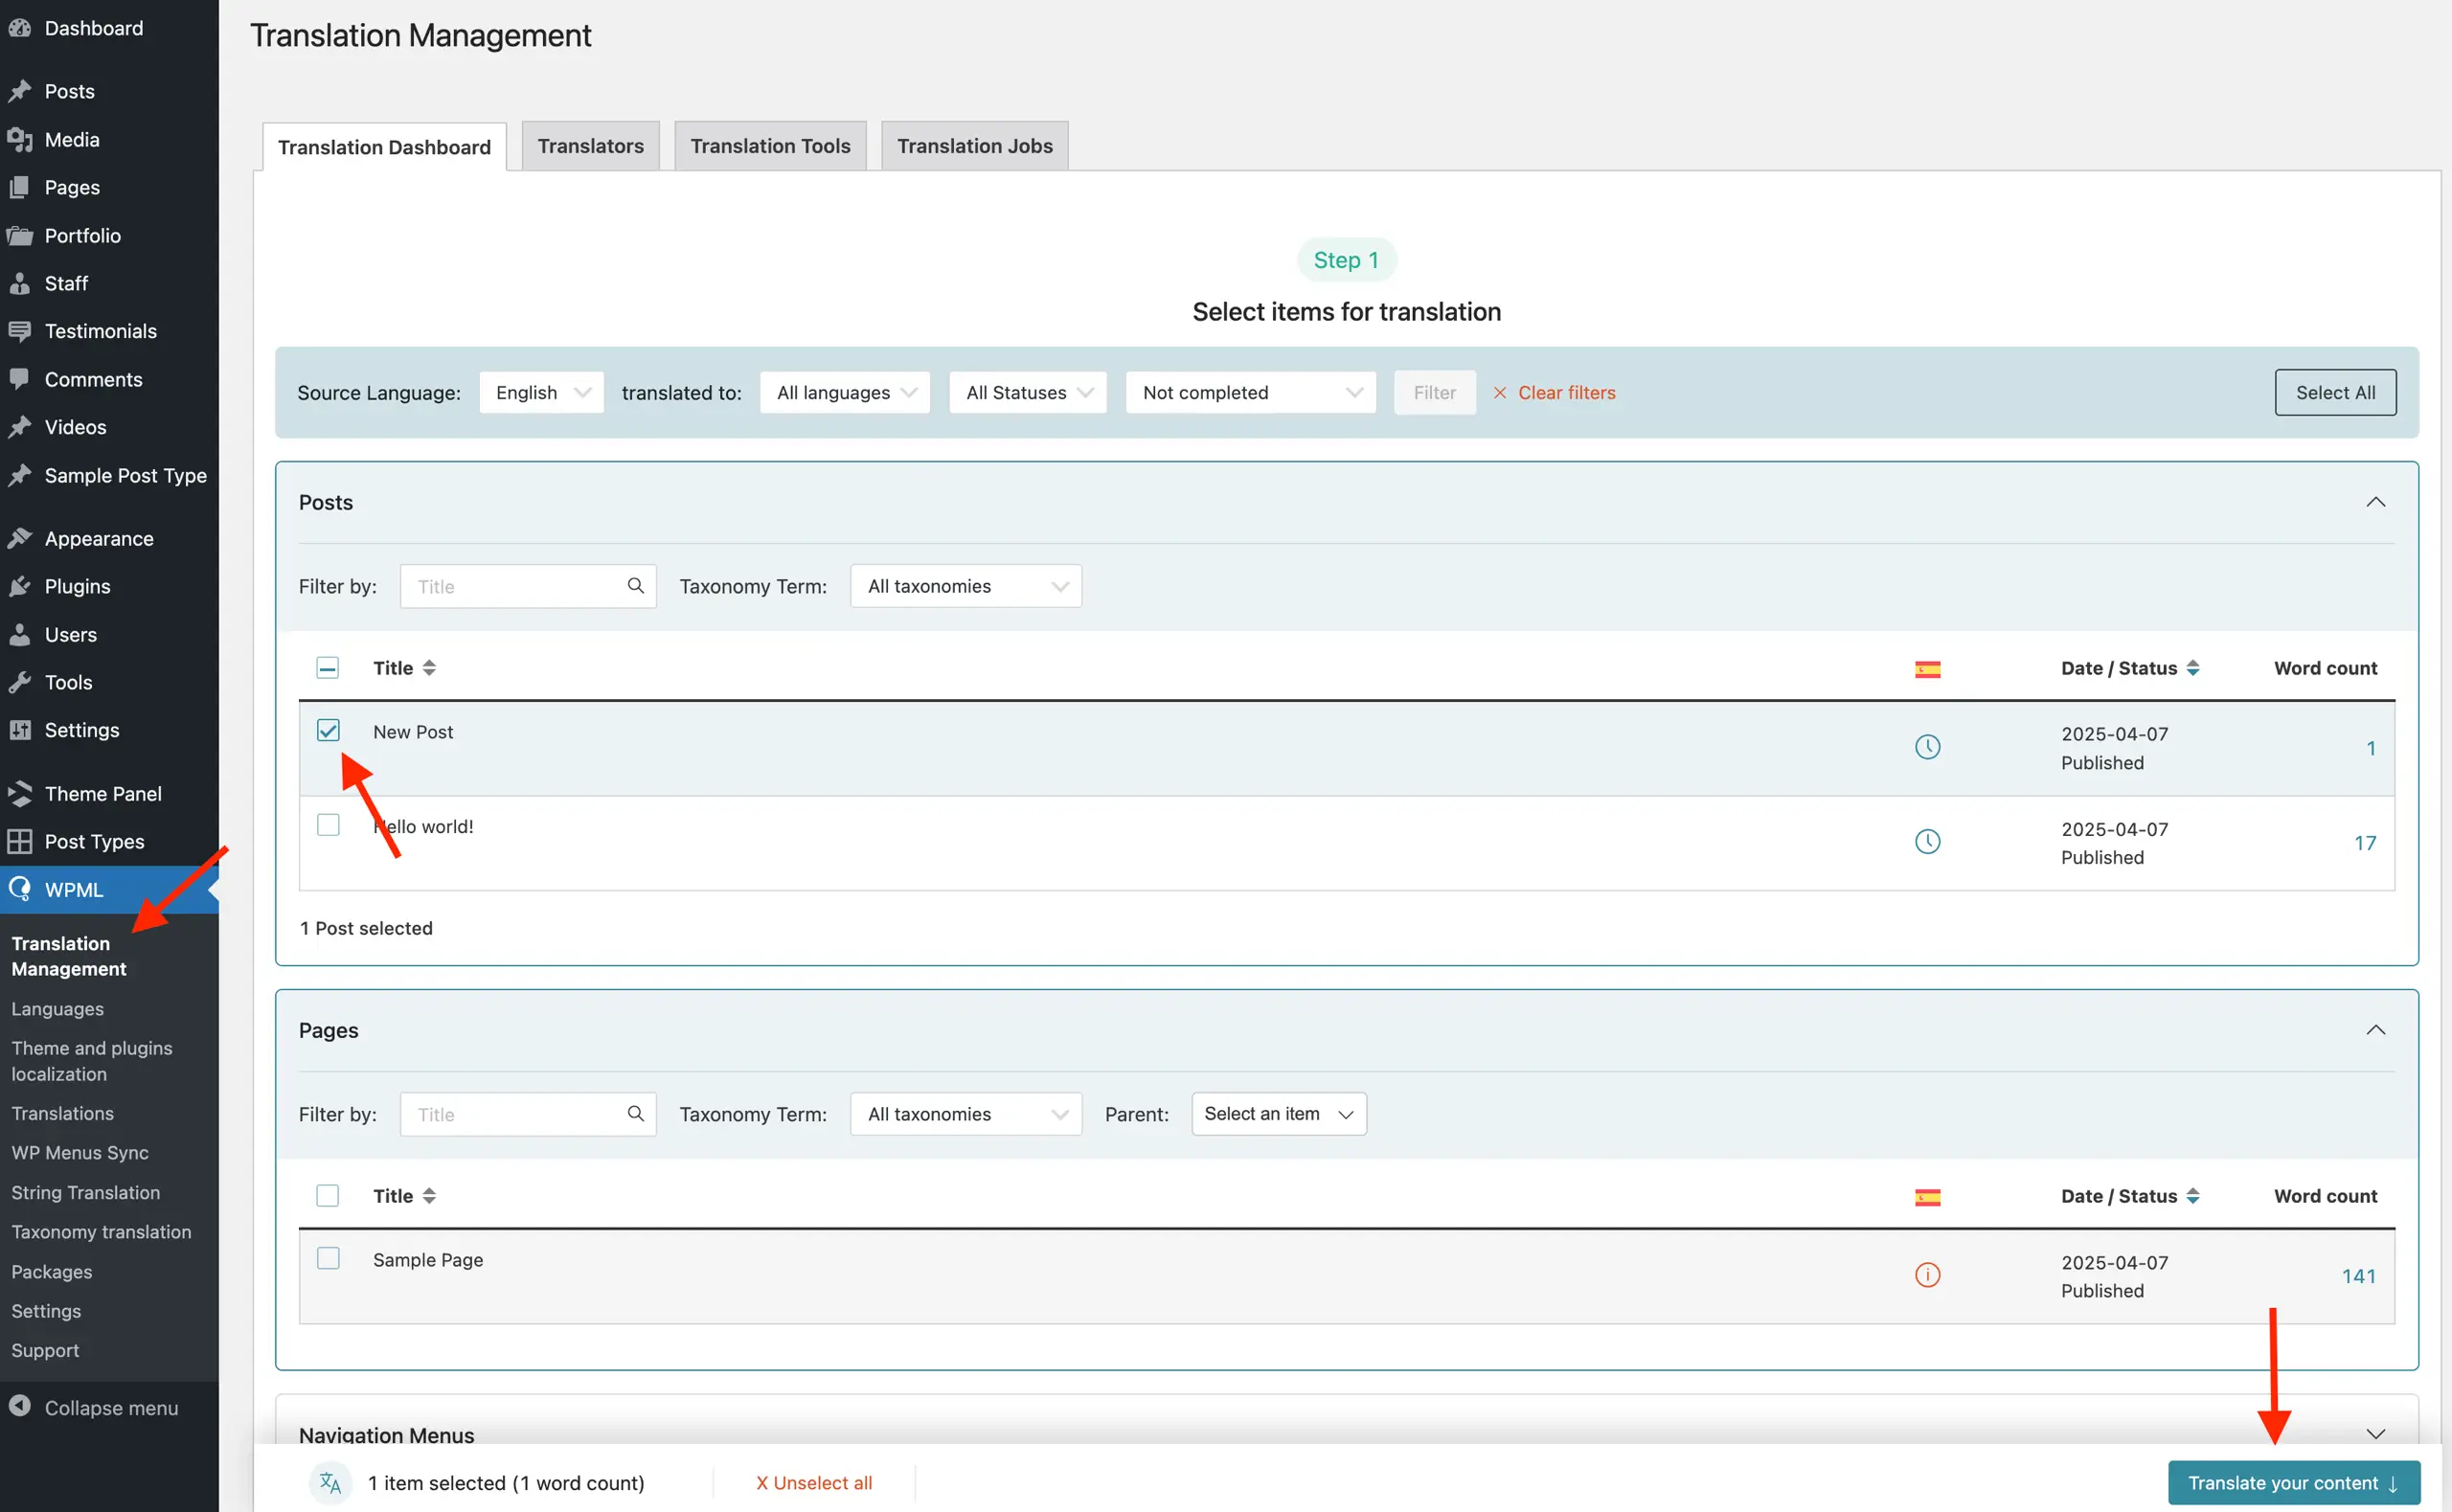
This will add the item to the translation queue, which can be accessed under WPML > Translations. From there, you can view its status, translate it, or remove it from the queue.

To translate other strings and content, you may need to follow additional steps. Below, I will guide you through the process of translating some of the other content on your site.
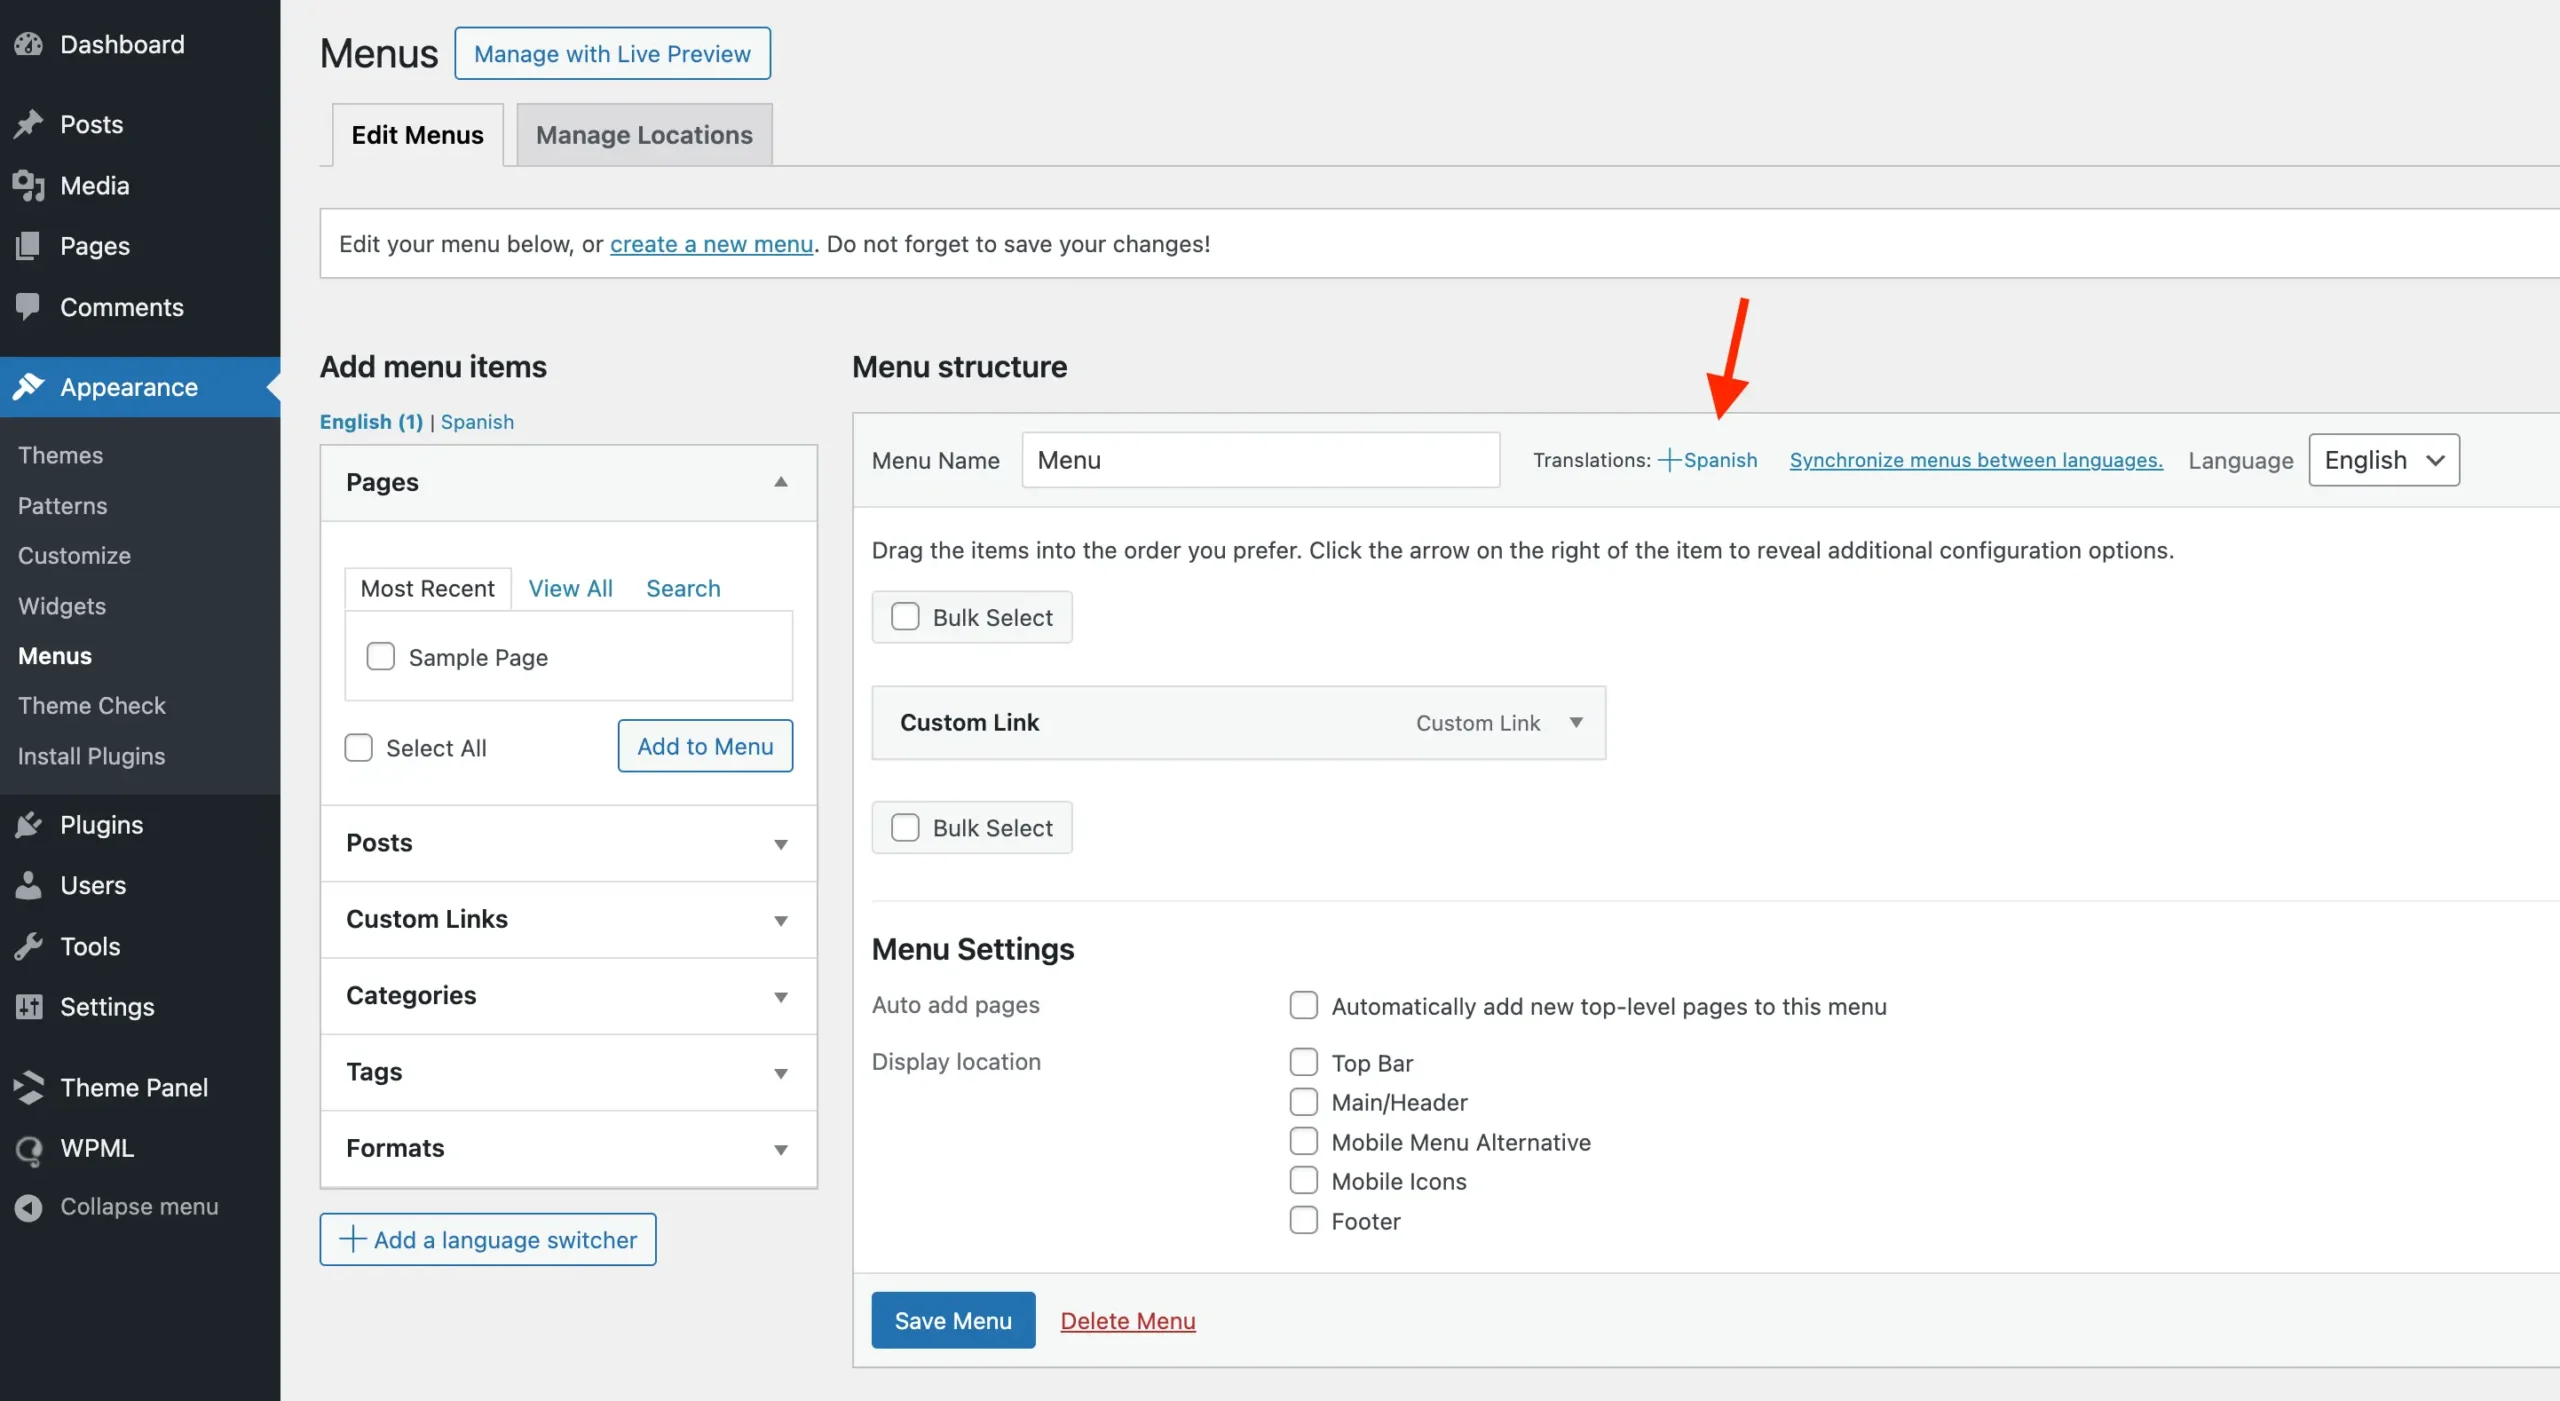
Translate WordPress Menus
By default, WPML automatically creates translations for menus that link to pages, posts, products, and categories. All you need to do is translate the content the menu links to, and WPML will handle the rest. However, if you want to create different menu structures for different languages or include custom links, you’ll need to follow a few additional steps.
Creating Different Menu Structures for Each Language
Most websites likely won’t require this, but if you need a different menu structure for each language, you can enable this through the translations section next to the menu name, as shown in the screenshot below:
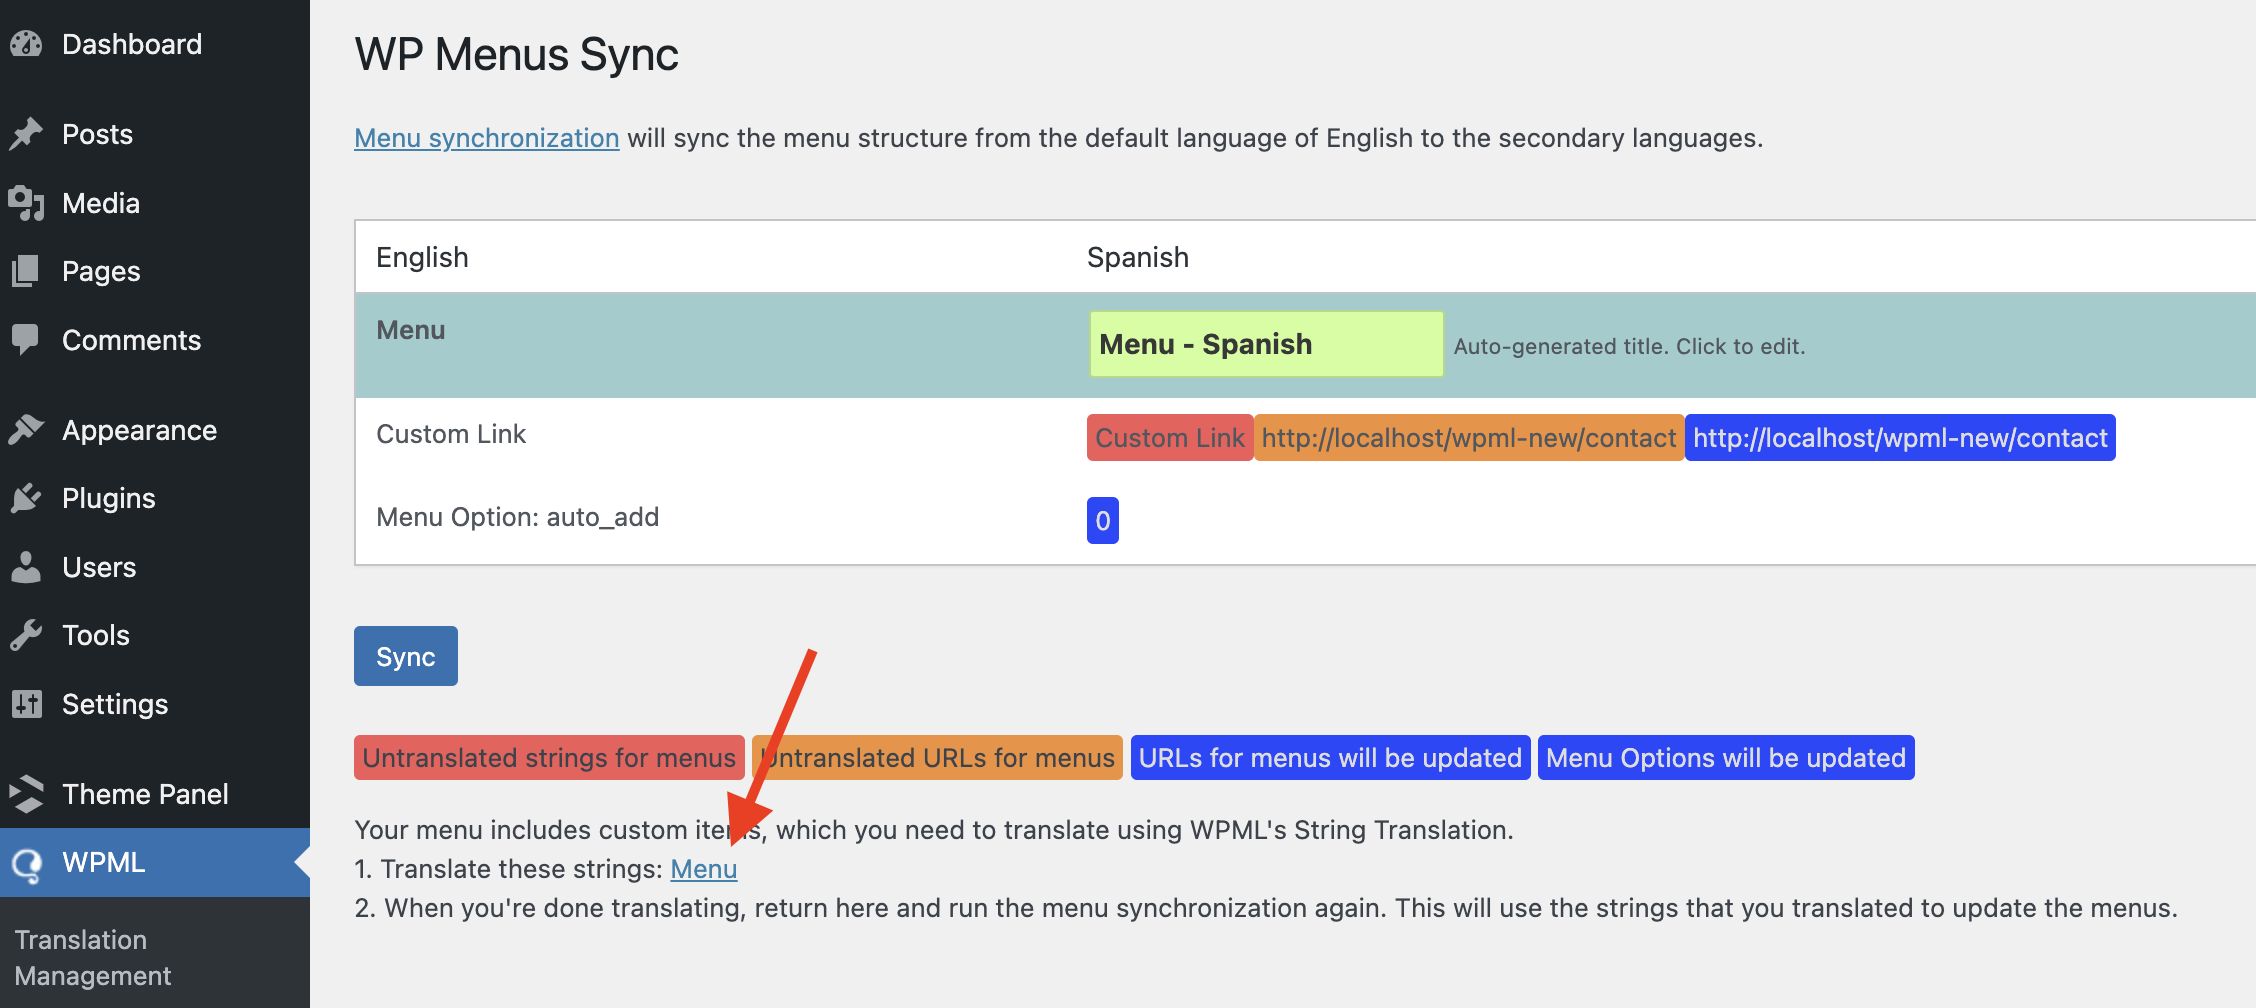
Translating Custom Menu Links
If your menu has custom links that need translation, you can do this by creating a new menu for each language as mentioned previously. However, this can also be done via the WPML > WP Menus Sync panel.
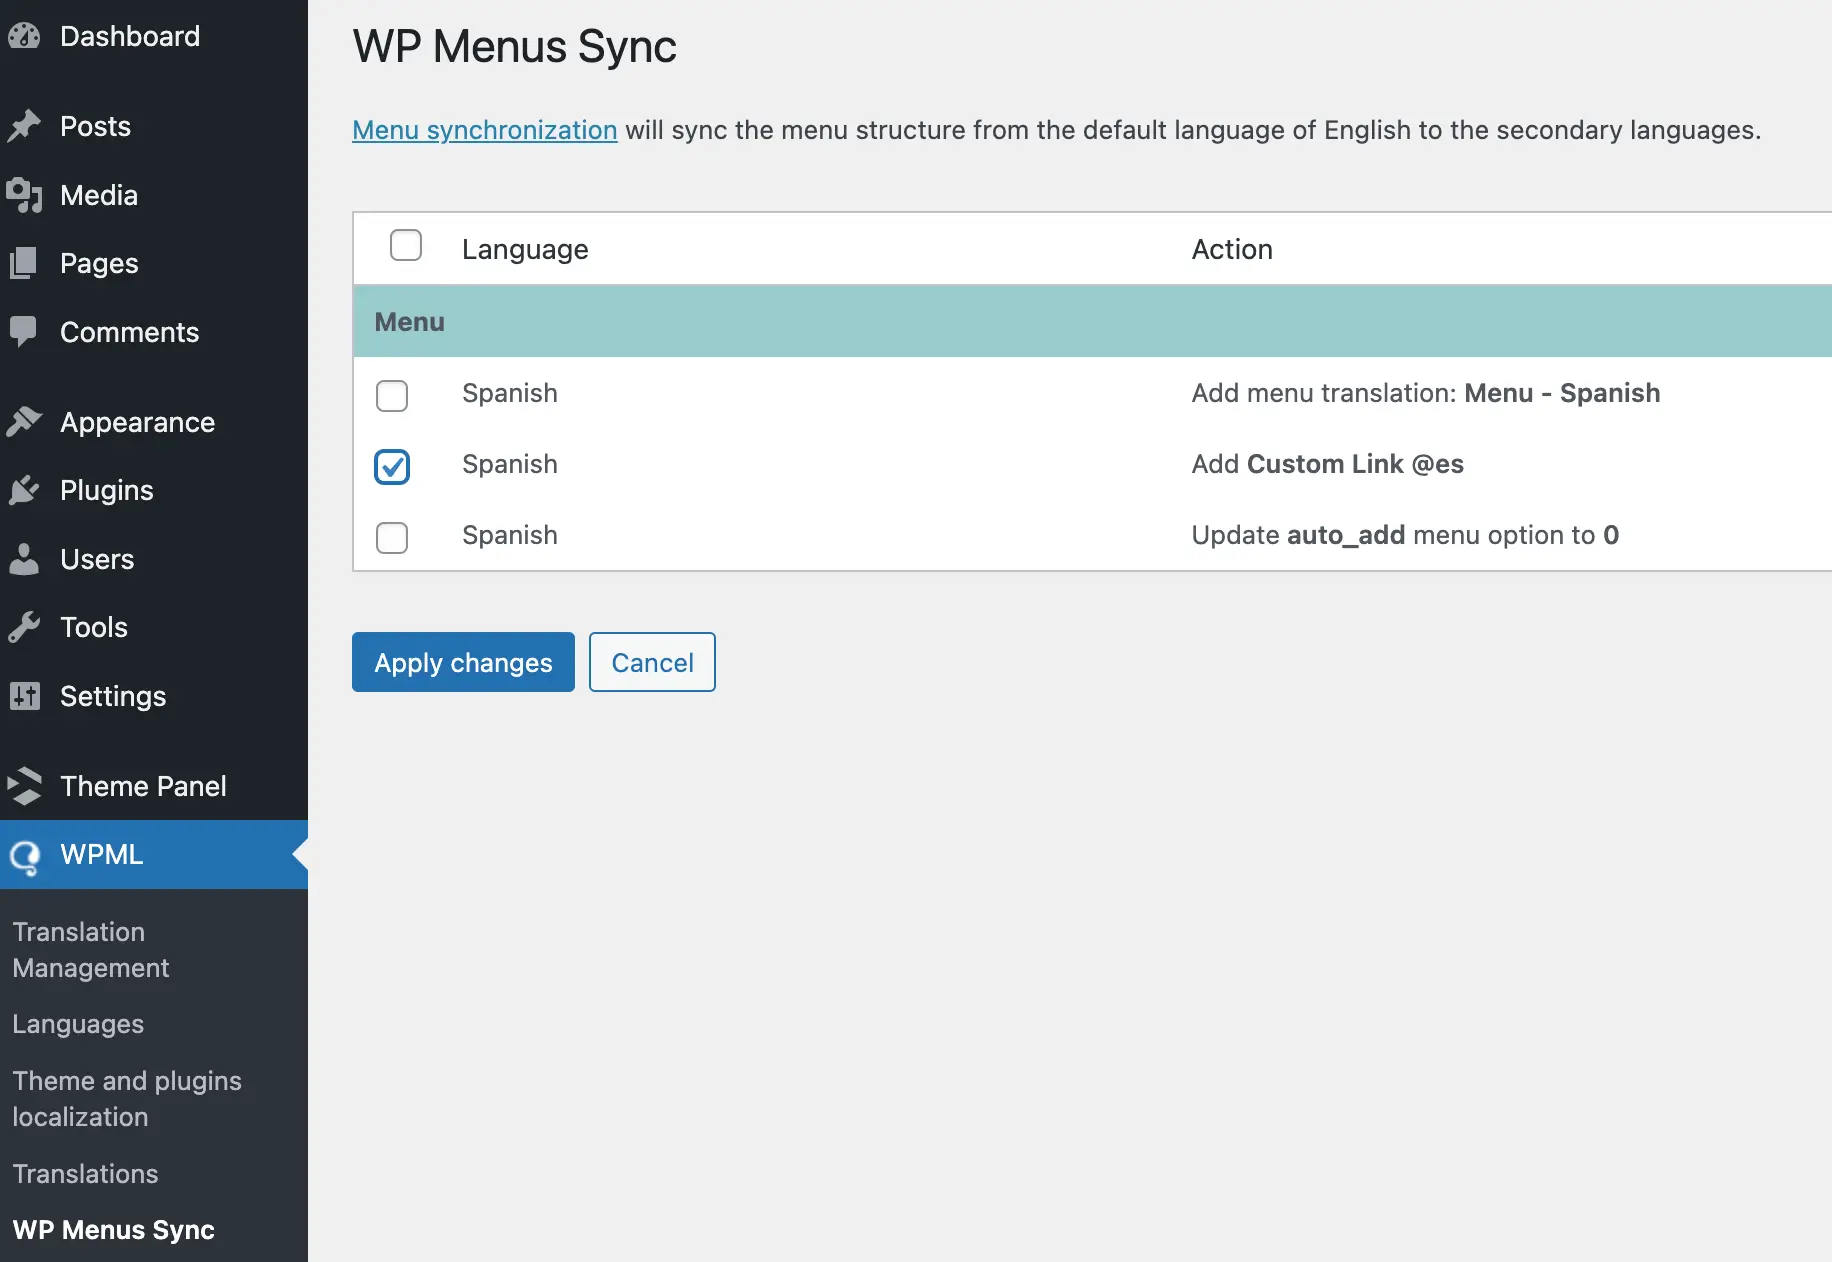
On this page, simply check the box next to any menu item you wish to synchronize and click the apply changes button. This will add the menu item to the String Translation panel, where you can translate it. You can quickly access this panel by clicking the “Menu” link shown below the table (see screenshot below).
Translate Theme (Customizer) Settings
The Total theme utilizes the core WordPress Customizer for most settings. All translatable settings have been registered with WPML, making it easy to translate them. To do so, simply go to WPML > String Translation and select “Theme Settings” from the “Domains” dropdown.
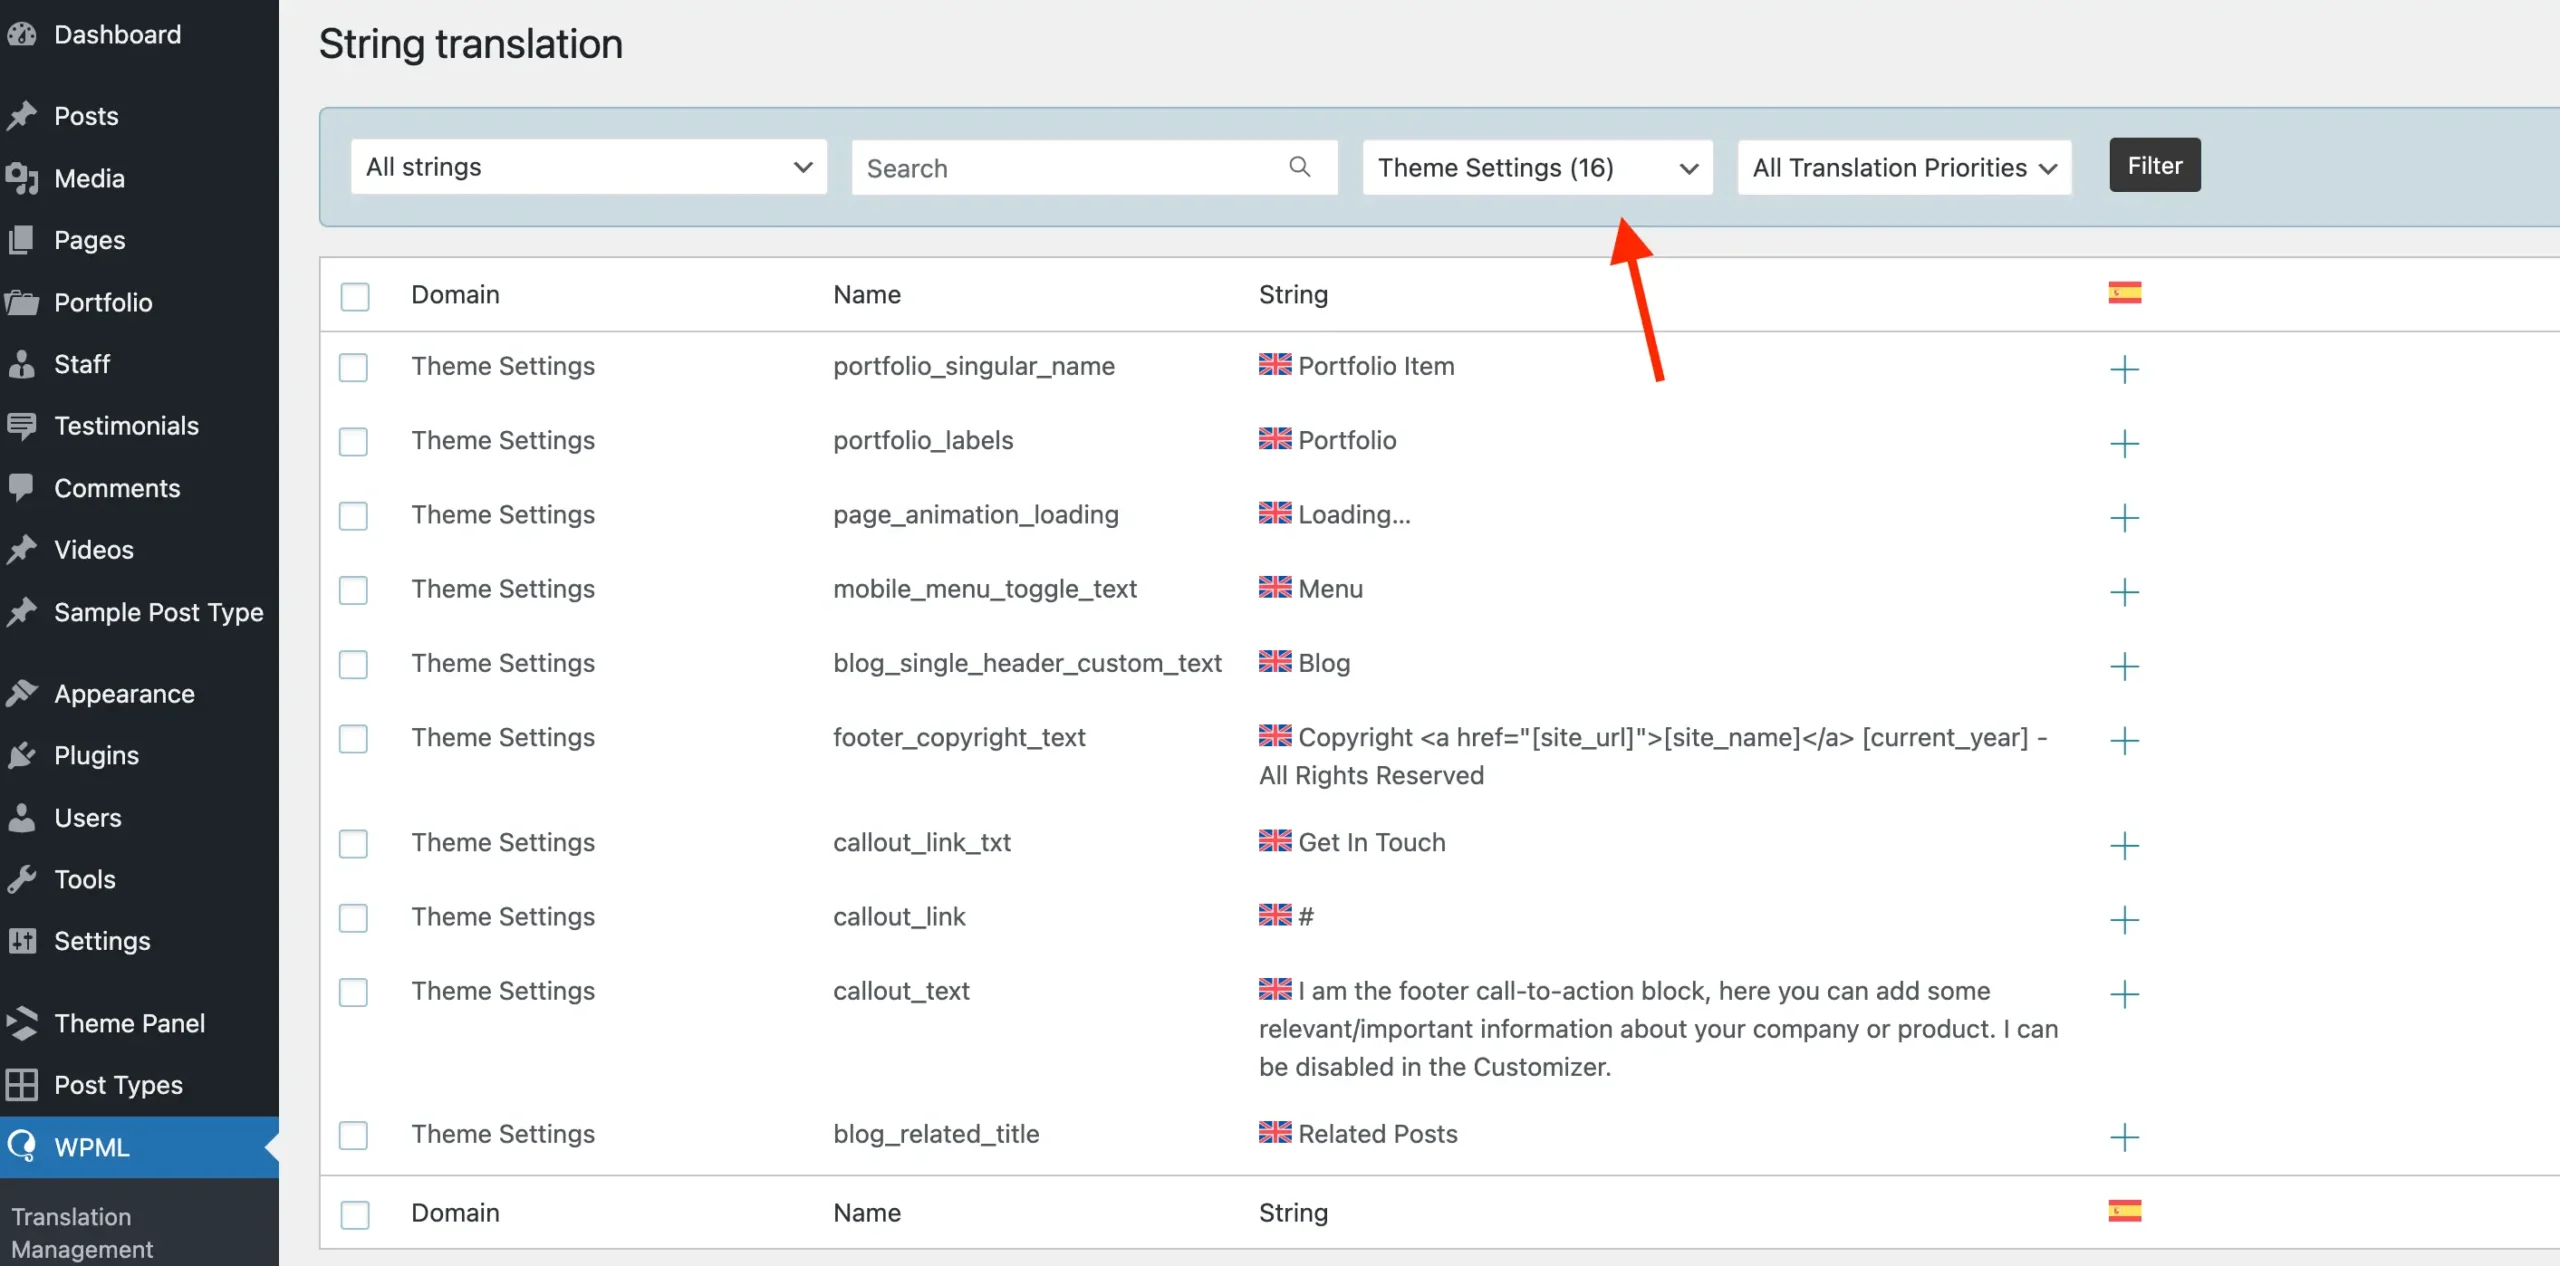
Click the plus icon next to any string you want to translate. As shown in the screenshot above, various theme settings have default values. For settings without default values, the strings will be added to the String Translation table as you assign values to them in the Customizer.
This is how you will translate your top bar content, header aside, callout, aria labels and other string based theme settings.
Theme settings can also be translated via the Translation Management dashboard by clicking on the “Other Texts” section.
Translate Theme & Plugin Strings
Themes and plugins often contain strings that appear on the frontend, such as the word “Home” in the theme’s breadcrumbs, which you may want to translate. Additionally, you can translate admin strings, such as theme settings or page builder field names, ensuring a fully localized experience for both users and admins.
Before translating theme and plugin strings, you first need to visit the Theme & Plugins Localization page to scan your theme and any plugins for translatable strings.
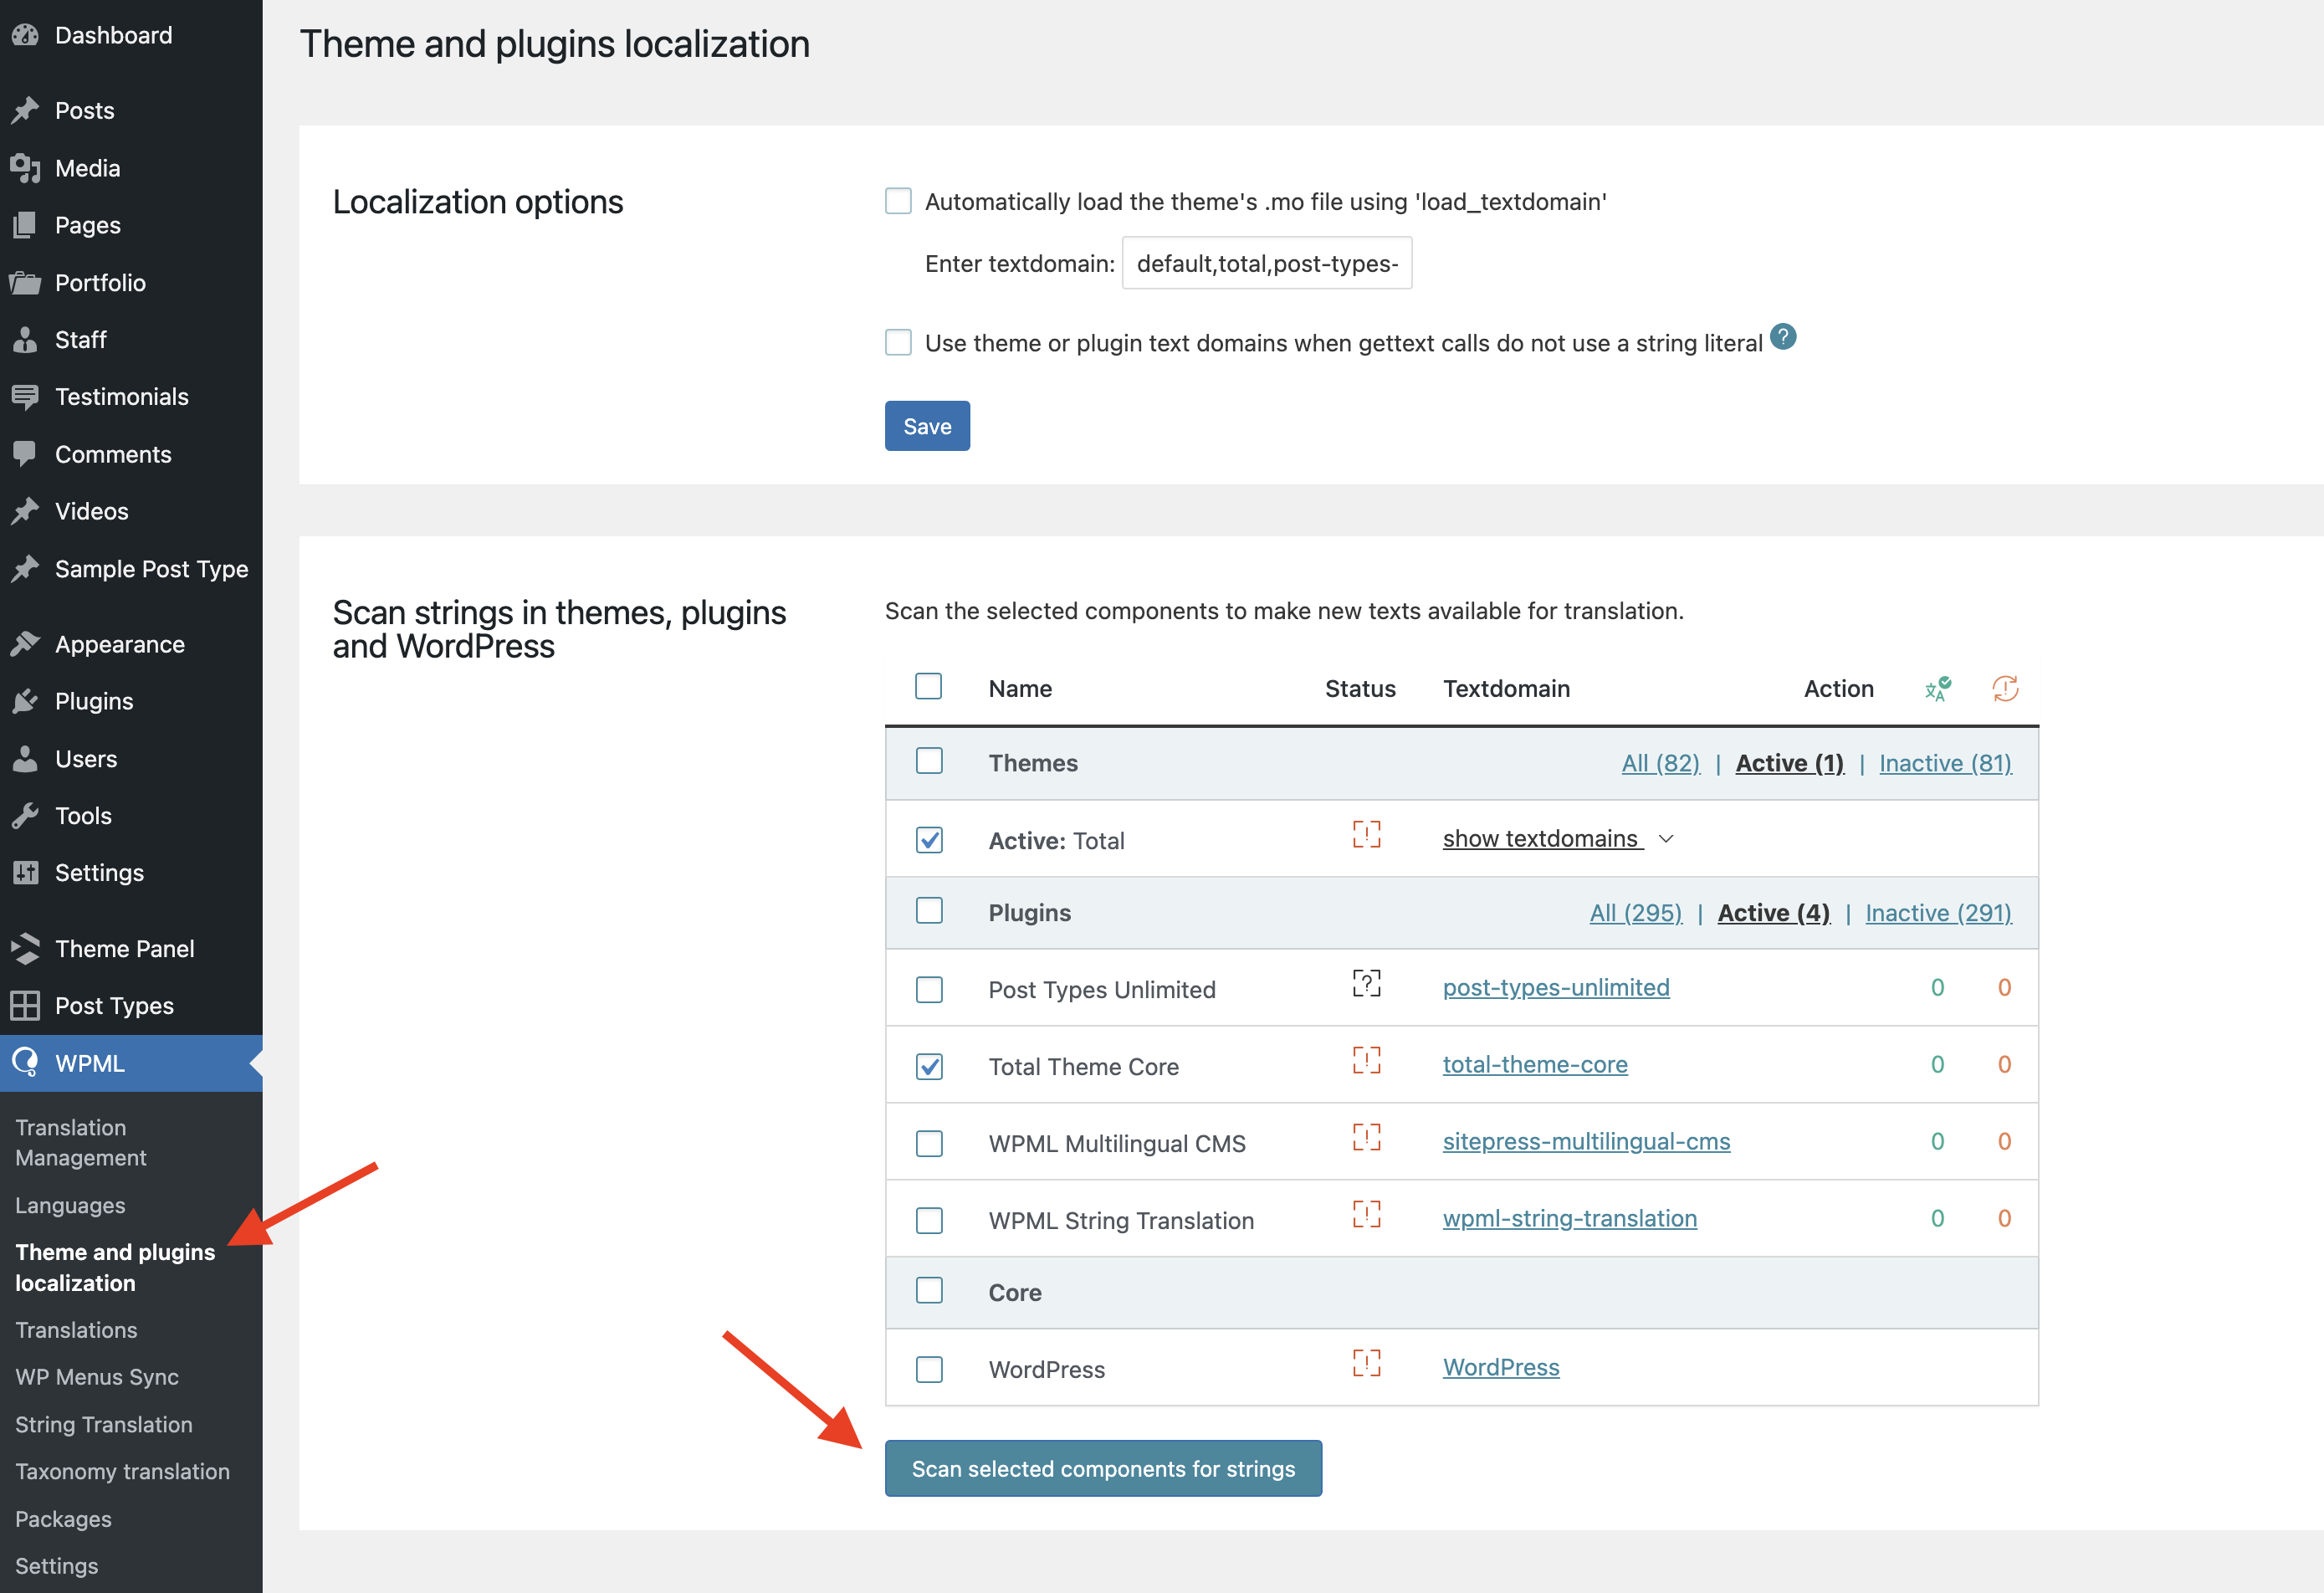
Check the box next to any item you wish to scan then click the Scan selected components for strings button.
The scanning process can take a little while, so we recommend kicking back, relaxing, and grabbing a fresh cup of coffee (or maybe a snack, too) while WPML does its thing. And don’t freak out when you see thousands of strings are found—this is completely normal!
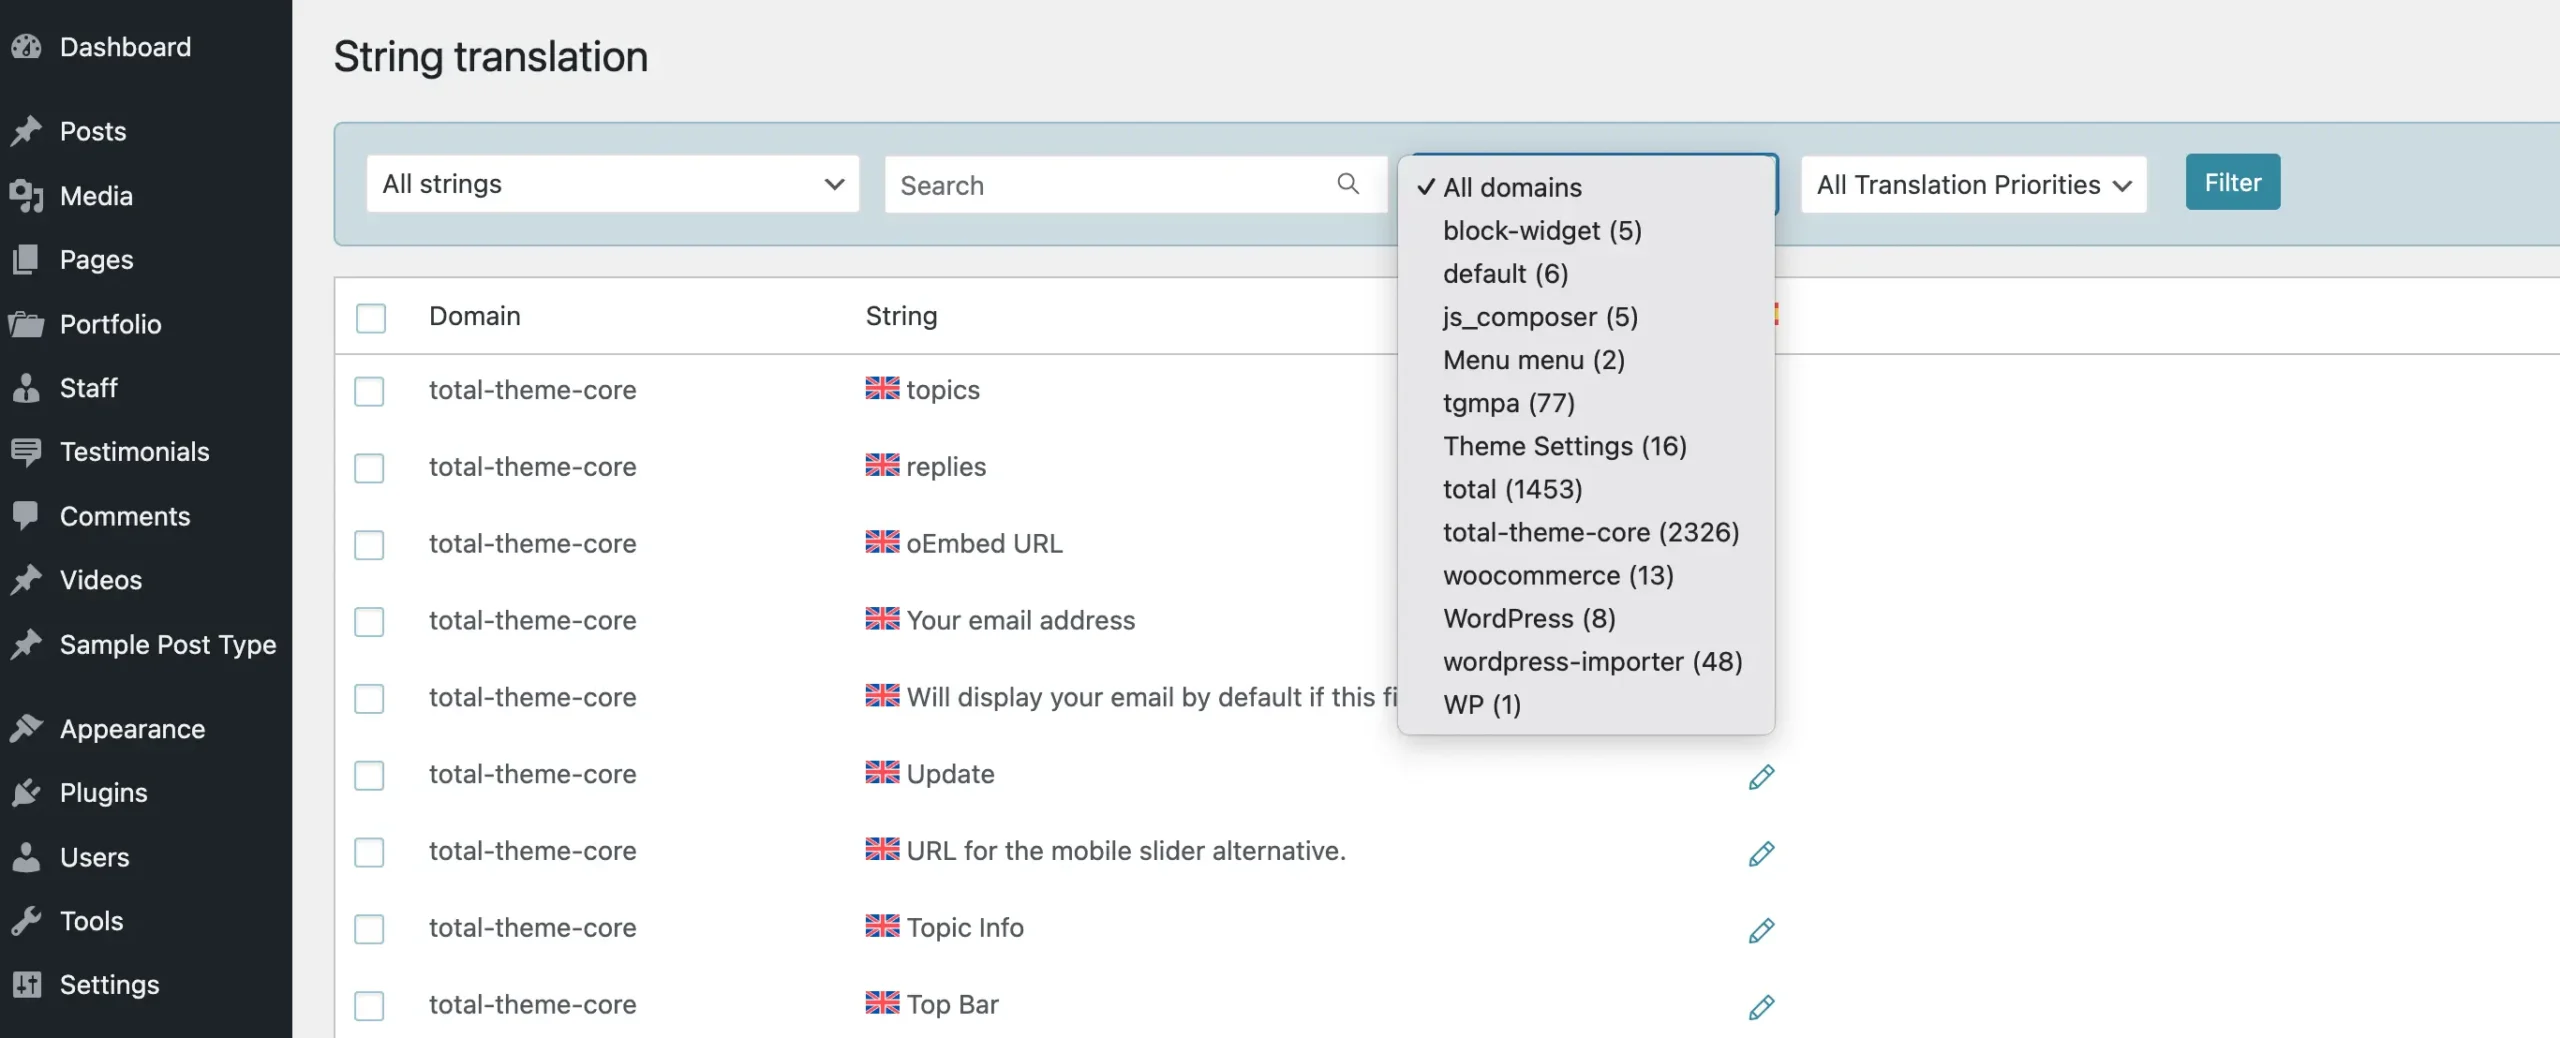
Once the scan is finished, the theme and plugin strings will appear under the String Translation tab, ready for translation into different languages. You’ll be able to use the All Domains dropdown to sort the strings by text domain, meaning you can filter them by theme or plugin.
Theme and plugin strings can also be translated via the Translation Management dashboard by clicking on the “Other Texts” section.
Translate Taxonomies (categories, tags, other)
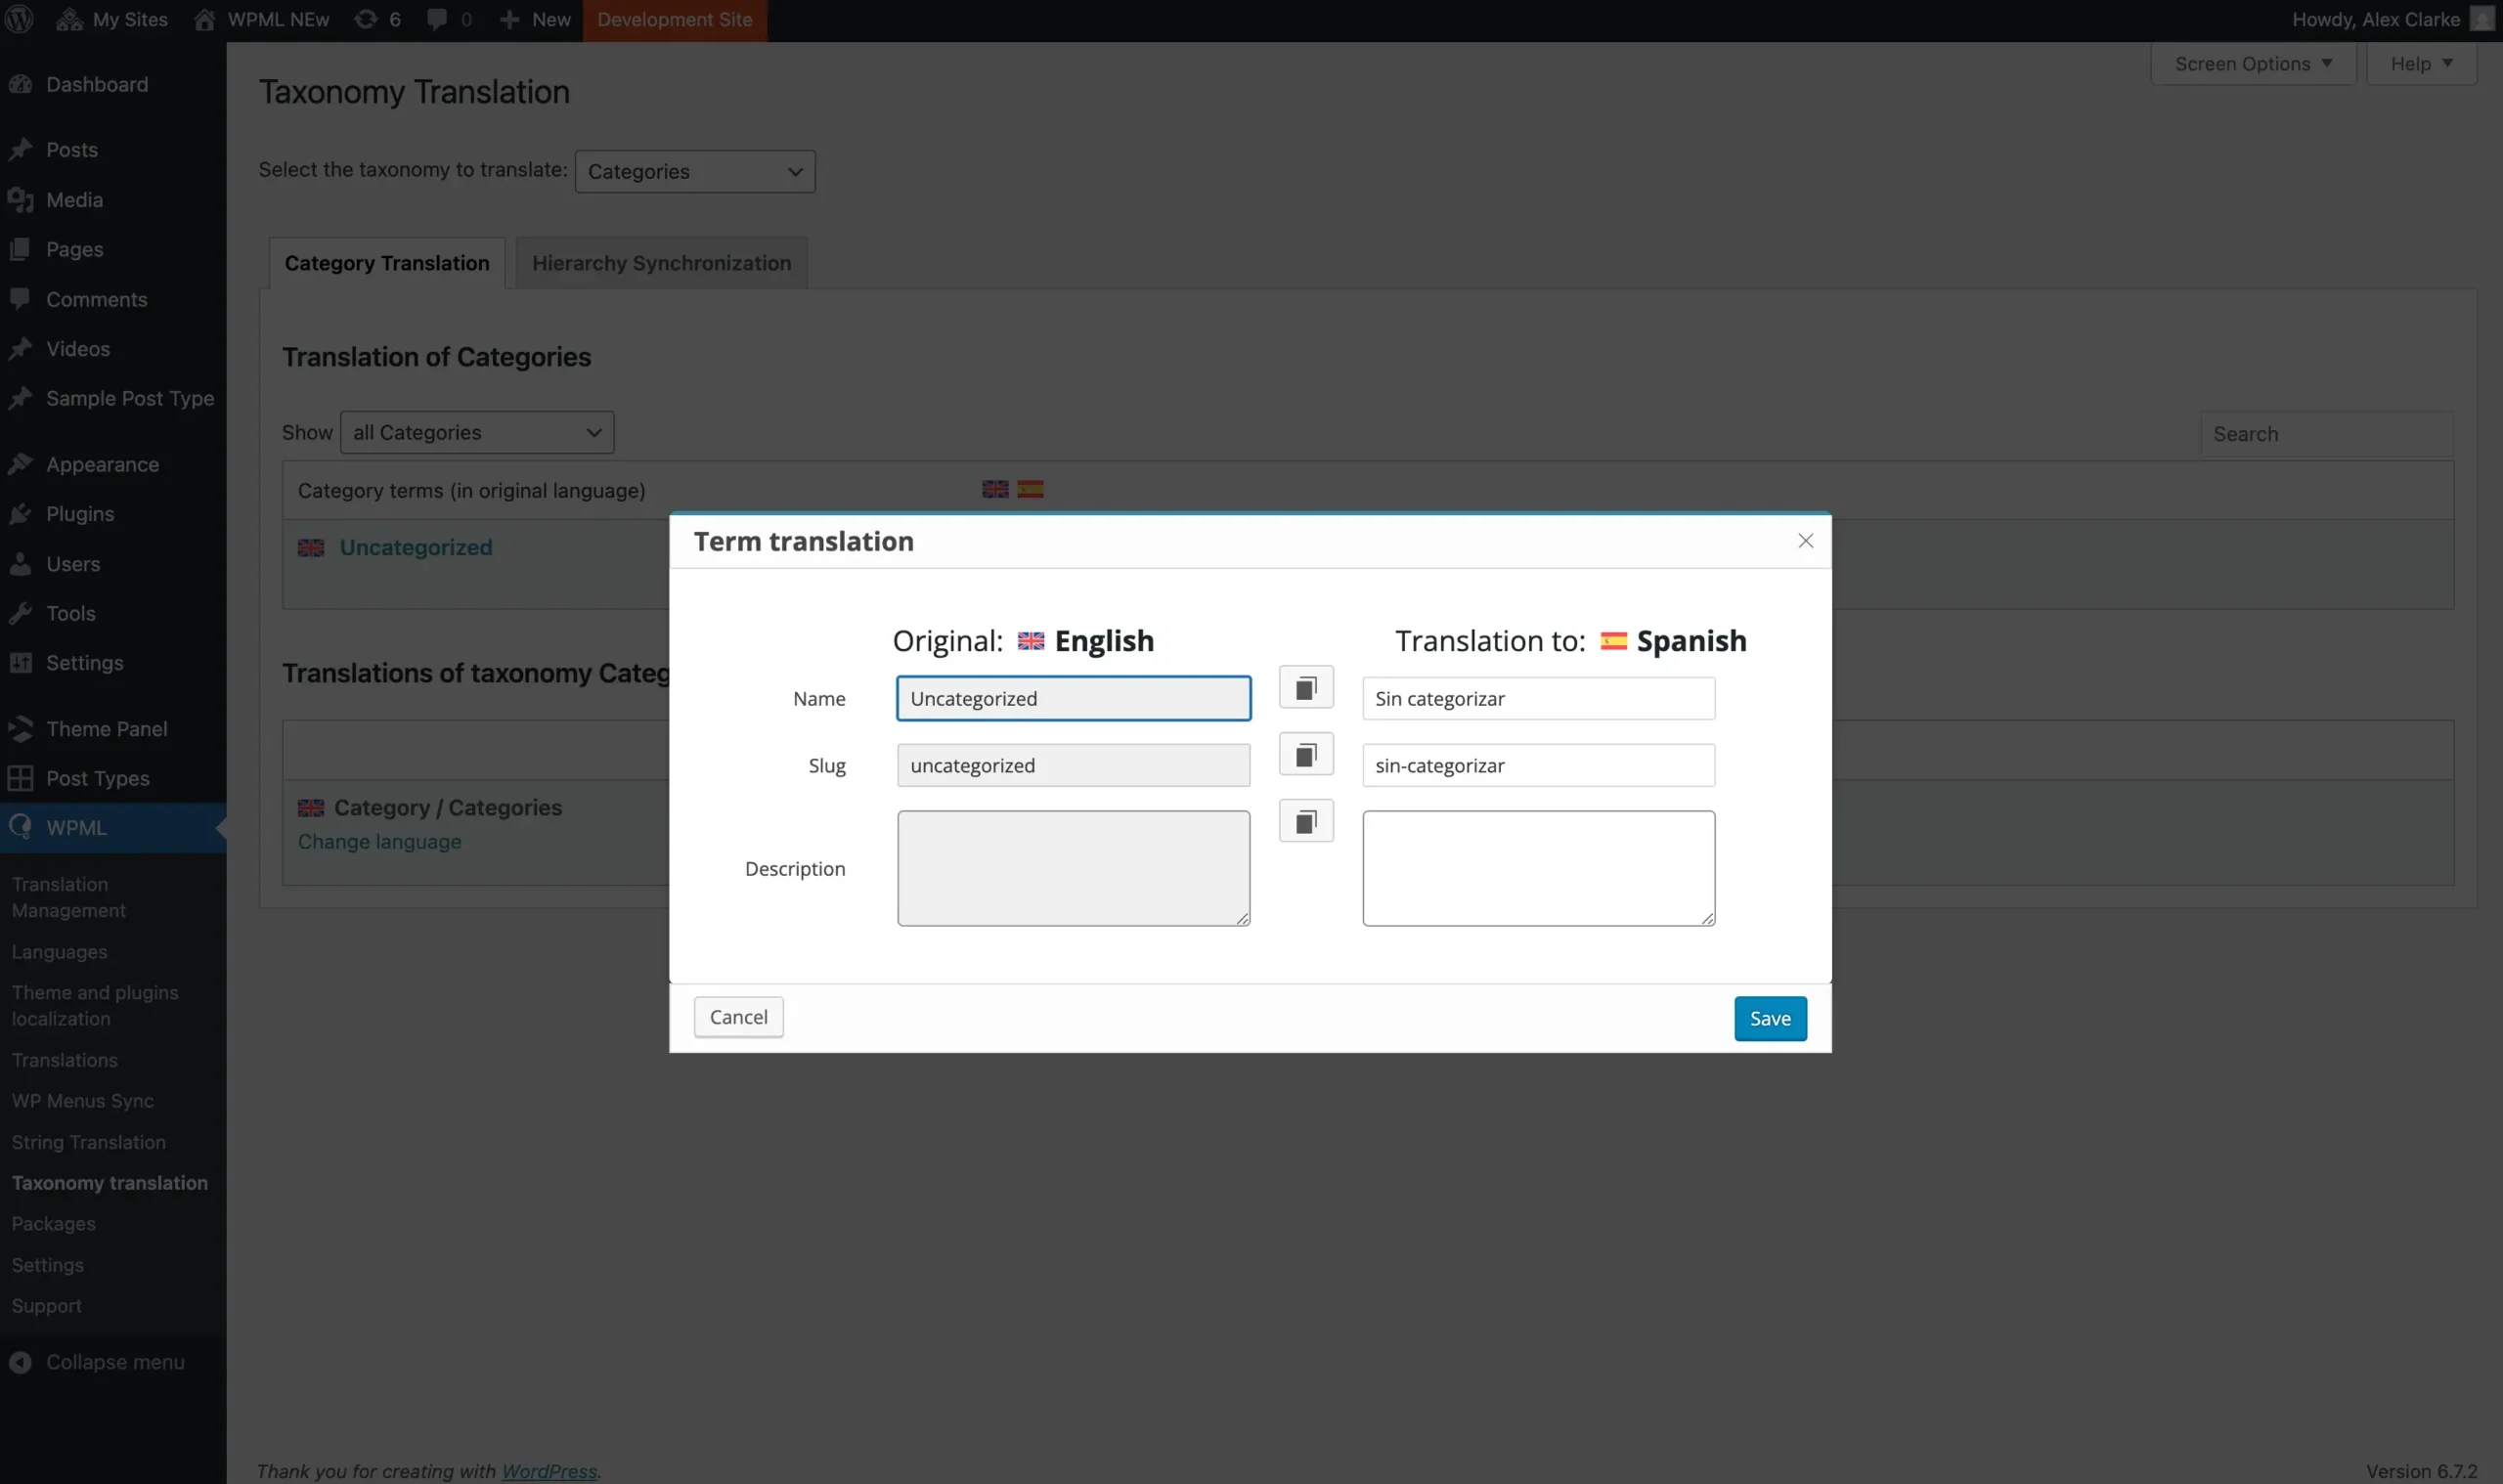
You’ll want to translate your taxonomies, which include categories and tags, so they have different names and URLs for each language. This is done via WPML > Taxonomy Translation.
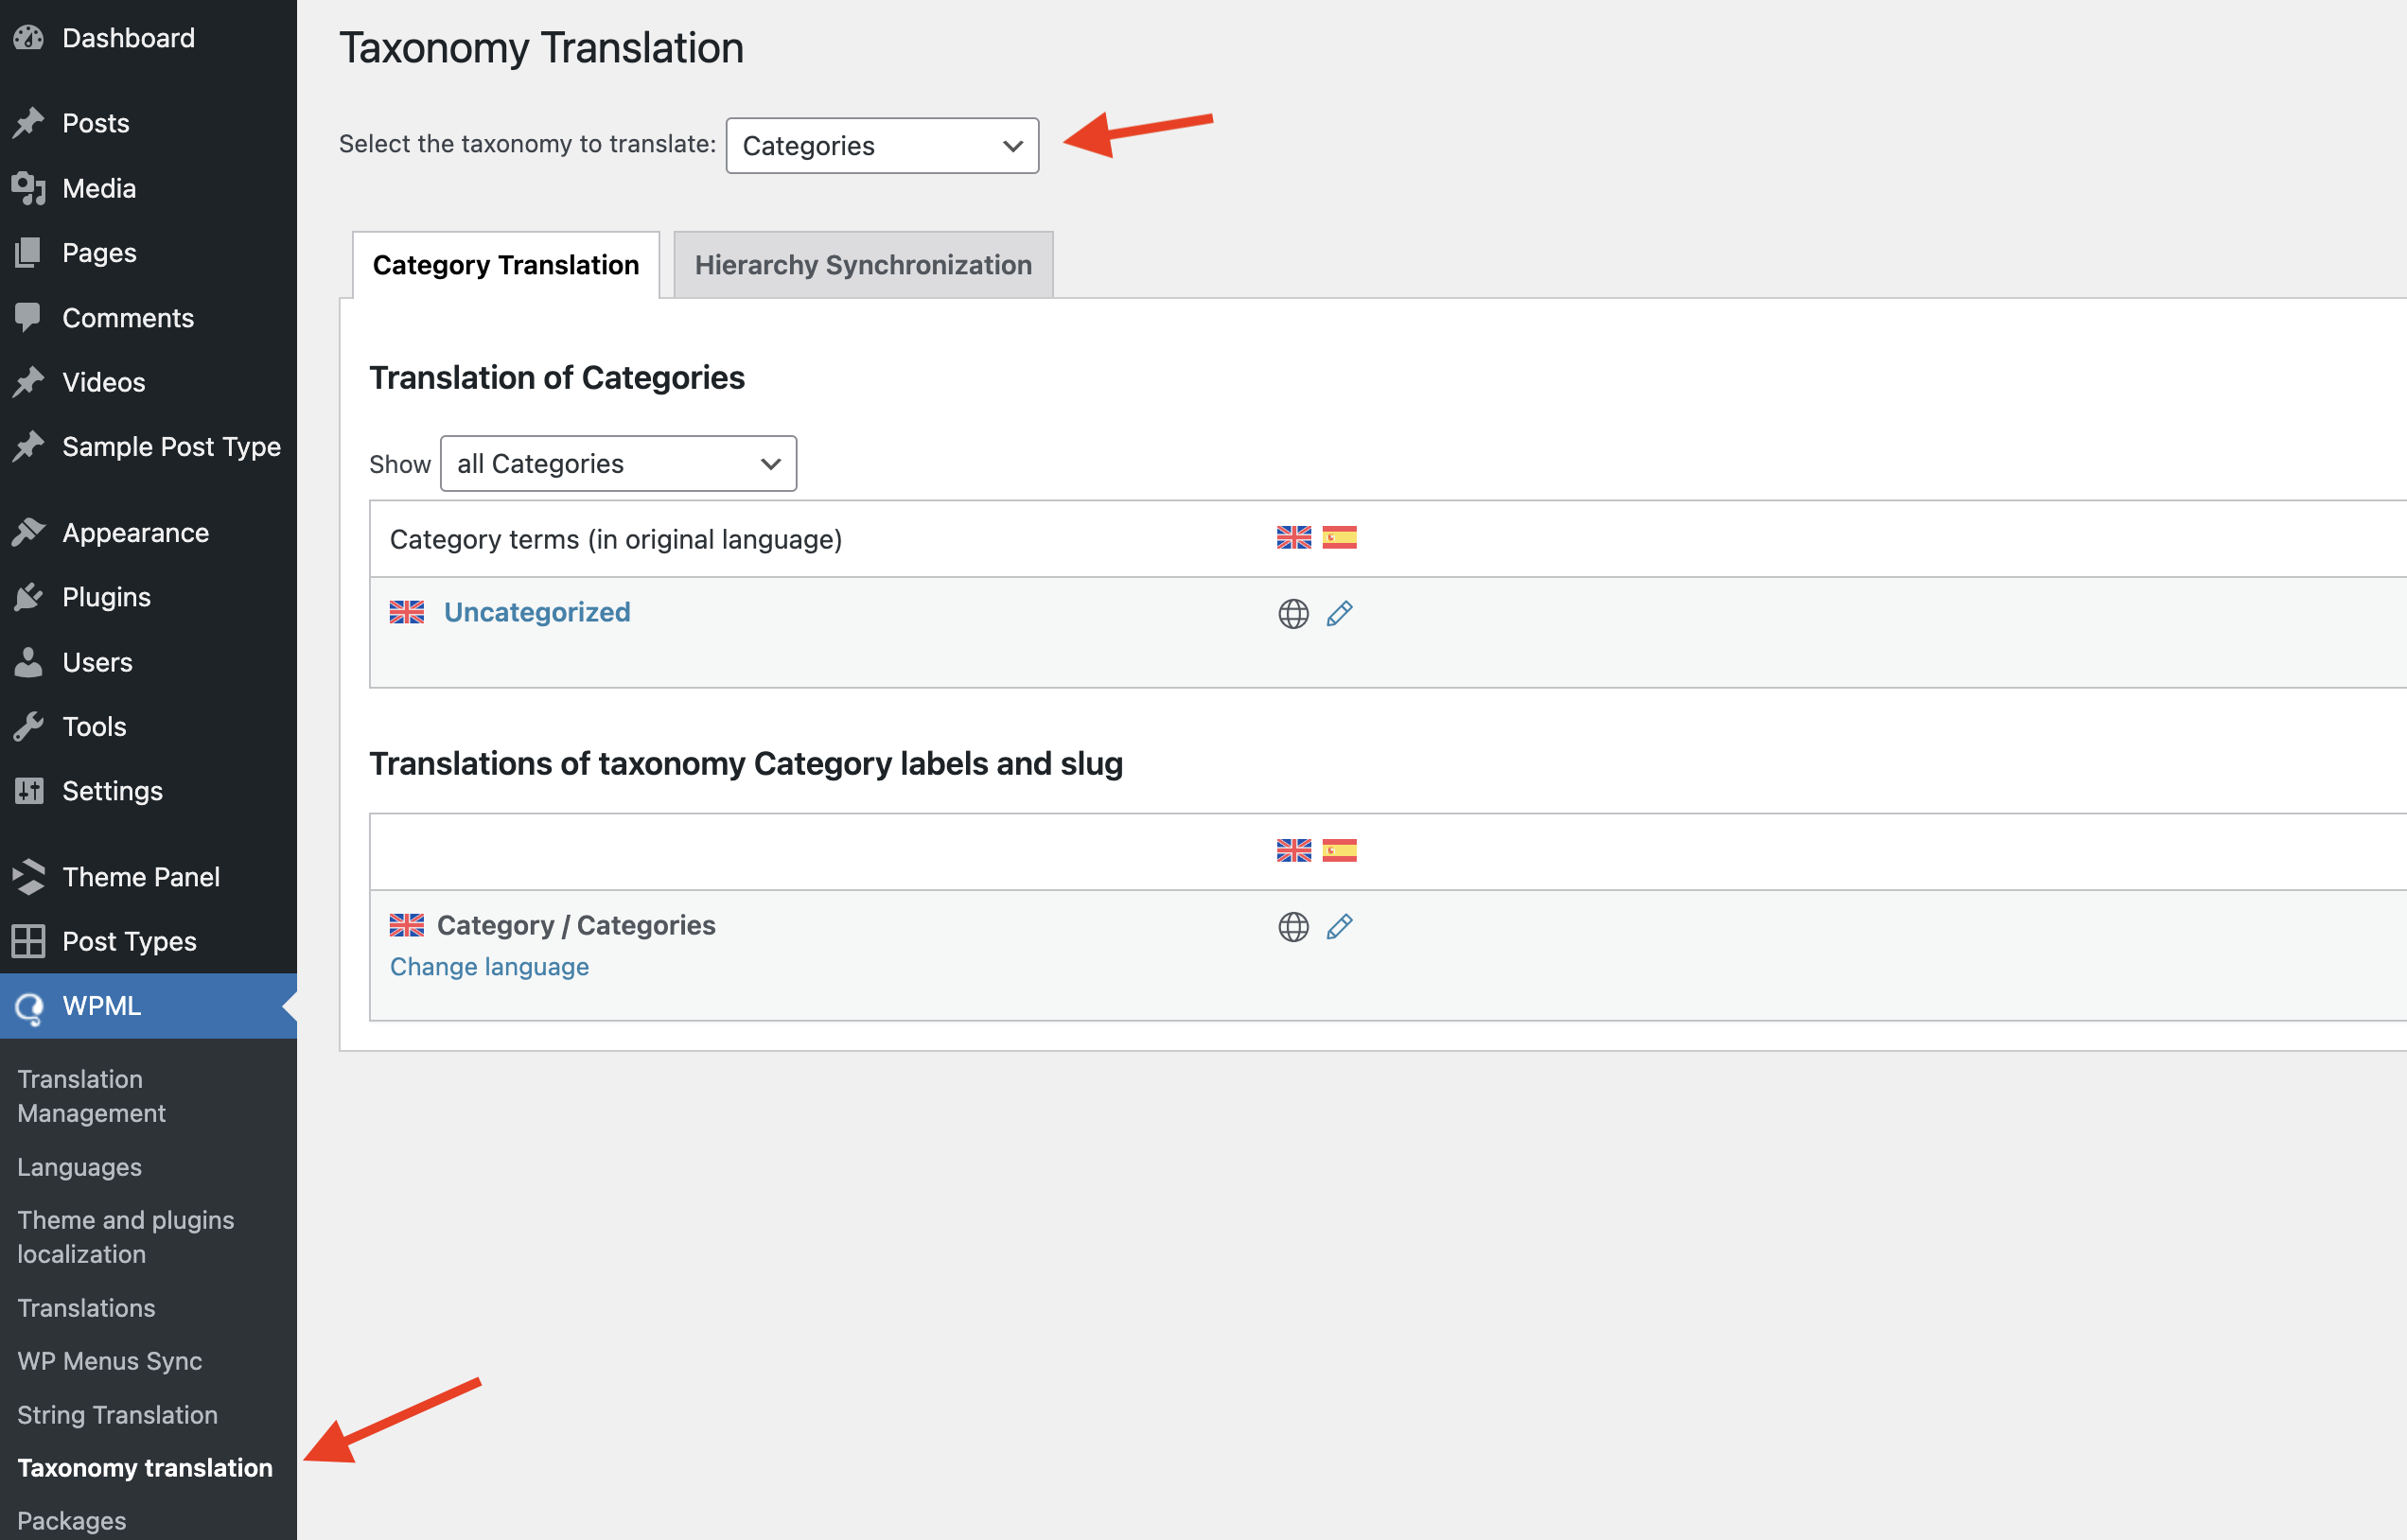
By default, the taxonomy translation panel will be empty. To get started, select the taxonomy you want to translate from the dropdown at the top. Then, click the pencil icon next to each term to begin the translation process. This will open a modal window where you can define the translated name, slug, and description for each language.
Translate Media (images, videos, PDF’s)
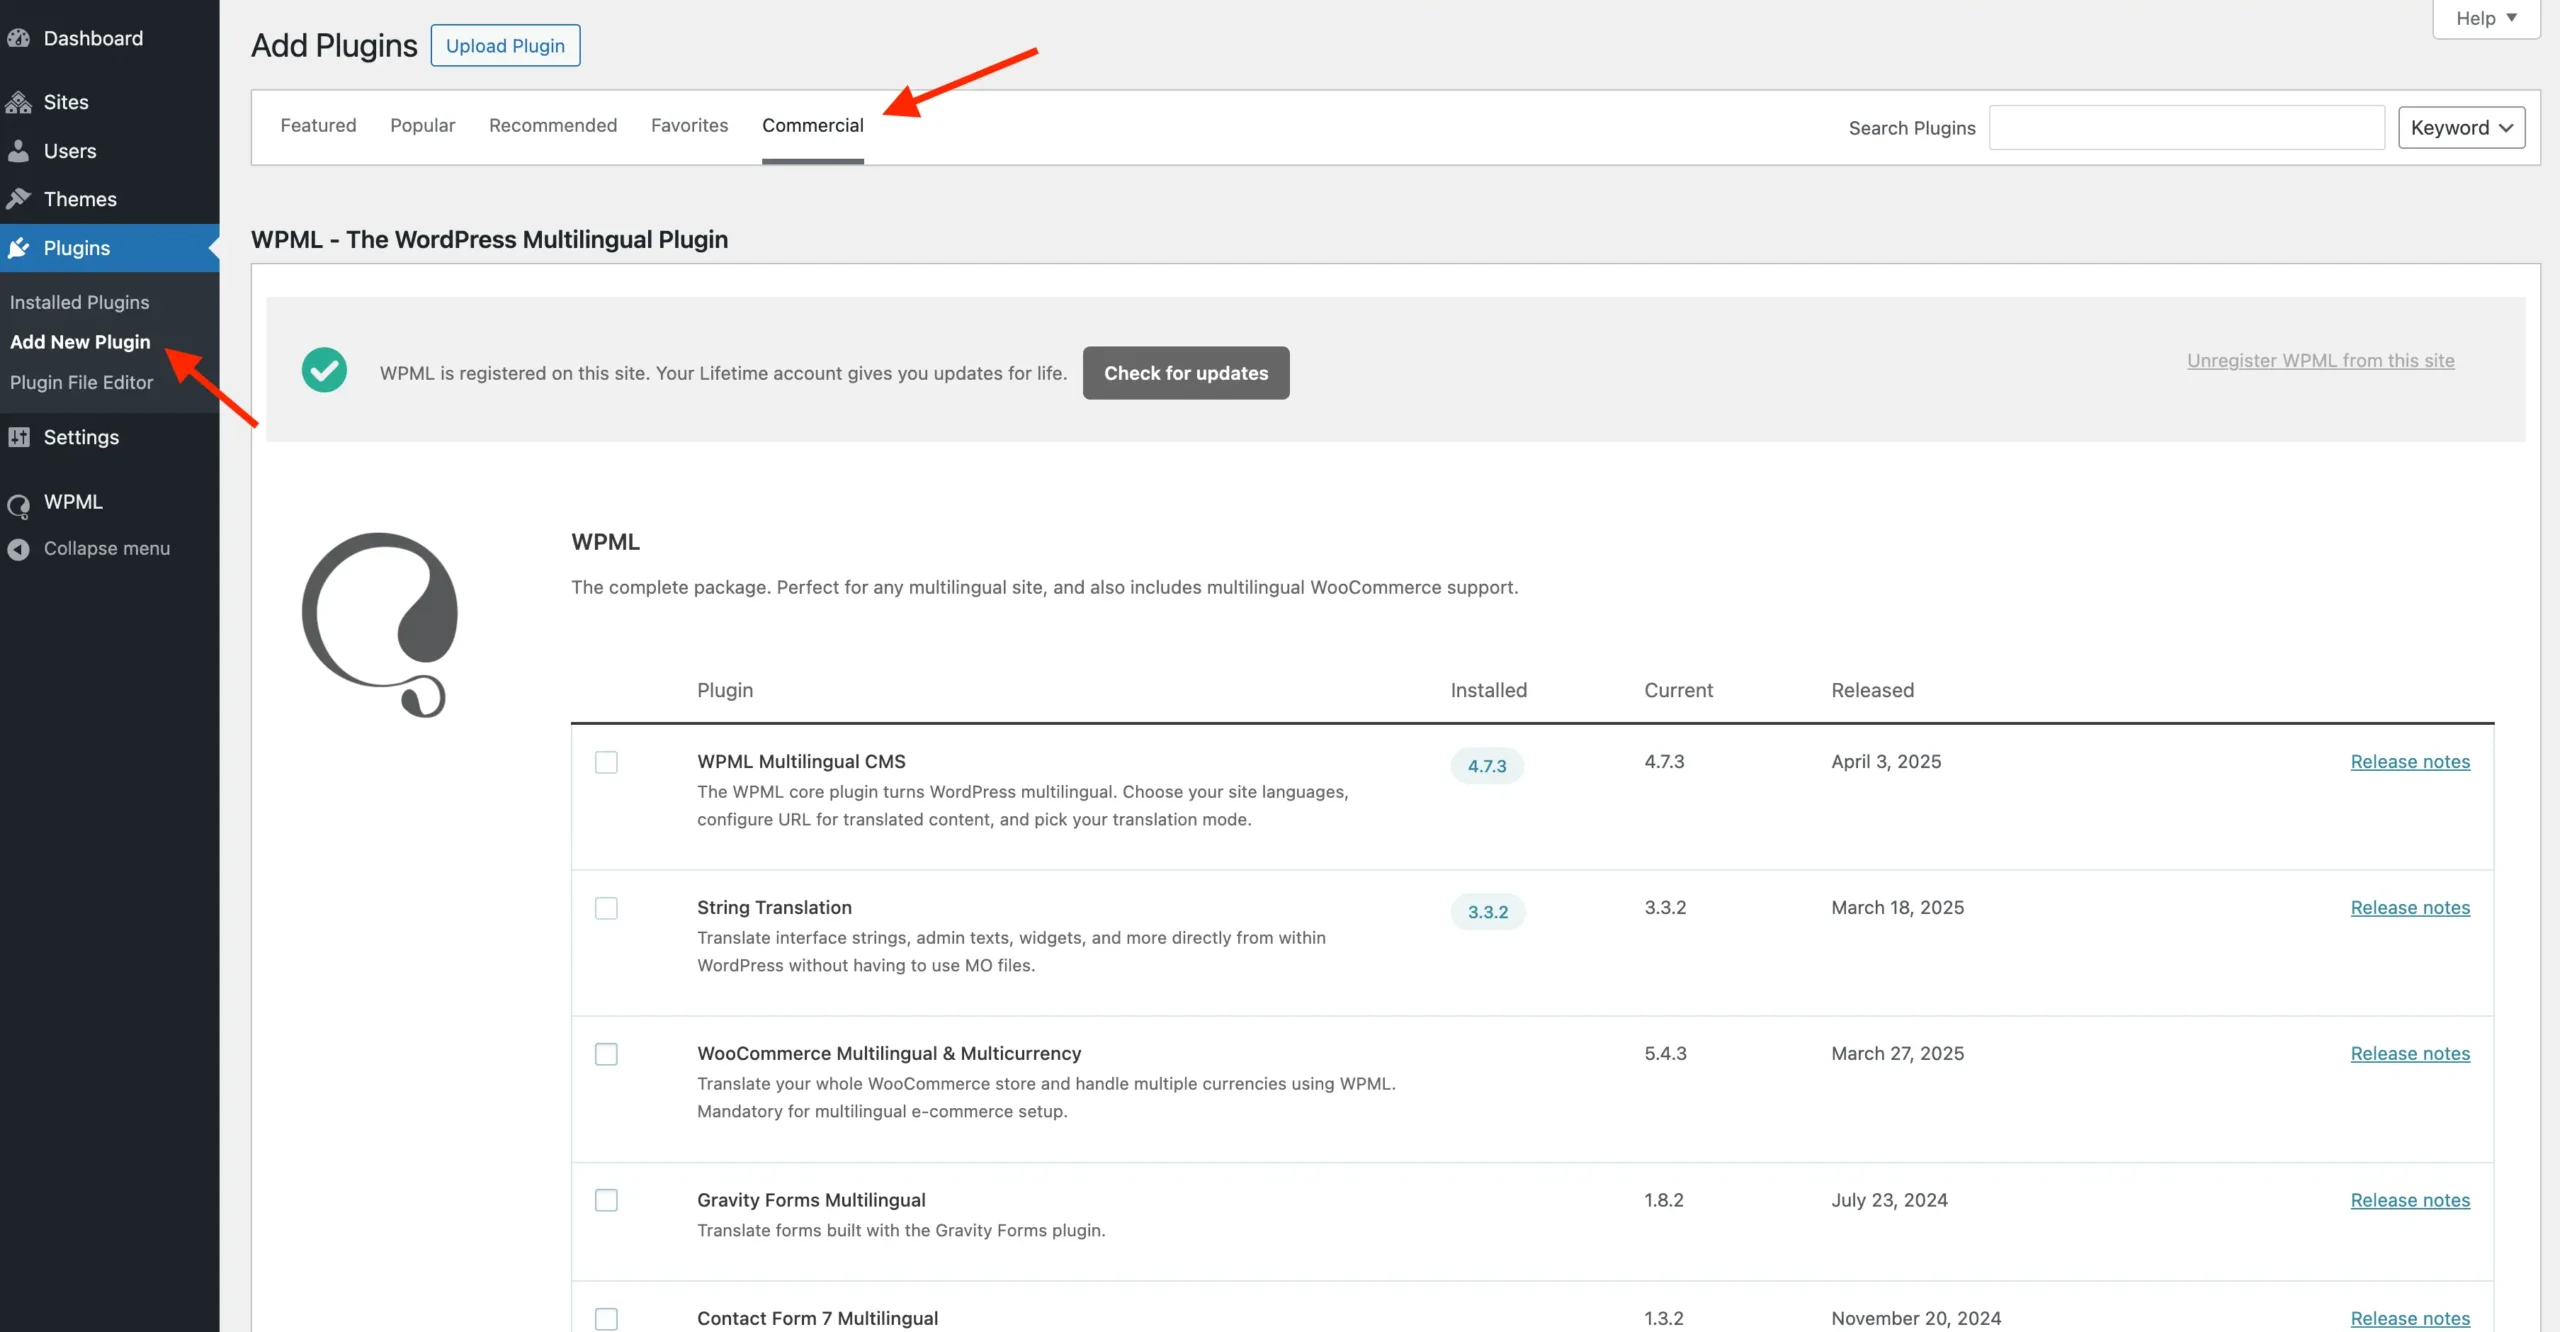
If you want to display different media for different languages, typically for media that includes text or audio, you’ll first need to install the Media Translation addon plugin. To install WPML add-ons, go to Plugins > Add New Plugin. Next, click on the “Commercial” tab at the top to access the WPML page (though it’s unclear why this tab is labeled “Commercial” instead of something like “WPML Add-ons”).
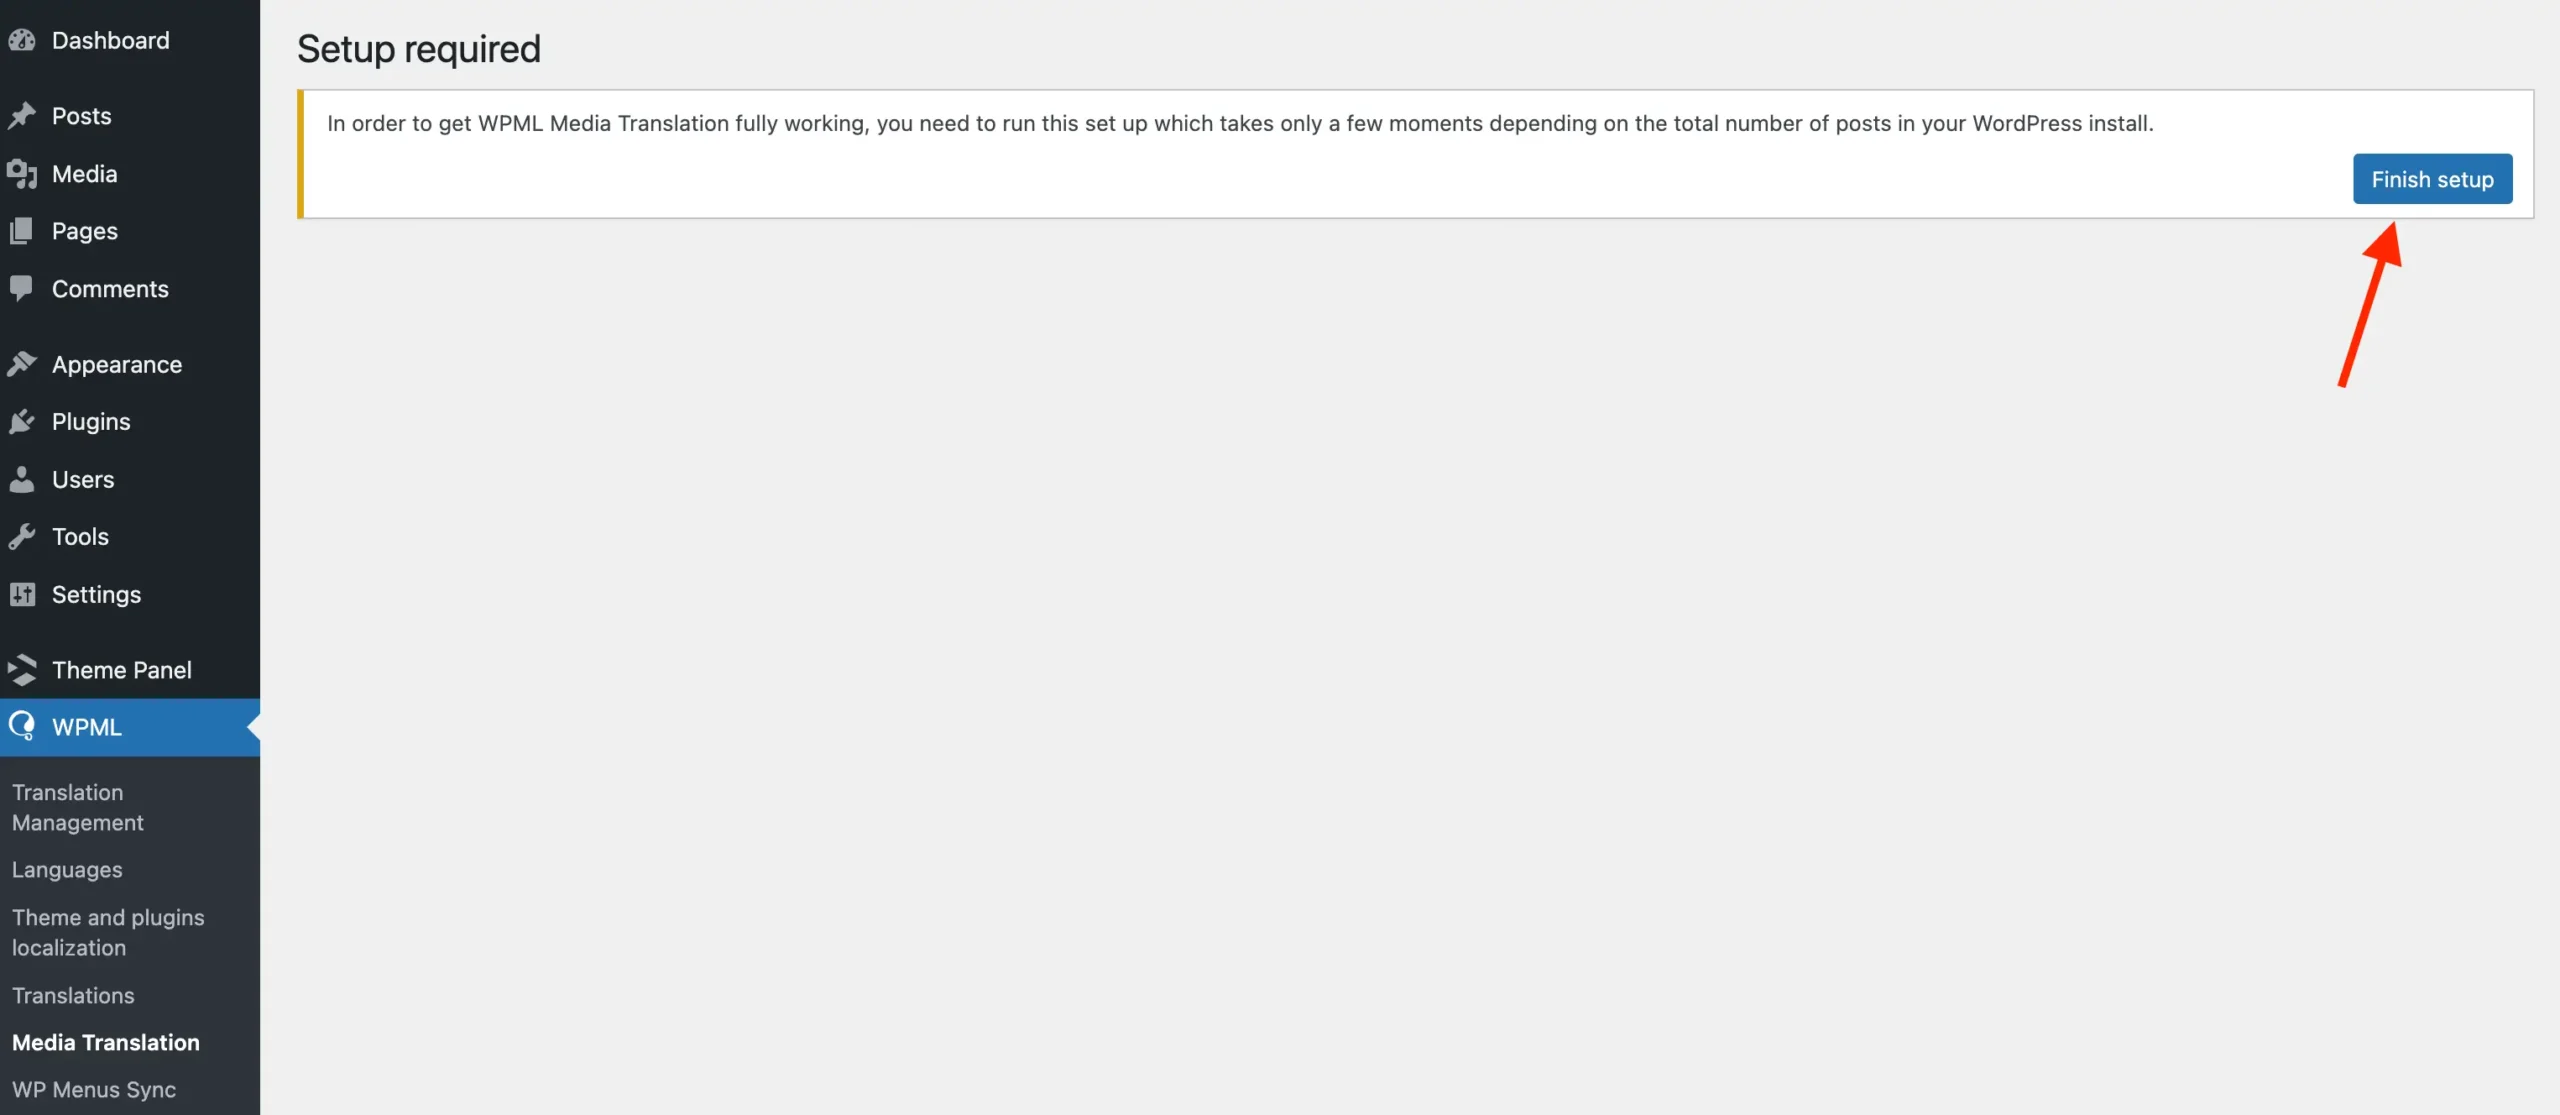
After installing and activating the plugin, go to WPML > Media Translation and complete the initial setup by clicking the button in the notice at the top of the page.
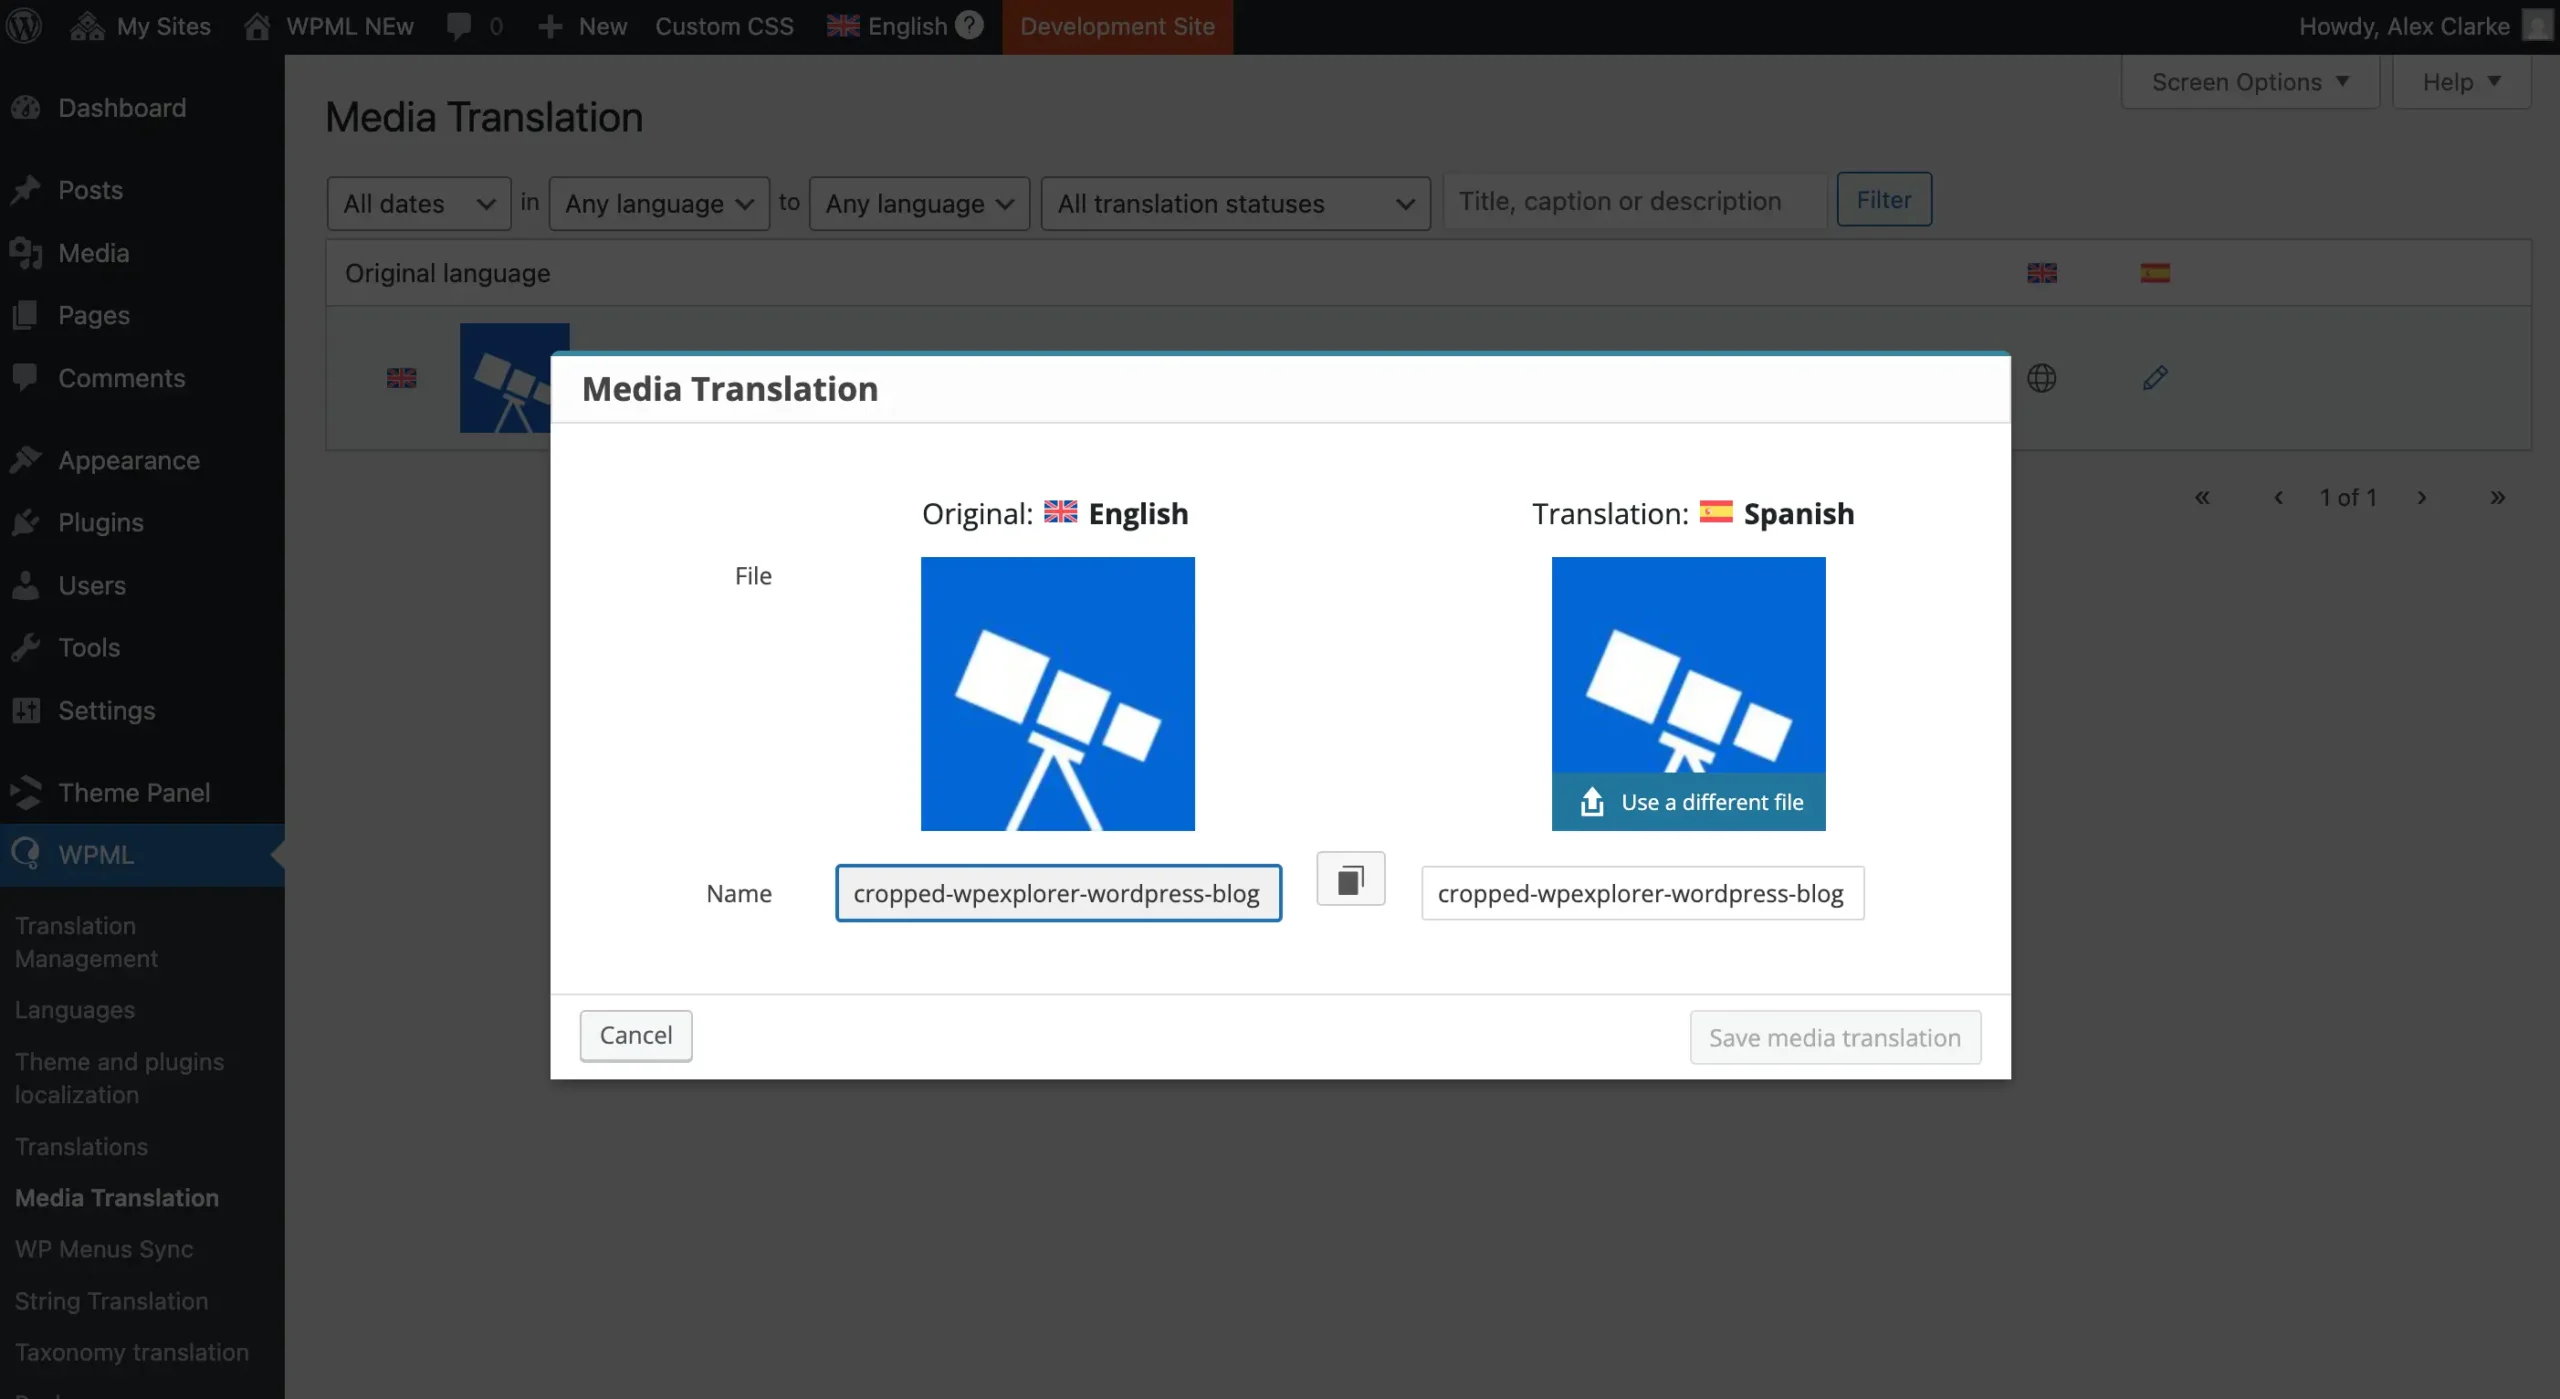
The scan will check your site for all media, and once complete, the page will refresh to display a table with all items available for translation. Click the pencil icon next to any item to open a modal window, where you can upload an alternative file for each language.
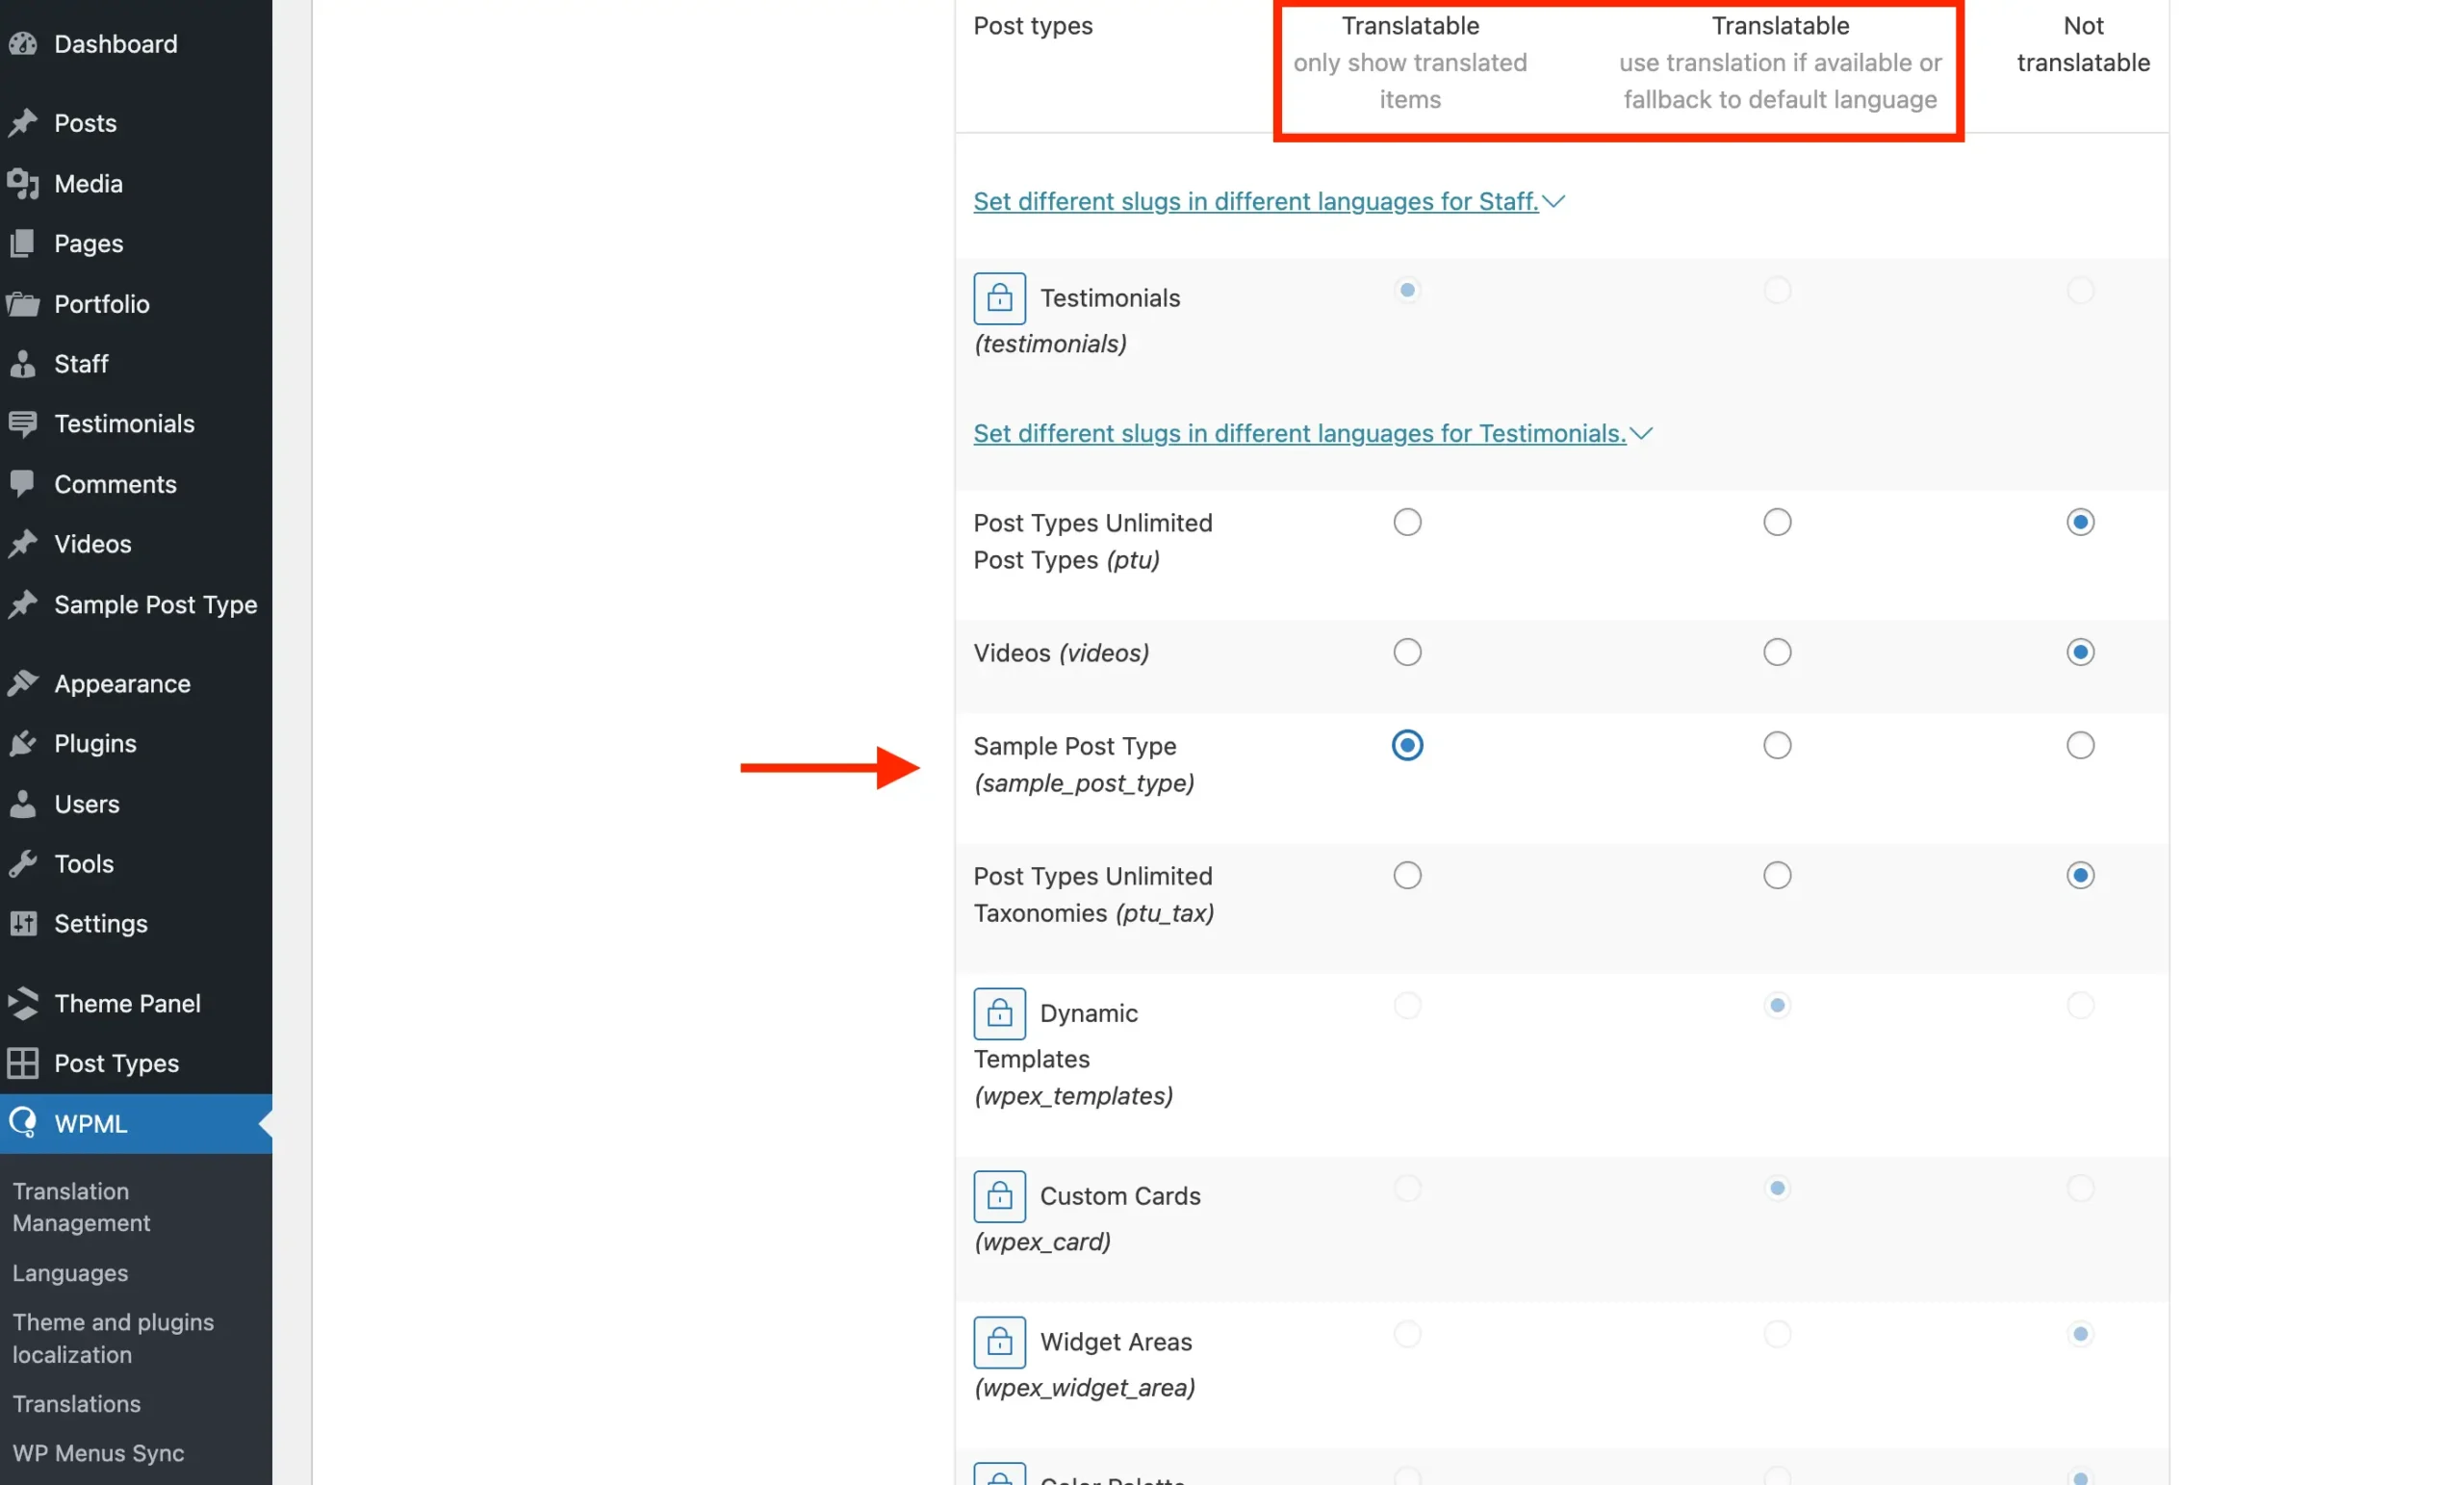
Enable Translations for Custom Post Types & Taxonomies
By default, the theme’s built-in post types and taxonomies (such as Portfolio, Staff, and Testimonials) are already set up to be translatable with WPML. However, if you add custom post types or taxonomies through custom code or plugins (ideally the Post Types Unlimited plugin), you’ll need to inform WPML if you want these to be translatable as well.
This is done via the WPML > Settings page. Click on the Post Types Translation link at the top which will scroll down to the relevant table.
Simply locate your post type or taxonomy and click the bullet under the Translatable column to select the desired option for your post type. You will notice two translatable columns—choose the appropriate one: “Show translated items only” (first column) or “Use translation if available or fallback to default language” (second column). Then, click Save.